Chapter 3
Using Dokusha as a Japanese-English dictionary
If you have installed the Japanese-English dictionary files
(jdic1.pdb through jdic6.pdb), you can use Dokusha to
lookup up Japanese words to find their English meanings, kanji/kana
spelling, and pronounciations.
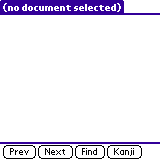
From the main reader screen (appearing as shown below if you have not
opened a Japanese text file for viewing), you can use the
Dictionary/Manual Search menu option to initiate a dictionary
lookup.

There are two different ways of inputting Japanese text for searches:
Kana and Romaji. You can changed between them in the Preferences screen.


After entering your search text, press Find Any to find all words
starting with the text you entered, or press Find Exact to find all
words that exactly match what you entered.
Using Kana input mode
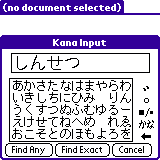
In Kana input mode, a simple kana keyboard is displayed. Tapping on
kana characters inserts them into the rack at the top of the dialog
box. Once your search string is input, you can use the Find Any or
Find Exact buttons to initiate the search.
Alongside the kana keyboard is a column of 5 icons. These are used in
conjunction with the kana keyboard to help you enter your search
string. From top to bottom, they are as follows:
- Nigori toggle. Tapping this icon after entering a kana
character toggles it between unvoiced (e.g., ka) and voiced
(e.g., ga).
- Maru toggle. Tapping this icon after entering a
ha-row kana character toggles the small circle
(maru) over the character (for example, changing ha
to pa).
- Large-Small toggle. Tapping this icon after entering a kana
character toggles it between small and large versions. For
example, you can use this to input small-tsu and
small-ya.
- Kana toggle. Tapping this icon toggles between
hiragana and katakana keyboards. Dictionary
searches are not sensitive to kana syllabaries, however, so this
option is mostly for cosmetic purposes.
- Backspace. Tapping this icon deletes the most recently entered
kana character.
Using Romaji input mode
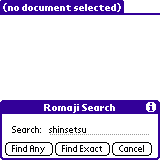
Romaji input mode uses fairly standard Japanese romanization rules.
The romaji recognized is basically "wa-puro-" romaji with the
following considerations:
- Voiced 'tsu' is written 'dzu' or 'tzu'; voiced 'chi' is written
'dji'
- 'shi' can also be written 'si'
- "Twisted" moras are written consonant + y + vowel, e.g., 'kya'
- "Twisted" 'chi' moras are written 'cha', 'chu' and 'cho'
- 'jya', 'jyu', 'jyo' can be written 'ja', 'ju', and 'jo',
respectively
- Small-tsu can be written with a double consonant ('yappari') or
with 't-' ('yat-pari')
- The katakana lengthening stroke is written as a hyphen -
- The consonant n can be written with a following apostrophe ' to
prevent it from being interpreted as part of a twisted mora (nya vs
n'ya)
- The object particle 'o' is written 'wo'
- Long vowels must follow kana orthography; Tokyo is toukyou, not
tookyoo
Looking up words from the text
If you are viewing a Japanese text document, you can select one or
more characters in the text and use the Lookup menu to lookup
the selected word:
- Find Initial Match: Find words beginning with the selected
characters.
- Find Exact Match: Find words that match the selected
characters exactly.
- Find Any Match: Find words that contain the selected
characters within them (only works for all-kanji searches; kana
searches work as if you selected Find Initial Match).
- Find Longest Match: Probably the most useful command for
general searching. Starting at the first selected character,
finds the words that match the longest possible string of characters
from the text.
You can also tap the Find button to perform a search. The
function of the Find button can be set via the
Preferences page.
Using the Dictionary
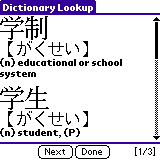
Here is an example of the results of a search for gakusei:

As you can see, each matching dictionary entry is displayed showing
the Kanji spelling, the pronounciation (in kana or romaji, depending
on the selected output mode), and the English meanings.
The number of matching entries is shown in the bottom-right corner of
the screen. In this case it is [1/2], meaning that entry #1 of
a total of 2 is currently displayed at the top of the screen. The
entry at the top of the screen is considered the "selected" entry.
You can use the Next and Prev buttons at the bottom of the screen to
scroll through the displayed entries, if there are more matches than
can fit on your screen at once.
In the dictionary lookup screen, you can tap on any displayed Kanji
character to immediately jump to the details for that Kanji. See the
chapter on the Kanji Dictionary to read how
to interpret this display.
Using the Display menu, you can change how dictionary entries
are displayed. You can choose not to display certain parts of
dictionary entries (for example, No Definitions omits the
English definitions). You can also choose Large Font or
Small Font to select which font Kanji characters are to be
displayed in.
The Tools menu contains several useful options which operate on
the selected (top) dictionary entry:
- Flashcard - toggles the entry between being a flashcard or
not. See the chapter on flashcards
for more information. Note that if the current entry is in your
flashcard list, a small diamond symbol appears in the top-right
corner of the screen. Tapping in this corner also toggles
whether the entry is a flashcard, the same as selecting this menu
option.
- Find Homonyms - Many Japanese words are pronounced the
same. This menu option automatically searches for other words
with the same pronounciation as the selected word.
- Copy Definition - Copy the English meaning of the selected
entry to the clipboard. You can later paste it into another
application (for example, the Memo Pad).
- EDICT Tags - Dokusha uses the EDICT dictionary, which uses
parenthesized codes in the English meanings indicating the
kind of word (suru verb, humble word, etc). This
option brings up a quick references to these codes.
- Restrict Search - Sometimes a dictionary search may yield
too many results. If you have a general idea of the form of the
word you are looking for, you can use this menu option to narrow
your search criteria. See the Advanced
Searching chapter for more information.
- Copy Kanji (SJIS) - Copies the current word to the clipboard
in Shift-JIS format. You can then paste it into a text field if you
are using a Japanese OS.
- Search History - Invokes the Search History screen. See
Advanced Searching for more
information.
Back to Contents


