

|
|


|
CUSTOM LACING PATTERNS


|
|


|
Wheels can be laced in many different ways. We all know about the standard radial and cross patterns, but there are also many non standard and custom patterns that will make a strong, stable wheel. The CROW'S FOOT LACING and STRONG REAR WHEEL LACING chapters discussed some non standard lacing's for wheels. In this chapter I will pass along information of other custom lacing's I know about, and give you information that will allow you to create your own custom pattern.
|
THIS CHAPTER IS ARRANGED INTO THE FOLLOWING SECTIONS: FIVE SPOKE CROW'S FOOT THREE LEADING-THREE TRAILING RACE LACE 3-CROSS/RADIAL MIX 2-CROSS/4-CROSS MIX YOUR OWN CUSTOM PATTERN |
In addition to the standard three spokes per set Crow's Foot pattern (see CROW'S FOOT LACING chapter) it is possible to lace a Crow's Foot pattern with five spokes in a set. I do not feel that a Crow's Foot pattern with five spokes has any advantages over one with three spokes, I actually feel it would make the wheel weaker in most circumstances. But the five spoke Crow's Foot pattern is very unique and can make a very unusual wheel. The only problem with the five spoke pattern is that you need hubs and rims with spoke holes divisible by 10, such as 30 or 40. These hubs and rims are not commonly available, but you can have blank hubs and rims custom drilled if you wish. This pattern could be an interesting pattern to use if you are building wheels for a high wheeler. I learned about this pattern from Rowland Cook who has a site about custom wheels he has built over the years.
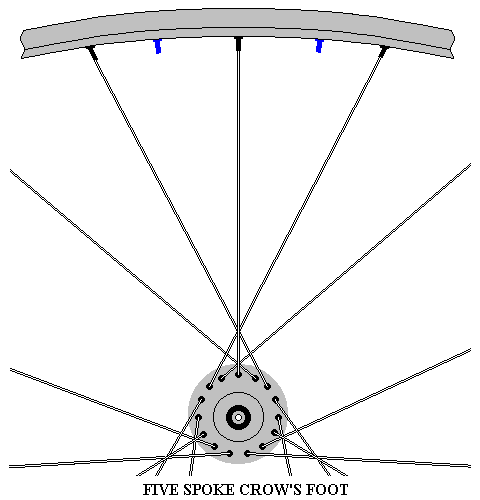
In the five spoke Crow's Foot pattern the radial spoke has two spokes on each side that cross it. After considering the various possibilities that exist for lacing a Crow's Foot pattern with five spokes, I came to the conclusion that the lacing shown in the following figure (which is one side of a 30 spoke wheel) would be the best pattern to use.
|
In the figure all of the crossing spokes are '3-cross' length. All of the spokes are laced on the outside of the hub flange, with the radial spoke crossing over the outside of the crossing spokes. To build a wheel like this you would first lace the inner crossing spokes (inner meaning the spokes at the hub that are closest to the radial spoke), then the outer crossing spokes (so they cross over the outside of the inner spokes, and finished by lacing the radial spoke. I feel that this pattern will give the spokes tension properties of standard cross lacing patterns. All of the spokes, except for the radial spoke, could be greased before assembly. This lacing will give the crossing spokes some give, due to the contact with the other spokes, which should give the wheel a nice ride quality. Also with this lacing, since the radial and inner spoke crossings are close to the spoke heads, it would be a good idea to pre-bend the elbow of the radial spoke and the outer crossing spoke by reducing the angle (that is make the elbow straighter). This will give these spokes a more solid contact with the hub and reduce the stresses at the elbow.
While I drew the figure of a 30 spoke wheel, I feel that this lacing would only be desirable in a 40 spoke or greater wheel. The 30 spoke version would have large differences in the build tensions of the spokes and the resulting forces on the rim (even though they will all balance out) which, I feel, would make the wheel go out of true easily.
Other possible variations of this lacing will be to have the inner crossing spokes a '2-cross' length, which would place them closest to the radial spoke at both the rim and hub. In this case the outer crossing spokes would be a '4-cross' length. I feel that this variation would only result in greater build tension differences, which would make the wheel more unreliable. Another variation could be made with the outer crossing spokes crossing the outer spokes of the set's next door, which would add one more crossing value to their effective length (in the lacing of the above figure they would be '4-cross' length).
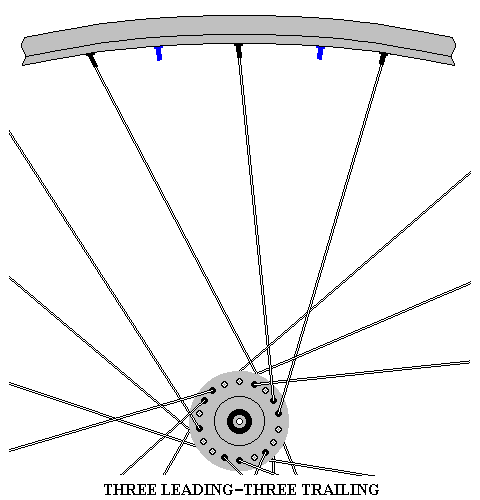
Another custom lacing I learned about from Rowland Cook's site is a Three Leading-Three Trailing pattern. This lacing will work with hubs and rims with spoke counts divisible by 12, such as 36 and 48. This is another lacing that, I feel, would not make a wheel have any advantageous qualities, but it is unique enough that one might want to use it on a special bike, or just for fun. I also feel that this pattern would be better on a wheel with 48 or more spokes. The figure below shows half of a 36 spoke wheel with this lacing. The spokes are the length of '3-cross' spokes. This could be another interesting pattern to use on a high wheeler wheel.
|
 A wheel with this pattern will be extremely difficult to build. The simplest way, which would also result in the most unreliable wheel, would be to not have any of the spokes cross. If you do this, don't grease the threads when you build the wheel. The figure to the right shows the lacing pattern I envision as giving the best spoke tension qualities for the wheel. The spokes weave in and out of each other, giving them all the properties of spokes in standard crossing patterns. I drew the spokes in different colors to make it easier to figure out exactly which way they weave. Notice that the middle spoke of a trio anchors to the opposite side of the flange than the other two spokes. This aids the weave and allows the inner spokes to have a crossing that does not place sharp bends on the spokes.
You might want to try a variation of this lacing on a custom wheel of your own. For example 32, and 48 spoke wheels can be built with a Two Leading-Two Trailing pattern (using '2-cross' length spokes). Or you could build a mixed lacing rear wheel with the non drive side laced with one of these Leading-Trailing patterns and the drive side conventionally laced. I don't suggest a mixed lacing with the drive side of a rear wheel using one of these patterns, or lacing the drive side radially when the non drive side is laced this way.
The principle aspect of a Race Lace is the spoke heads are all on the inside of the hub's flanges. This style of lacing can be used with almost any spoke pattern. Variations of a Race Lace were discussed in the RADIAL LACING INFORMATION chapter, the CROW'S FOOT LACING chapter, and the STRONG REAR WHEEL LACING chapter. It is easy to lace a wheel radially this way, but it can also be done with crossing patterns.
If you Race Lace a wheel with a 2, 3 or 4-cross lacing pattern, the first spoke crossing is very close to the head end of the spokes. It is a good idea to pre-bend the elbow of the spokes that cross over the outside to reduce the elbow's angle, this will allow the head end of the spokes to rest inside the hub solidly and alleviate a potential high stress point. If you Race Lace a 32 or 36 spoke wheel with a 5-cross pattern you will end up with the situation shown in the figure below. The figure is half of a 36 spoke wheel that has a 5-cross Race Lace.

|
The spokes end up resting next to each other at the head end. In the figure the black&white (B&W) spokes were laced first, the red spokes were laced last. The red spokes pass over the B&W spokes at the first crossing and then thread under the B&W spokes at the fourth crossing. The spokes never really make 5 crosses, even though that is their length. Pre-bending the red spokes slightly at their elbow, to reduce the angle, would also be a good idea. Normally a 5-cross lacing on a 32 or 36 spoke wheel would not do anything for the wheel but add extra weight, but in this situation, the resulting lower stresses seen at the first crossing can benefit the wheel.
I learned about the Race Lace from Cam Milliken, a visitor to this site that laces many wheels with variations of the Race Lace. He informed me that if you properly pre-bend the spokes they do not suffer stress related failure from the first crossing. It works well on 32, 36 and 48 spoke wheels, and I am sure that if done properly it could work on just about any spoke count wheel.
The 3-cross/Radial lacing pattern has been used by Jeremy Parfitt, a bike shop owner in Santa Fe that passed this information on to me. He has built 32 spoke wheels with this lacing. It combines 8 spokes that are 3-cross in length with 8 radial spokes on each side of the wheel. Jeremy laces these wheels with the '3-cross' spokes on the outside of the flange first and then the radial spokes on the inside. The radial spokes cross over the '3-cross' spokes, and since this crossing is close to the hub, the radial spokes are pre-bent at the elbow to aid this crossing. The figure below is of half of a 32 spoke wheel with this lacing.

|
Jeremy has been building rear wheels with this pattern laced on both sides of the wheel. I am sure it could be used on front wheels, and mixed lacing rear wheels as well. In addition to these variations, it is possible to vary this pattern in different ways.
All of the spokes could be laced so they lie on one side of the flange. If I were to lace this pattern like this I would lace the spokes so they rest on the outside of the flange (heads on the inside), lacing the crossing spokes first and then the radial spokes. You could lace this pattern with the spokes arraigned just the opposite of the figure, the radial spokes on the outside and the crossing spokes on the inside. You can also vary how the spokes cross with any of these different lacing styles. If your lacing is going to have a sharp crossing (like the lacing in the figure) it would be a good idea to pre-bend the elbows of the spokes to aid this crossing and relieve potential high stress points.
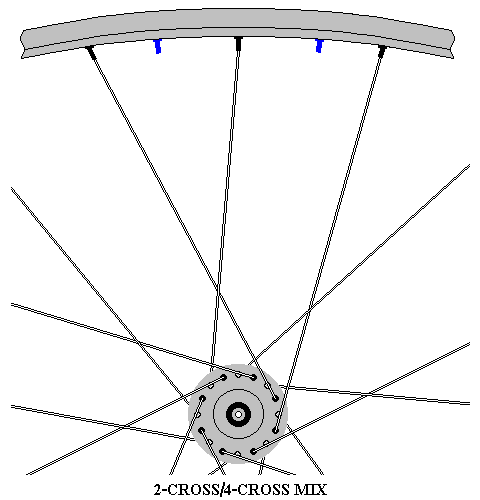
Another interesting custom lacing pattern mixes 2-cross length and 4-cross length spokes on one side of the wheel. This results in 3 actual crossings. The figure below shows one side of a 32 spoke wheel laced like this.
|
This lacing, while not terribly unique, could be used in ways to lace wheels with an unusual pattern. For instance, you could flip-flop the 2-cross/4-cross pairs on each side of the wheel to make an interesting spoke formation for the entire wheel, and you could mix these pairs with standard 2 or 3-cross pairs, radial spokes, or a combination of all of these to make a very interesting pattern. I haven't worked out all the possibilities, but if you are considering a wild mix pattern you should spend some time to carefully draw out the lacing on one side of the wheel to work out the details. If you do something like this make sure the wheel has an even number of the patterns you are going to use, and that these pattern are distributed evenly around the wheel. This will make sure all of the build force tensions will balance out. Splitting the wheel into quarters, and designing one quarter at a time, could be helpful for making sure the completed wheel is balanced.
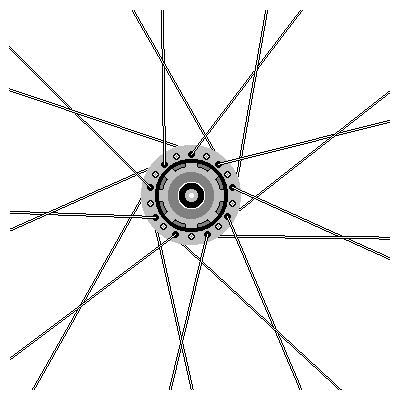
I experimented with this lacing for the drive side of a mixed lacing 32 spoke rear wheel. The figure below is a detail of the lacing at the hub that shows how this was done. The '4-cross' spokes were laced so they were responsible for transferring the drive torque from the hub to the rim, and the '2-cross' spokes were responsible for giving the drive side good lateral strength.
|
While the rear wheel was solid, it wasn't as reliable as I like my rear wheels to be, it lost true fairly often. That might have been due to the fact that the drive side and non drive side used different patterns, the non drive side was laced with a standard 2-cross lacing. The wheel did exhibit good drive side lateral strength, however, and it never had a catastrophic collapse, so it wasn't a total failure. Perhaps if both sides of the wheel were laced with this pattern, including the possibility of the non drive side being laced with the '2-cross' and '4-cross' spokes aligned in the opposite direction, it might have held true better. This might also be a better pattern to use in wheels with more than 32 spokes (36 or 48). I never experimented with this lacing further to find out about these possibilities.
This section will outline the necessary steps to designing your own custom lacing pattern. The possibilities are nearly endless. You could design a mix lacing pattern for one side of a wheel, one with different length spokes such as the CROW'S FOOT, the 3-CROSS/RADIAL, or the 2-CROSS/4-CROSS. Or you could design a lacing pattern for use in a mixed lacing rear wheel, such as those detailed in the STRONG REAR WHEEL LACING chapter. About the only thing you shouldn't do is design a pattern that will be dangerous, like a pattern that will center the rim directly over a hub flange (which would cause the wheel to have no lateral strength), or those conditions discussed in the LACING PATTERNS THAT ARE DIFFICULT OR WOULD NOT WORK AND OTHER THINGS TO AVOID chapter. When you design your own pattern, you need to make sure that the rim will have support that is balanced all the way around for both radial and lateral forces.
If you contemplate a design with spokes in set's that have more than two spokes, like the Crow's Foot which is based on set's of three, the way to figure out how many spokes a finished wheel will have is the following. I will use the Crow's Foot pattern as an example. Take the number of spokes in a set and multiply it by 2 to figure the Effective Spoke Count. A Crow's Foot works out to 3 X 2 = 6. You then need to decide the minimum number of these set's you feel each side of the wheel will need in order to be stable, this will be the Number of Set's. I don't suggest a wheel with less than 4 set's on one side. You then multiply the Effective Spoke Count by the Number of Sets to figure out the Lowest Spoke Count a wheel will need. For the Crow's Foot 6 X 4 = 24. To figure out all the potential wheels buildable with your new pattern, add the Effective Spoke Count repeatedly to the Lowest Spoke Count to find out the spoke counts of wheels you could build. With a Crow's Foot this works out to 24, 30, 36, 42, 48, etc.. In general I do not suggest building a wheel with a custom pattern that has less than 24 spokes.
For your reference and understanding, custom patterns like the 3-CROSS/RADIAL MIX or the 2-CROSS/4-CROSS MIX above have 2 spokes per set. The CROW'S FOOT has 3 spokes per set, and the THREE LEADING-THREE TRAILING above has 6 spokes per set. Hubs and rims with spoke hole counts other than 24, 28, 32, 36 or 48 are hard to find, and you might need to have blank hubs and rims custom drilled, blanks can also be hard to obtain. If you are considering a wheel with a non-standard spoke count (other than 24, 28, 32, 36, or 48), I suggest you investigate the availability of components before spending time designing such a wheel. You might want to modify your plans to use components you can readily obtain.
One thing you will need to do when you design a truly custom pattern is determine the length of the spokes. This is, of course, the main purpose of this site. To determine the proper length, all of the values you need to use in the formula come from the hub and rim except for the SAA, Spoke Anchor Angle, which is a factor of the effective crossing length of the spoke. For example the CROW'S FOOT has two basic variations, one with 2-cross length crossing spokes and one with 3-cross length crossing spokes. Once you know the effective crossing length of the spokes in your you new design you can either use the COS(SAA) values given on the COSINE page, or you can calculate the values using the information on the MEASURE page.
The only problem is how do you figure the effective spoke length of the spokes on a custom pattern you create? To aid those who wish to create truly unique custom patterns, I generated blank wheel forms for common 24, 28, 32, 36, and 48 spoke wheels. These forms are Bitmap files that will work directly in Windows® operating systems, or that can be converted to other formats with conversion programs you can find on the Internet. I created a PkZip® file that has all of these files. If you do not have PkZzip® software to read this file, there is a link on the HOME page at the bottom for going to the PkWare site where you can get the PkZip® software for free.
Select here to download the files.
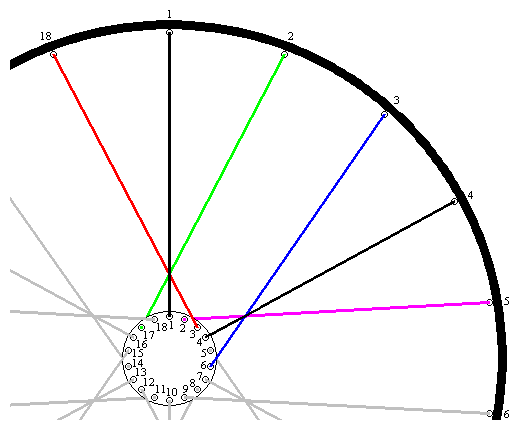
To use these files you can print them on one page, make the side borders .5" or less, or you could design with them right on your computer. These files show the spokes in only half the wheel to make them easier to use, you really only need to design one side at a time anyway. The hub and rim have numbered holes that represent the spoke holes, for example the 32 spoke wheel form has 16 numbered holes on both the hub and rim. To calculate the effective spoke length, the hub and rim spoke hole numbers are aligned. The effective spoke length is the LARGER number minus the SMALLER number, regardless of which part the larger number is on. For a radial spoke all the hub and rim numbers will be the same, so one minus the other is zero. In a 3-cross lacing all the hub and rim numbers will be different by 3, etc.. The only trick is when a spoke crosses the highest number position, for example, in a 32 spoke wheel the spoke goes from hub hole 15 to rim hole 2. In a case like this you add the number of spokes on the form (16 in a 32 spoke wheel) to the smaller number before you do the subtraction of the smaller number from the largest. In the stated example, 2 + 16 = 18, 18 - 15 = 3, the spoke length is 3-cross. To give a better example of how this works the figure below is a section of the 36 spoke blank wheel form laced with a 3-cross Crow's Foot pattern.
|
I will explain how to calculate the effective spoke length using the colored spokes. The easiest spokes are the BLACK ones, they are all radial spokes, the hub and rim holes have the same numbers. The other colored spokes are all 3-cross length. The BLUE spoke goes from hub hole 6 to rim hole 3, 6 - 3 = 3. The PURPLE spoke goes from hub hole 2 to rim hole 5, 5 - 2 = 3. The RED spoke goes from hub hole 3 to rim hole 18, (3 + 18) - 18 = 3. The GREEN spoke goes from hub hole 17 to rim hole 2, (2 + 18) - 17 = 3. For any other pattern you use this same logic to calculate the effective spoke length. Using the effective spoke lengths you can then figure out the COS(SAA) values as detailed above.
If build a wheel with a custom pattern that is very different and hasn't been ridden before, it would be a good idea to test it before you actually ride on it. You can test a wheel by putting loads on it to simulate a ridden bike. For side stress, you can rest the hub, minus skewers, on a block of wood and press on the rim. Don't use excessive force, especially when testing the drive side of a rear wheel (it will be on top when the hub is resting against the wood), this could potato-chip the best wheel. Use enough force to make sure that the wheel has good lateral strength. For front and non drive sides your body weight is a good amount of force, for drive sides your full body weight would probably be too much. A test for rotational strength for front wheels is to mount the wheel on the bike and ride it against a wall. Don't hit the wall at speed, ride the bike slowly against the wall while putting as much pressure as you can into the pedals while the lowest gear is selected, start just a couple of feet away from the wall. For rear wheels, about all you can do is to hop the bike while clipped or strapped into the pedals. Have a friend support the front of the bike to keep you from falling over. Hop the bike as hard as you can manage in many places around the rear wheel. If all seems solid, test it out on the road gently before trying any hard maneuvers and have fun!

