| |
| |
|
|
|
| |
| |
|
|
The measurements of the hub and rim are very critical to getting the spoke length right. Although spokes only come in 1mm or 2mm increments, in order to get the desired length as close as possible, the measurements need to be accurate. If you have a set of calipers and a Metric tape measure the measurements will be easier. If you do not have a set of calipers you will need to be very careful when you take the hub measurements. If you do not have a Metric tape measure, you can use an English tape measure. Any measurements you take in English, whether with the calipers or tape measure, can be converted to metric. First convert a fractional reading to a decimal number, i.e. 1/8=.125, and then multiply that by 25.4 to get the millimeter equivalent.
The trickiest measurement to get accurate will be the Hub Spoke Radius, HSR in the main formula. For most front wheels, figuring out the Hub Flange Offset, HFO, is fairly easy, you just measure the distance between the two flanges and divide by two. The rear wheel on multi-speed hub's is more difficult because on these hub's the two flanges are offset unequally from the hub's center. For single speed or internally geared hub's, the flanges might or might not be off-center, so it would be best to measure them assuming that they are to make sure the HFO values are accurate. Front disc brake hub's usually also have uneven dish, so you need to measure them as though they were multi-speed rear hub's.
The rim radius is fairly easy, you just divide the inside rim diameter by two and figure out how far the spokes penetrate into the rim. It's a good idea to take many rim measurements and calculate the average, in case the rim is a little deformed from a perfect circle (which is likely). Figuring out the spokes penetration into the hub can be a little tricky with aerodynamic rim's that have the spoke heads set inside the rim or rim's that require extra long nipples. You need to be aware of spoke hole stagger and offset in some rim's. If you have the ERD (Effective Rim Diameter) figure for your rim this should take care of any stagger, and it might take care of any offset. Check with any documentation that might have come with the rim, or the place where you obtained the rim. You can also try getting in contact with the company that made them (the Internet can be useful for that).
The sections below will explain in greater detail how you need to take the necessary measurements in order to properly use the formulas.
|
THIS PAGE IS ARRANGED INTO THE FOLLOWING SECTIONS: HUB SPOKE HOLE MEASUREMENTS HUB FLANGE OFFSET RIM MEASUREMENTS RIM SPOKE HOLE OFFSET AND STAGGER |
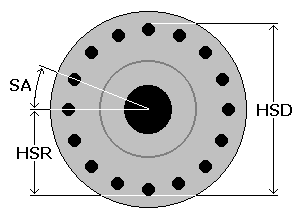 The figure to the right shows the first measurement you need to take on the hub, the Hubs Spoke Diameter, HSD and the Spoke Angle, SA, that is related to the number of spokes.
The Hubs Spoke Radius, HSR is calculated by dividing the HSD by two (HSR = HSD / 2). If you have a set of calipers to use it will be an easier measurement to take than if all you have is a tape measure or ruler. The figure of importance is the outside edge of the spoke holes. Spokes are measured from the edge of the bend closest to the threaded end of the spoke, not from the center of the head like one might assume.
If you do not have calipers, there are several ways to make this measurement with just a ruler. One of the quickest ways will be to eyeball it. Hold your ruler or tape measure as close to the flange as possible, making sure it is parallel to the flange and two opposite spoke holes. Sight down the measurement marks of the ruler to the spoke hole edges. Doing this will be more accurate if you just use one eye. Sight down the edge of the two hub flanges until they just meet, and take the reading off the ruler. Then, without moving the ruler, use the same technique for the opposite spoke hole. If in doubt, take a couple of measurements and make sure they agree.
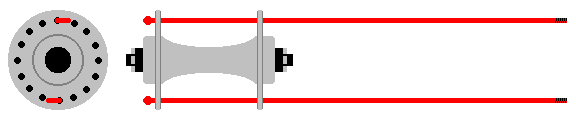
Another way that you can take this measurement is two use two spokes, but this will work only on a hub that has two equal diameter flanges (which most modern hub's have). Make sure the spokes are as straight as possible. Place one of the spokes through a spoke hole in one of the flanges, and then place it through a spoke hole in the opposite flange making sure the two holes are exact opposites. The spoke holes do have some stagger, which is half of the Spoke Angle, SA, so the spoke will be at a slight angle compared to the center line of the axle. Place the second spoke at the exact opposite side of the flange in the same manner. Make sure all the spoke holes the two spokes go through are exactly 180 degrees apart on the flanges. The result will be the two spokes are parallel but will not be in line with the axle's center line. The below figure shows what this looks like. The figure shows both the front and side of the hub, and the measurement spokes are the RED lines.
|
After you have the spokes properly aligned as shown, measure the distance between the outside of the spokes as close as you can to the flange. This will be the HSD value. Divide that value by 2 to calculate the HSR. The value of the Spoke Angle, SA, is easy to determine. Divide 720 by the number of spoke holes on the hub. The SA values for common hub's are:24 hole: SA = 30From the SA value, you now calculate the Spoke Anchor Angle, SAA, for the main formula. The SAA equals the SA times the number of crosses, for standard crossing patterns. For radial lacing the SAA is zero. In an exotic pattern the SAA is calculated based on the effective crossing length of the spoke, which is the number of spoke holes away from the one that would be used if the spoke was radially laced. For example, in a 3 cross 36 hole wheel, the SA is 20, 20 X 3 = 60, the SAA is 60 degrees.
28 hole: SA = 25.71
32 hole: SA = 22.5
36 hole: SA = 20
48 hole: SA = 15
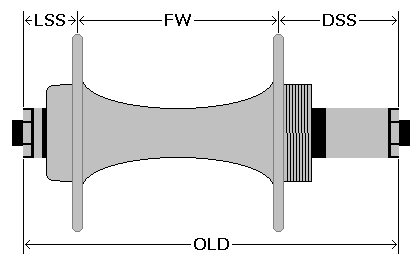
The next measurements you will need are the Hub Flange Offset, HFO, values. Each hub has two values for HFO, one for each hub flange. The figure below shows the needed measurements needed with a multi-speed rear hub to get the HFO values. For standard front hub's, the hub flanges are equal distances from the center of the hub, so the HFO value for one flange is the same as the HFO value of the other. Front disc brake hub's should be treated as though they are a multi-speed rear hub, most of these hub's do have different HFO values.
|
If you are using rim's that have either an offset spoke hole pattern to reduce the dish of a rear wheel, or a spoke hole pattern that staggers the spoke holes far off the center line of the rim, information in the RIM SPOKE HOLE OFFSET AND STAGGER section below tells how to compensate for this. This compensation needs to be applied to the HFO values before you calculate the spoke length.
For standard front hub's all you need to do to calculate the HFO value is this; Measure the separation of the flanges at their mid point, like if the flanges were extremely thin. This is the Flange Width, FW, in the figure. After you have the FW divide it by two and this will be the basic HFO value. Then subtract any rim stagger and you will get the final HFO value to use in the formula; HFO = (FW / 2) - any rim stagger. You should not use a rim with spoke hole offset on a front wheel, even one with disc brakes. These rim's are only for rear wheels, and they could cause control problems when used on the front because of how the spokes attach to the rim off to the side. This causes an imbalance in the forces acting on the front wheel.
For multi-speed rear wheels it is trickier to calculate the HFO values because of the uneven dish of the wheel. For one speed or internally geared rear hub's, that might not have uneven dish, it would still be a good idea to take the measurements described below, rather than just assume they don't have uneven dish. Even a small difference in the HFO will make the spokes the wrong length.
You will need to know the overall width of the hub assembly. This is called the Outer Locknut Dimension, OLD. The OLD value is readily available for most new hub's. The common OLD values for most hub's are listed below;Front hub's: OLD = 100mmThis is the figure for the distance from the outer most edges of the lock nuts where they rest against the inside of the dropouts, it is shown in the figure above. I couldn't find any information about the width of three-speed or multi-speed internally geared rear hub's to pass on, it probably varies by manufacturer and expected use of the hub. The OLD value for these hub's will have to be measured if you are not supplied with the value when you get the hub.
Older rear track hub's: OLD = 110mm
New rear track hub's: OLD = 120mm
1 speed 'Cruiser' hub's: OLD = 120mm
Old 5 speed hub's: OLD = 120mm
80's era 6 speed hub's: OLD = 126mm
Modern rear road hub's: OLD = 130mm
Modern rear mnt. hub's: OLD = 135mm
Most tandem rear hub's: OLD = 140mm
After you know the OLD value you will need to measure the Left Side Spacing, LSS, and the Drive Side Spacing, DSS. These measurements are taken from the center of the respective flange to the outer edge of the lock nut as shown below. For front disc wheels, pretend the disc mount is the freehub to simplify these calculations. An easy way to get these values would be to put a very thin flat wrench, like a cone wrench, against the lock nut, making sure it is against the face of the nut evenly and it is parallel to the hub flange. Then measure from the inside edge of the wrench to the center of the flange. You might be able to use a quick release and some nuts or washers to hold the cone wrench against the locknut.
After you have accurate measurements of these two dimensions (LSS and DSS), you now have all you need to calculate the two HFO values for the hub. If the rim's spoke holes have offset or stagger this is where you figure in the compensation, see the RIM SPOKE HOLE OFFSET AND STAGGER section below. This is the way you calculate the two HFO values; First divide the OLD by two. From this number subtract the LSS value to calculate the non drive side HFO value, and figure in any compensation for rim offset or stagger, HFO = (OLD / 2) - LSS - any rim stagger or offset. For the drive side, subtract the DSS value from OLD divided by two and calculate in any rim offset or stagger, HFO = (OLD / 2) - DSS [- any rim stagger OR + any offset]. You now have the two HFO values you will need to figure out the two different rear spoke lengths.
Some wheels have an ERD (Effective Rim Diameter) value from the manufacturer available. If your rim's have a know ERD value, to calculate the RRSP (Rim Radius plus Spoke Penetration) value, divide the ERD by 2 and then add 2mm for the spokes's penetration into the nipple. Rims that have an ERD value usually take care of any spoke hole stagger.
If the rim's you have don't have an ERD value, or if you would like to double check for yourself just to make sure it's right, follow these directions.
For the rim dimensions the first measurement you will need to take is the diameter of the inside of the rim. Using a tape measure, measure the distance between the inside of two spoke holes that are exactly half way around the rim. It would be a good idea to do this in several places to make sure the rim isn't a little distorted. Take the average of the readings to get a value to work with. For rim's without eyelet's, take this measurement right off of the body of the rim, next to a spoke hole, trying to be as centered as possible. For rim's with eyelet's, this reading should be taken from the inside edge of the eyelet's. In the figure below this is represented as RMP for Rim Measure Point. After you have the rim's diameter in millimeters, divide it by two to get the Rim Radius, RR. It is OK to round this number to the nearest millimeter.
You will now have to figure out how deeply the spoke will penetrate into the rim. For most rim's with eyelet's that use standard nipples, this will be 4mm. For most rim's without eyelet's this will be 3mm. To double-check these values or if you have rim's that need extra long nipples or are lacing an aerodynamic rim where the nipples are buried in the rim, you will have to take measurements.
 The figure to the right represents standard nipples in a typical rim. For rim's that use standard or extra long nipples, the first measurements you will need to know are the length of the nipple and the depth of the nipples driver slot that is worked by a spoke nipple screwdriver. These dimensions are referred to as SNL, Spoke Nipple Length, and SNDD, Spoke Nipple Driver Depth. Most standard nipples have a SNL of 12mm and a SNDD of 1mm, so the distance from the squared end to the bottom of the driver slot is 11mm, the spokes penetration past the inside end of the nipple. After you have these values you will need to measure the distance the nipple will extend out of the rim, the SNE (Spoke Nipple Extension). Measure this by putting a nipple in the rim, press on it firmly to make sure it is seated all the way, and then measure from the edge of the eyelet if the rim has eyelet's, or the rim if it doesn't, to the end of the nipple, this is the SNE.
You now have four numbers, 1: the rim's radius (RR), 2: the length of the nipple (SNL), 3: how much of the nipple sticks through the rim (SNE), and 4: the depth of the nipples driver slot (SNDD).
Start with the value for the rim's radius, RR. Add the value for the length of the nipple, SNL. Subtract the depth of the nipples driver slot, SNDD. Then subtract the distance the nipple sticks through the rim, SNE. This will give you the value for RRSP, the Rim Radius plus Spoke Penetration. RRSP = RR + SNL - SNDD - SNE.
For example, lets say the rim's radius (RR) is 300mm, the nipple's length (SNL) is 12mm with 6mm that sticks through the rim (SNE) and has a driver depth (SNDD) of 1mm. This gives you 300 + 12 - 6 - 1 = 305, 305mm is the value of RRSP in the spoke length formulas on the home page.
 If you are building a wheel with aerodynamic rim's that have a deep V shape and the nipple is fully inside the rim, things are a little harder. The measurement to determine the rim's radius is the same, just make sure that you measure on the center edge of the rim, right next to the spoke holes. To figure out how far the spoke penetrates into the rim, you will need to make a measurement similar to the one illustrated in the figure to the right.
You will need to use a spoke and a nipple. Thread the spoke through the rim from the direction of the hub. With the spoke sticking up far enough to have access to the threads, thread a nipple on it and tighten it about as far as depicted in the above figure. You don't want to thread the nipple on all the way, leave about 2mm worth of spoke threads free, or when you build the wheel you could run out of spoke threads before it's tight. Pull the spoke back through the rim until the nipple is seated in it's depression and then wrap a piece of tape around the spoke at the point where it comes through the rim.
Now unscrew the spoke from the nipple and measure the distance from the edge of the tape on the side near the threads to the end of the spoke. Add this value to the determined radius of the rim and that will give you the RRSP value for the formula on the home page.
For example, the rim's diameter measured 550mm so it's radius is 275mm. After doing the above, you figured out that the spoke penetrates into the rim about 20mm. Adding the 275mm radius to the 20mm penetration gives you a factor of 295mm to use in the spoke length formula for the RRSP value.
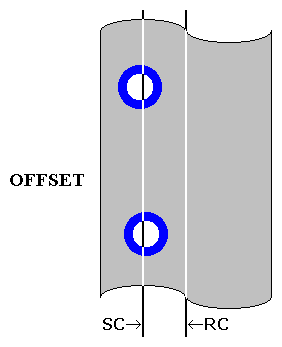 The figure to the right illustrates a rim with offset, which is used to reduce the uneven dish of most rear wheels. If the rim you are using has the spoke holes offset like this, you will need to know the distance between the center line of the spoke holes, SC for Spoke Center, and the center line of the rim, RC for Rim Center, as shown in the figure. This view is from the inside of the rim.
If the rim didn't come with information about the offset, you can measure it with a tape measure as outlined below for staggered spoke holes. When you are taking the measurements for the offset, be careful to not let any spoke hole stagger affect your readings, and also be careful that any stagger isn't large enough that it would affect the spoke length, 1 millimeter or less of stagger shouldn't cause problems. After you have the value of the spoke hole offset from the rim's center line, you subtract the offset from the non drive side values above when calculating that HFO value and add it to the drive side values above when calculating it's HFO value. If the rim also has a large amount of spoke hole stagger in addition to the offset, you also need to subtract the amount of stagger from the HFO values when performing the calculations.
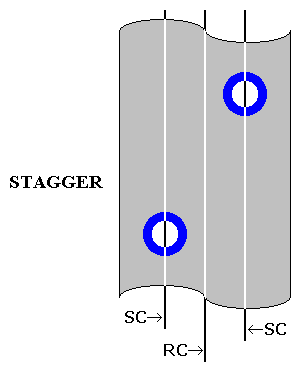 Almost all rim's have some stagger to the spoke holes to help orient the spokes to the hub, and it usually won't make a difference in calculating the value for the spoke length. However, if the stagger is large it can affect the length of the spokes. I have worked withsome rim's that did have the spokes staggered so far it affected the spoke length. The figure to the right illustrates a rim with a large ammount of stagger that needs to be compensated for.
The way to compensate for rim's with large spoke stagger is to subtract the amount of the stagger from the HFO values for both sides of the hub. You will need to carefully measure the distance from the rim's center, RC, to the spoke holes center, SC, as shown in the figure.
The easy way to measure this stagger is to first measure the width of the rim with a tape measure and divide it by 2 to get the center line value of the rim. Then measure the distance from the side of the rim to the center of the spoke holes. Tape measures make it easy since the flange at the end of the tape will grab the side of most non-aero rim's. If you do not have a Metric tape measure, you can use an English tape measure, convert the reading to a decimal point, i.e. 1/8=.125, and then multiply the measurement by 25.4 to get millimeters. If the rim's you are using have an "aero" profile, that is the center is very rounded, and a tape measure won't catch the side of the rim, you will need to place a flat object like a cone wrench against the side of the rim to use for a reference point. If you need a reference for the rim's side, make sure it doesn't point to the inside or outside of the rim, it needs to be parallel to the side plane of the rim.
If the value of this stagger is about 1 millimeter, which is typical for most rim's, you will not need to do anything. When this stagger value gets to about 2 millimeters or larger, it can affect the spoke length and you will need to subtract the stagger value from the HFO values to compensate for it. For front and rear hub's, subtract the stagger value equally to both HFO values and use the adjusted value when making your spoke length calculations.