All
the |
(Navigation bar
directly below.)
*******
© A.J. Goldsby,
2009.
(All rights reserved.)
****************
Click HERE
to see my
Chess Items.
****************
****************
Buy a book
from Amazon.com
(And help me out as well!)

"The Final Blow" in Chess
Checkmate In Chess
( or ... "The Hammer Falls." )
Click HERE to return to my Training Page.
Click HERE to return to my HOME Page.
________________________________________________________________
Click HERE to go to another site where the basics of chess are covered.
Click
HERE
to go to another site where the basics
of how the pieces move are covered.
Click HERE to go to another site where the basics RULES of chess are covered.
In this section we will look closely at just a
few checkmates. The idea
here is not to turn you into a tactical
wizard overnight, but simply to make
you able to understand thoroughly the
concept of mate, and being able
to recognize it when the possibility of it
occurs in your own game.
CHECKMATE
Checkmate occurs whenever
the King is in check,
and has no legal move to get out of check.
If you are mated, it is the end of the game.
Just so that you will
understand it, we will look carefully at a few examples
of a Check-Mate - or simply "mate" as many chess-players refer to
it.
Take a look at the graphic below.
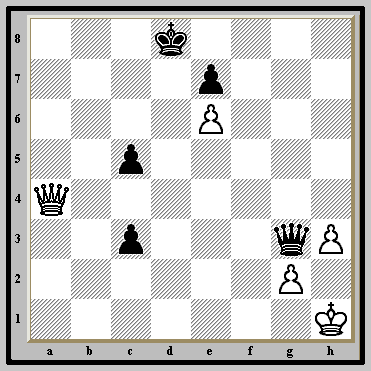
Let us pretend, or stipulate that it is White's move in this diagram.
What would you play? Take a couple of minutes to study the board.
After thinking a few
minutes, White says, "Whoa!, I think I see something."
White thinks he sees a mate in one move!
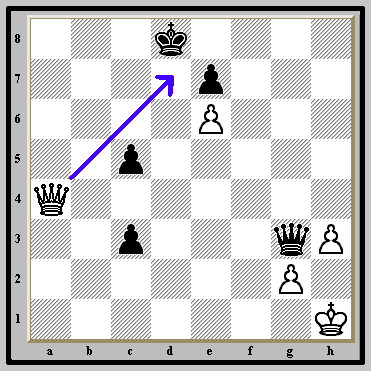
White decides to move his
Queen along the line indicated by the blue arrow.
This would be written as 1. Q/a4-d7, or 1. Qd7
(The White Queen on a4 moves to the empty d7-square.)
The diagram below shows what the new position would look like.
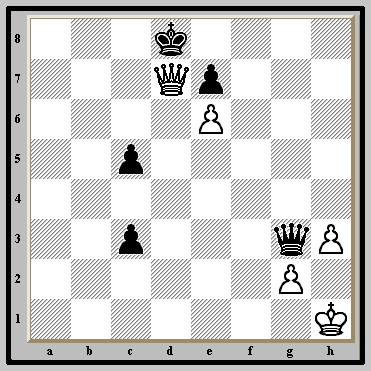
And that's it!! Its a checkmate!
Black cannot
recapture with his King, because of the White pawn on e6.
(He would be moving his King into the capturing power of the White Pawn.
This is
an ILLEGAL MOVE,
and is known as "moving into check."
This is NOT allowed
by the rules of chess.)
The Queen, because of her
extraordinary movement powers, covers all the
other squares that
the Black King could move to.
The game is over. Give yourself a pat on the back of you saw this without too much trouble.
Let's look at another example of a relatively simple checkmate.
Take a close look at the graphic below.
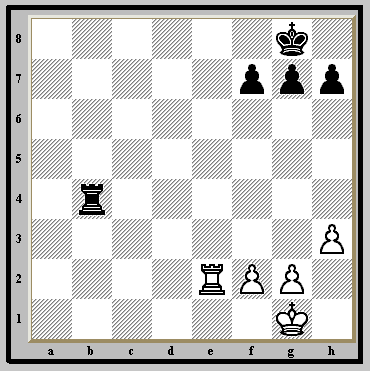
OK, pretend you are White here, and its your move.
What move would you play?
(You may want to take a few
minutes
and try to guess what the correct move is.
Hint # 1: Its a mate in one.)
(Hint # 2: Its a Rook move.)
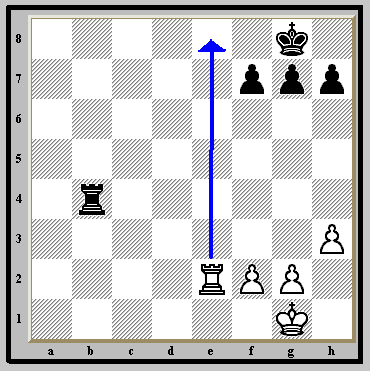
White decides to move the
Rook along
the path indicated by the blue arrow.
Was this the move that you predicted?
Now look carefully at the
diagram below.
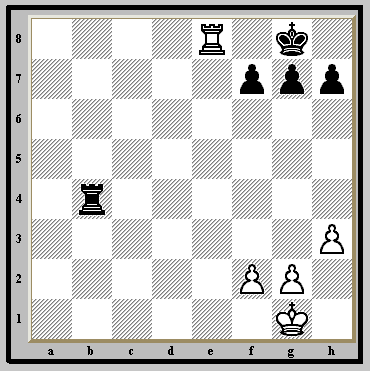
Boom! That's it!!
Its a checkmate. The Black
King on g8 is under
fire from the White Rook on e8.
(Remember that the Rook can move
UP & DOWN AND from SIDE
TO SIDE.)
The Black King is in check,
and has no move to get out of check.
(Reminder: You may NEVER capture your own pieces.)
This type of mate, where you
are hemmed in on your first row by your own
pawns is known as a "Back-Rank"
Mate. It is very common in chess.)
Now those two mates were
relatively easy.
Are you ready for something a little tougher?
Take a close look at the
diagram below. If you have a chess set, you are definitely
going to want to set
this one up!!
(If you
don't have a chess board right now, don't worry about it. Follow along as best
you can.
If you get a chess board in the near future, you can come back to this
example and study it.
This little gem is simply meant to show you just a small
portion of the tremendous and complex
possibilities that could occur in a mating
attack. If you don't think you can follow the action
without a chess board, you
may simply skip to the last diagram.)
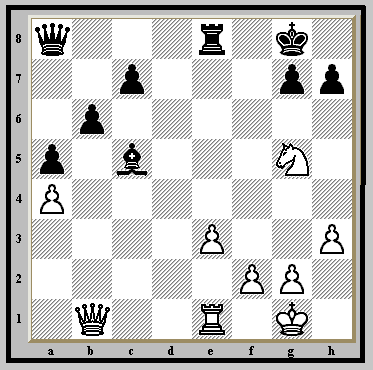
Take a few minutes and study this one, if you like.
You are White in this position. What move would you play?
I will give you another
hint. The first move is NOT
Queen captures
the Pawn on the h7-square, (WITH CHECK.). This would win for White.
I.e. 1. Qxh7+, Kf8; 2. Qh8+,
Ke7; 3. QxP/g7+, etc. This would definitely win for White.
He has won two pawns,
and flushed the Black King out into the open. This is good,
but White has
something MUCH BETTER!!
Give up? What move did you pick?
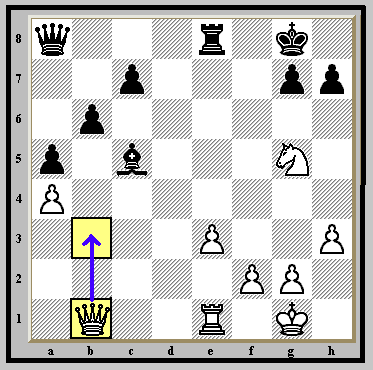
The correct move is to move the White Queen from b1 to the b3-square.
***
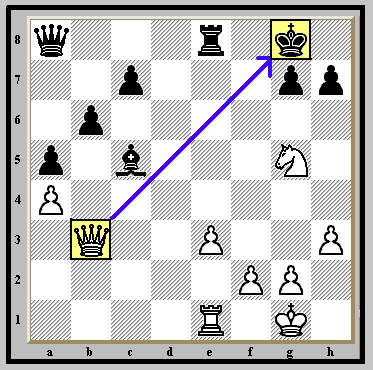
Notice that the Black King
is in the "field of fire" or in
the sphere of the capturing influence of the White Queen.
(Remember: The Queen moves in a straight line, as far as she likes.)
The Black King is now said
to be in, "Check."
(Notice the high-lighted squares and the blue arrow.)
(It is customary to announce
check, although
there is NO rule that REQUIRES this.)
So this first move is to
move the White Queen
from b1 to b3, giving check to the Black King.
(This is written, or recorded as:
1. Q/b1-b3+. Or 1. Qb3+!.)
Now you will definitely need
a chess board to follow the next few moves!
(If you don't have a chess board, try to just visualize this combination. Close
your eyes,
and see the moves in your head, if you can.)
The Black King can't go to
the f7-square as that square is
covered by both the Queen AND the White Knight.
If Black played,
"King to the f8-square," (1...Kf8?;), White would respond
by moving,
"Queen to f7-square, CHECKMATE." (2. Qf7#)
So the only good move for
Black is to put his King in the corner.
("King to the h8-square, or 1...Kh8.)
Now White has a series of clever Knight checks:
(The next few moves are
forced, Black has no moves but the ones given.
REMEMBER: Any time Black plays
his King to the f8-square,
White has Queen to f7, mate.)
So play proceeds:
"The
Knight goes the f7-square, giving check to the Black King in the corner."
(2.Nf7+,)
Black plays the only legal
move he has,
"King to the g8-square." (2...Kg8;)
******
Now White plays: "Third
move [in the combination], Knight to the h6-square,
giving check to the Black
King" (3. Nh6+,)
Notice that the King is now
in check from BOTH the White Queen ...
AND the White Knight. This is
known as a double-check!
******
Black responds by playing
his King back into the corner. (3...Kh8;)
Black thinks: "Well if he just keeps going back and forth, its a
draw!!"
Now White plays a real
stunner of a move.
"Queen to the g8-square, with CHECK! " (4. Qg8+!!)
Black can NOT take with his
King, as that would be
moving into check from the White Knight on h6.
His only legal move is to capture the
White Queen with his Rook. (4...RxQ/g8; or just
4...Rxg8.)
Now Black thinks:
"Has White lost his mind? What does that do?"
******
Now
White smiles.
>> He grabs his Knight. <<
Black thinks, "He is going to take my Rook. What good will that do?"
Then White moves his Knight from the h6-square, to the f7-square.
He smiles again. Very softly
... very calmly he says:
(With a twinkle in his eye.)
"Now that, my friend, is Checkmate!"
(White just played 5. Nf7#.)
***
Take a close look at the diagram below.
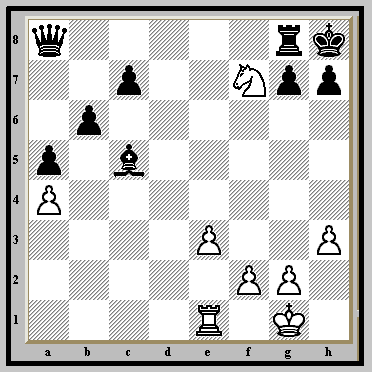
This is the final position
in our little combination.
The Black King is in check
from the Knight. He has NOWHERE to run to!
(Remember: You may NEVER capture your own pieces!)
It is checkmate!
This mate with the Knight, reaching into the burrow which Black has buried himself into, is known as a "SMOTHERED MATE." (Note how the Black King has perished, completely surrounded by his own pieces.) It is not as common as a "Back-Rank Mate," but it does occur fairly often in chess.
Remember: Check-Mate is said
to occur when the King is in check,
and cannot get out of check. Remember also: The Knight is
said to be able to "jump over" other pieces ... even to give
check.
Hopefully now you know what
a checkmate is. You should be able
to recognize one if it happens in your own
game. And maybe, just
maybe, I have even sparked your imagination and intellect
with
our little combination.
******
That concludes our study on "The Final Blow," or Checkmate.
(Page last updated: December 23rd, 2003.)
***
Copyright (c) LM A.J. Goldsby I
Copyright (c) A.J. Goldsby, 1996-2008.
Copyright © A.J. Goldsby, 2009. All rights reserved.
Click HERE to go to the next page in my Beginner's Chess Course.
Its called "Special Moves" in Chess.