
 The
following tactics can be applied to units or to
individual characters in a skirmish game, it's just a
question of scale. Some of the ideas, such as wedge
formations are more applicable to units which do not use
rank and file, or to skirmish troops.
 General Tactics
Protect your firebases
Your Heavy Weapons platforms are a high value target to you opponent. Most foot troops are also "move or fire" so you don't want to waste shots by moving them.
T - Establish a good field of fire when you setup, but don't make them too exposed!
T - Keep a squad close by and on Overwatch to defend your fixed firebase.
T - For mobile Heavy Weapons use "Shoot and Scoot" or "Shoot and Hide" tactics.
CT - Attack your opponents firebases to free up your troop movement using:
Use
the terrain
Games Workshop recommends using as much terrain as
possible in its 40K related games as this improves the
game. Regardless of the amount, try to set it up so that
it feels realistic. Always walk round and view the table
from your opponent's point of view as well as your own.
![]() Keep your units under cover
as long as possible, unless you are attacking, you are
always open to attack.
Keep your units under cover
as long as possible, unless you are attacking, you are
always open to attack.
![]() If you are confident of your
troops and your abilities and you know your opponent and
their troops then setting up first can be a major
advantage.
If you are confident of your
troops and your abilities and you know your opponent and
their troops then setting up first can be a major
advantage.
T - Place units:
![]() - In cover, or:
- In cover, or:
![]() - Far enough away that they
cannot be reached by enemy troops charging from cover.
- Far enough away that they
cannot be reached by enemy troops charging from cover.
![]() [Note - don't forget to place
Overwatch as some enemies can cover large distances.]
[Note - don't forget to place
Overwatch as some enemies can cover large distances.]
CT - Have units and weapons capable of
negating terrain effects.
![]() - Airborne troops; and
- Airborne troops; and
![]() - Template weapons.
- Template weapons.
Wedge Formations
For troops which are capable of skirmishing, consider
using Fire Team Wedges to maximise fire to the front.
Remember you must have a visual line of fire to be able
to shoot. Some skirmish games contain rules that can
penalise you for shooting too close to one of your units,
so be careful - "Friendly Fire" anyone?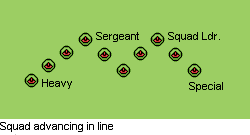
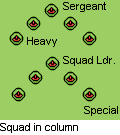
Use column formation when advancing through difficult
terrain which doesn't permit advancing in line. If you
are expecting H2H you might want to reverse the position
of Heavy and Special.
Defensive
Tactics
Clausewitz wrote that defense is the strongest strategy
as you have all the advantages. The basic defensive
strategy is to set up and wait while your opponent comes
to you. However, if any enemy H2H troops get into your
lines then you're history, as most defensive troops are
soft targets.
![]() Never field an army without
some good H2H troops.
Never field an army without
some good H2H troops.
Concentrated Defence
The aim here is to prevent any enemy units from even
reaching you lines. Target all fire on the nearest unit
until it is destroyed, then target the next closest.
Anything that survives should be weakened enough for your
own H2H troops to handle.

![]() Be
careful with this tactic, don't waste shots on screening
units.
Be
careful with this tactic, don't waste shots on screening
units.
Deep Defence
This is a variant of the above in which you deploy your
forces as close to your table edge as possible. This
should give you one more turn in which to fire before
they reach your lines.
![]() The disadvantage is that if
your units break, you have no field left in which to try
and rally them. They'll flee the table!
The disadvantage is that if
your units break, you have no field left in which to try
and rally them. They'll flee the table!
Moving Reserve
If your army has lots of heavy weapons and fast attack
troops, position a fast and powerful reserve so can move
to meet any threat. They can reinforce your Main Effort,
attack any unforseen targets, and defend your flanks.
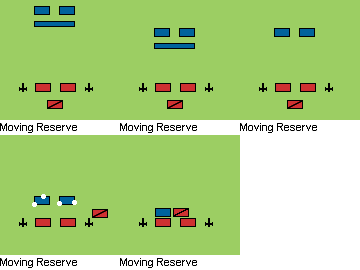
![]() Placing these units behind
your Main Unit and Heavy Weapons can reduce the
temptation to commit them into combat too early
Placing these units behind
your Main Unit and Heavy Weapons can reduce the
temptation to commit them into combat too early
Kill Zones
First decide where you want to kill your enemy, this is
called the Kill Zone (KZ) or Engagement Area. This is
usually an open area, often where the enemy has to slow
to cross or move through terrain and then regroup. Set up
your units to best cover this location with overlapping
fire arcs. If you have enough units, place some on
overwatch so you can catch movement in the KZ even when
it's not your turn.
![]() In the real world, soldiers
setting up such a position will place range markers or
"aiming stakes". If your opponent permits,
measure distances to reference points in your KZ from
your current positions before the game begins.
In the real world, soldiers
setting up such a position will place range markers or
"aiming stakes". If your opponent permits,
measure distances to reference points in your KZ from
your current positions before the game begins.
![]() Be careful with your Assault
troops, they're usually close to, or actually within your
KZ.
Be careful with your Assault
troops, they're usually close to, or actually within your
KZ.
Massed Assault - Waves
Some opponents have masses of cheap troops. The best
defense is to kill as many of them as possible before
they get into H2H. Use template and multiple shot weapons
to maximise kills per round of shooting.
Armoured Assault
Set up your firebases so you can mass fire on vehicles as
they move into your KZ. Try to get flank or rear shots as
this armour is usually weaker. Whenever possible, engage
your targets at stand-off range to destroy them while the
fewest possible weapons can engage you.
![]() Set up your KZ so that
vehicles have to turn as they enter it. This will open up
more opportunities for flank shots. This will also slow
down the vehicles to give you more opportunity to deal
with them before they reach you.
Set up your KZ so that
vehicles have to turn as they enter it. This will open up
more opportunities for flank shots. This will also slow
down the vehicles to give you more opportunity to deal
with them before they reach you.
![]() Don't forget about the
infantry that often moves in under cover of an armoured
assault.
Don't forget about the
infantry that often moves in under cover of an armoured
assault.
![]() Mass your fire to maximise
kills.
Mass your fire to maximise
kills.
Offensive
Tactics
The most important thing to remember about Offensive
Tactics is that you have to Fire AND Move. Moving units
will get cut to pieces unless there is adequate covering
fire.
![]() You must soften up your
targets before your Assault units get into H2H combat.
You must soften up your
targets before your Assault units get into H2H combat.
Bounding
Using two units, one provides fire or overwatch fire
while the other runs forward. In the next turn they
reverse roles. There are two methods of bounding,
"alternating" and "successive".
![]() Note that this formation can
be used to both advance and retreat.
Note that this formation can
be used to both advance and retreat.
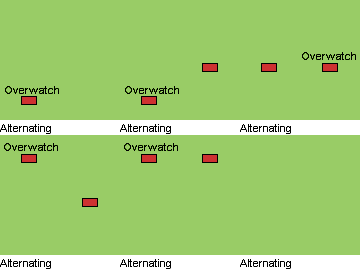
![]() In alternating bounds, one
squad provides covering fire or overwatch while the other
squad runs through and sets up a forward position to
protect the first squad which then follows through. This
is most effective when both squads have similar
capabilities, as both squads alternate in the lead role.
In alternating bounds, one
squad provides covering fire or overwatch while the other
squad runs through and sets up a forward position to
protect the first squad which then follows through. This
is most effective when both squads have similar
capabilities, as both squads alternate in the lead role.
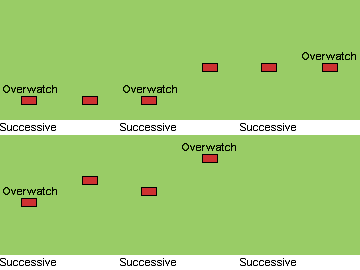
![]() In
successive bounds, the squads pull level with each other,
so one squad is always taking the lead role. This is most
effective when one squad is better at H2H (the lead
squad) and the other has better long range weapons
(following squad.)
In
successive bounds, the squads pull level with each other,
so one squad is always taking the lead role. This is most
effective when one squad is better at H2H (the lead
squad) and the other has better long range weapons
(following squad.)
Firebase
Not so effective in heavily terrained
battlefields, but then you have terrain cover anyway.
One unit continues to fire while the other units run to
the target. If no target presents itself then set the
Firebase on Overwatch.
Move and Fire
Good for heavy terrain where Firebases are not as
effective. Each unit moves and fires normally.
Charge!
Works well for armies with large numbers of Fast Attack
troops. Make sure that every main unit has some kind of
protection against psychic or magic attacks and is well
armoured.
Steady Advance
Soften up your enemy before engaging them. Move units
towards enemy, but don't charge headlong into the first
unit in their path. While you manoeuvre, soften them up
with heavy weapons fire and psychic attacks.
Waves
This works well for offensive armies with large numbers
of troops. Divide your army into two waves; fast H2H
troops in the first, followed by slower, more powerful
troops.
The first wave "softens up" the opposition
before the real units get stuck in. Since the first wave
is not supposed to survive, don't spend too much on them.
Just enough to make sure they don't rout
Anti-Vehicle
Don't attack from the front, instead use quick moving
units that can get outside fire arcs. Use cover to attack
them without exposing your units too much. Harass them,
this often upsets your opponent so they waste too much
time dealing with your insolence!
Combined
Tactics
Flank Attack
Place all your offensive troops on one flank, and all
your heavy weapons troops on other. Charge the offensive
units up their flank and into action. At the same time
pour heavy weapons fire into the enemy, which is by now,
charging your Heavy Weapons units.
![]() By this point, your offensive
units have routed their opponents and can attack the
flank or back of the enemy attacking your firebases.
By this point, your offensive
units have routed their opponents and can attack the
flank or back of the enemy attacking your firebases.
Defensive Arch - "Horns"
This is a variant on the Flank Attack but this time your
Heavy Weapons units are in the middle of the line with
offensive troops on both flanks. As the flanking troops
move quickly to engage, your army will form a
"U" shape on the battlefield.
![]() This manoeuvre is best used
when you set up last and your enemy has set up in a
central position. They will have to advance inside the
"U" and will be under fire from all sides,
potentially even encircled at the end.
This manoeuvre is best used
when you set up last and your enemy has set up in a
central position. They will have to advance inside the
"U" and will be under fire from all sides,
potentially even encircled at the end.
Suck 'em in
A variant on the Defensive Arch. Set up in line and, as
your opponent strikes at your main unit, pull it back to
suck your opponent into the Defensive Arch and open up
their flanks to attack.
Unorthodox
Tactics
Guerilla Warfare
Get your skirmishing units into cover, avoid H2H and
constantly harass your opponent with as much weapons fire
as possible. Flee from any enemy units which attempt to
engage in H2H
Powerful H2H characters or Fast Attack troops can then
roam the battlefield hitting targets as required. Try to
hit one enemy unit at a time until defeated.
Get your own Free Home Page