Applications
designed in FoxPro for Windows automatically take advantage of many new
Windows 95 features. Some of these new features cause side effects which
could not have been anticipated by developers who used FoxPro for Windows
applications. Running Microsoft FoxPro Applications Under Windows95
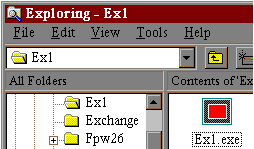
 The FoxPro Icon is displayed in
the Explorer for a distributed application.
 Including Large and Small icons
in the Explorer for a Distributed Applications

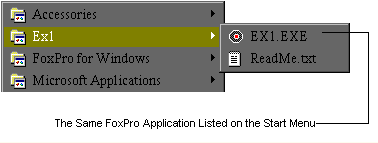
The Professional edition of FoxPro 2.6 shipped with a utility, AddIcon.prg, that allows you to specify an icon for your distributed application. Under Windows for Workgroups and Windows NT, this icon was used to display your application in Program Manager. In Windows 95, this icon is used to display your application in the Explorer.

Using AddIcon, you can bind an icon file which
includes both 32x32 and 16x16 pixel icons to your distributed executable.
1) Create a icon file which contains both 32x32 and 16x16 pixel icons.
Save it as Ex1.ico.
2) Open the sample project \fpw26\goodies\fndation\ex1.pjx
3) Select Build, choose Build Executable and enter Ex1.exe as the new application
name.
4) Run \fpw26\addicon.prg
5) Specify Ex1.exe as the executable and
Ex1.ico as the icon file.
 Default FoxPro Icon is Displayed
in Title Bar and in the Task Bar
The icon and title displayed when a FoxPro 2.6 application is minimized can be specified with a MODIFY WINDOW command. This also determines the icon and text displayed when the user cycles through all running applications by pressing ALT+ESC. In Windows 95, the default FoxPro 2.6 icon is displayed when an application is minimized. This same icon is displayed in the upper left edge of the main application window. There is no work-around for this problem in FoxPro 2.6.
![]()
1) Create a new project in FoxPro 2.6.
2) Add
a new program with the following code: MODIFY WINDOW SCREEN ICON FILE "Ex1.ico"
TITLE "A Sample Application" WAIT WINDOW "Hello"
3)
Build an executable and run it in Windows 95.
 Icon Specified For A Screen is
Not Always Displayed
FoxPro 2.6 allows an icon file to be specified for each screen. This icon is displayed when that screen is minimized in Windows for Workgroups and Windows NT. Under Windows 95, the small version of that same icon is displayed both when the screen is minimized and in the upper left corner of the screen. However, the correct icon may not be displayed when the screen is first displayed. In addition, the FoxPro icon or another screen's icon may be displayed when the screen is reactivated. There is no work-around for this issue in FoxPro 2.6.
1) Open the sample project \fpw26\goodies\fndation\ex1.pjx.
2) Select the Screen Set Excust, press Edit, select Excust, and press Edit
again.
3) Choose Layout from the Screen menu and then choose Window Style.
4) Specify an icon for this form and close the Window Style and Layout
dialogs.
5) Regenerate the form and then rebuild Ex1.app.
6) Run \fpw26\goodies\fndation\ex1.app.
 The Close Button is Always Disabled
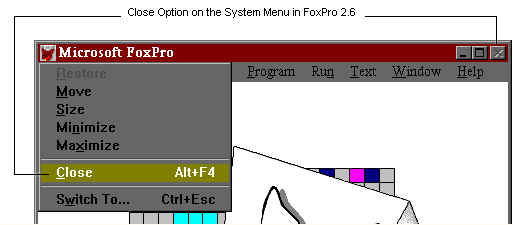
Under Windows 95, commands available on the system menu are also accessible through icons on the right of the title bar. Icons are grayed if the command is disabled to correspond to grayed options on the system menu. The Close icon is always disabled for FoxPro 2.6, regardless of whether Close is enabled.

Developers can exit a FoxPro 2.6 via the Close option on the System menu, using the Exit option on the File menu, or by typing Quit in the Command Window. Users of FoxPro 2.6 applications can use the Close option on the System menu or methods such as a Quit option included in the application.
 Screens with a BorderStyle of
System Cannot Be Restored.
A screen which is defined as to have a BorderStyle of System, Panel, or Double cannot be restored once the user minimizes it under Windows 95. To work-around this problem, change the BorderStyle to None or Single or disable the minimize option.
 How To Change the Icon in an Application
 Microsoft Visual FoxPro for Windows, versions 3.0, 5.0
In a distributed application that will be run under Windows 95, you may need to change the icon so that the executable displays your own icon file instead of the FoxPro Logo. You can accomplish this by using a reference to the _SCREEN object. This will also change the title bar icon in a Windows 95 application.
The _SCREEN system memory variable specifies properties and methods for the main Visual FoxPro window. The property that needs to be changed in this case is the Icon property. To change the icon shown on the screen's title bar, use this command:
_SCREEN.ICON = HOME()+"SAMPLES\GRAPHICS\ICONS\FLAG\FLGDEN.ICO"To show how this works, enter this command in the Command window with Visual FoxPro running under Windows 95. There is a directory of icons shipped with Visual FoxPro located in the following directory:
Vfp\Samples\Graphics\IconsFor more information on the _SCREEN system memory variable, query in the online Help using _SCREEN.
 How To Read from the Windows Registry
 Microsoft Visual FoxPro for Windows, versions 3.0, 5.0
You can use the Windows API functions RegEnumValue() and RegOpenKey() to read values into a Visual FoxPro application from a multiple-valued key in the Windows registry. For single-valued registry keys (not covered in this article) use the RegQueryValue() API.
More information about API functions in general can be found in the Win32api.hlp help file that comes with the Professional version of Visual FoxPro.
NOTE: Reading from the Windows registry applies to the Windows NT and Windows 95 operating systems. Use GetProfileString and WriteProfileString to read and write to the appropriate .ini files in the Windows for Workgroups and Windows 3.1 operating systems.
General Procedure for Reading Values from the Registry
NOTE: In some cases the Registry will not have all the settings for Visual FoxPro. Before running this code example, run REGEDIT for Windows 95 and make sure that the TMPFILES entry is there. If it is not there, this code example will go into an endless loop. On the Tools menu, click Options, and then click Set as Default. This will force the entries into the registry.
The following code reads the setting for the TMPFILES value from the Software\Microsoft\VisualFoxPro\3.0\Options\TMPFILES key in the Windows registry.
*** ***BEGIN PROGRAM CODE *** nKeyHandle=0 && Holds the handle to the key opened by RegOpenKey
iValue=0 && Index of value to query lpszValue=space(255) && Receives the name of the value
* In this example, you are looking for TMPFILES. lpcchValue=255 * This buffer tells the API the size of the lpszValue buffer. * If buffer is not large enough, the lpszValue buffer will be blank. lpdwType=space(255) && Receives the type code for the value entry lpbData=space(255) && Receives the data for the value entry
* In this example, it will contain the path to the TMPFILES.
lpcbData=255 && This buffer tells the API the size of the lpbData buffer
* If lpbData is not large enough, the buffer will be blank.
Declare RegOpenKey in ADVAPI32.DLL INTEGER, STRING, INTEGER @nKeyHandle
Declare RegEnumValue in ADVAPI32.DLL INTEGER nKeyHandle, INTEGER iValue,;
   STRING @lpszValue, INTEGER @lpcchValue, INTEGER, STRING @lpdwType, ;
   STRING @lpbData, INTEGER @lpcbData
** The number for the HKey_Current_User (the first parameter in RegOpenKey) ** is found in the Winreg.h header file included with Microsoft Visual C++
=RegOpenKey(2147483649,"Software\Microsoft\VisualFoxPro\3.0\Options",; @nKeyHandle)
do while alltrim(lpszValue)!="TMPFILES" &&loops through the key looking
* for TMPFILES
     lpszValue=space(255) &&need to reset the buffers
     lpcchValue=255
     lpdwType=space(255)
     lpbData=space(255)
     lpcbData=255
     =RegEnumValue(nKeyHandle,iValue,@lpszValue,@lpcchValue,0,;
@lpdwType,@lpbData,@lpcbData)
     ?alltrim(lpbData)+ ' '+alltrim(lpszValue)
     iValue=iValue+1
enddo
** END PROGRAM CODE **
 How To Write to the Windows Registry Using API Calls
 Microsoft Visual FoxPro for Windows, versions 3.0, 5.0
You can write information directly to the Windows 95, Windows NT, or Win32 Registry. The Windows Registry is the suggested place for 32-bit applications to store application information. Previous versions of Windows used .INI files for this purpose. This article gives a brief description of the Windows Registry and the steps necessary to write information to it programatically.
The following information comes from Chapter 10 of the Windows NT Resource Kit:
The Registry is analogous to the .INI files used under Windows 3.1, with
each key in the Registry similar to a bracketed heading in an .INI file,
and entries under the heading similar to values in the Registry.
However, Registry keys can contain subkeys, while .INI files do not
support nested headings. Registry values can also consist of executable
code, rather than the simple strings representing values in .INI files.
And individual preferences for multiple users of the same computer can
be stored in the Registry, which is not possible with .INI files.
Windows NT Registry
The Registry is a database of keys and values. The Windows NT Registry contains four primary keys:
HKEY_CLASSES_ROOT - File associations and DDE/OLE actions.HKEY_LOCAL_MACHINE - Global information on the state of the local
                      computer.

HKEY_USERS          - Configuration information about each individual user
                      of the computer and the DEFAULT entry.

HKEY_CURRENT_USER   - specific key within HKEY_USERS that stores
                      information for the currently active user.
Windows 95 Registry
Windows 95 adds a couple more primary keys:
HKEY_CURRENT_CONFIG - Hardware configuration for devices currently attached
                      and installed on the computer.

HKEY_DYN_DATA       - System Monitor data for performance settings and
                      statistics.
It is good idea for applications to store version specific information in
the HKEY_LOCAL_MACHINE\SOFTWARE branch in this format:
SOFTWARE\Vendor\product\versionThe example code in this article shows one way to register an application name and version.
Win32s Registry
The Win32s Registry is limited to only one hive, HKEY_CLASSES_ROOT, and all keys are children of that hive. Any information placed in the Win32s Registry should be placed in a child key of HKEY_CLASSES_ROOT instead of HKEY_CLASSES_ROOT (used in Windows 95 and Windows NT).
Sample Code
The following code illustrate the ability to create a new registry key by using the Windows API RegCreateKeyEx() and to assign a value to that key by using RegSetValueEx. These 32bit functions are first prototyped using the DECLARE command; then they are available to be called directly. For more information, please search for DECLARE - DLL in the Help menu.
NOTE: Some constants are declared with definitions taken from the appropriate Microsoft Visual C++ header files.
* REGISTRY.PRG * This code writes information to the HKEY_LOCAL_MACHINE\SOFTWARE key. * It creates a key called MYAPPS, and a value name called AppName that * contains the value "SuperApp 1.0"
PUBLIC RESULT,DISPLAY RESULT=0 DISPLAY=0
#DEFINE HKEY_LOCAL_MACHINE 2147483650   && (HKEY) 0x80000002
#DEFINE SECURITY_ACCESS_MASK 983103     && SAM value KEY_ALL_ACCESS
DECLARE RegCreateKeyEx IN ADVAPI32.DLL; INTEGER,STRING,INTEGER,STRING,INTEGER,INTEGER,INTEGER,INTEGER @, INTEGER @ DECLARE RegSetValueEx IN ADVAPI32.DLL; INTEGER,STRING,INTEGER,INTEGER,STRING,INTEGER
?RegCreateKeyEx(HKEY_LOCAL_MACHINE,"SOFTWARE\MYAPPS",0,"REG_SZ",; 0,SECURITY_ACCESS_MASK,0,@RESULT,@DISPLAY) && Returns .T. if successful
?RESULT                                     && Returns the key handle
?DISPLAY                                    && Returns one of 2 values:
                                            && REG_CREATE_NEW_KEY = 1
                                            && REG_OPENED_EXISTING_KEY = 2
?RegSetValueEx(RESULT,"AppName",0,1,"SuperApp 1.0",13)
Notes
You can run the Registry Editor to see the registry interface and check that your key was created successfully in the HKEY_LOCAL_MACHINE\SOFTWARE section. In Windows NT, you can find it in the Winnt\System32\regedt32.exe directory. In Windows 95, you can find it in the Win95\Regedit.exe directory.
For more information, please see the Win32API Help file shipped with Visual FoxPro. Search for RegCreateKeyEx() and RegSetValueEx() as well as the Reg.h and Winnt.h header files to find some of the constant definitions used in the code. To remove these values, you can use the RegDeleteKey() and RegDeleteValue() functions.
Copyright ©
1996-97 Pro WEBDesign
/ Gustavo - webfox@cyberservices.com
All Rights Reserved
This Page was Launched on Thursday, November 28, 1996

Welcome to Programatica Systems's Internet Search Page
This page hosted by ![]() Get your own Free Home Page
Get your own Free Home Page