 Introduction
I - Creation and equipment of the characters
II - Villages
III - Objects and spells
IV - Puzzles... And maps!
1- Teluitr
2- Mirandor
3- Darendel
4- Zarach
5- Meresh
6- Morod-Alazul
7- Segolane
8- Balar-Duin
The End
INTRODUCTION
Many thanks to Jim Groom for the translation!
Version française ici.
Introduction
I - Creation and equipment of the characters
II - Villages
III - Objects and spells
IV - Puzzles... And maps!
1- Teluitr
2- Mirandor
3- Darendel
4- Zarach
5- Meresh
6- Morod-Alazul
7- Segolane
8- Balar-Duin
The End
INTRODUCTION
This game for the Oric had me holding my breath for several years: it is the continuing saga of Tyrann - "Tyrann 2: Amnukor's Blade". I am unaware if this game was a success, especially considering that it was released at the end of Oric's commercial life (which coincides with the end of Théoric, does it not?), but it deserved to be: it is no more or less than Dungeon Master for the Oric.
Here is a guide intended to help you if you wish to plunge yourselves into the underground worlds of the Land of the North, or to move on if you have become trapped there for an eternity... This guide cannot be perfect, as it is derived from notes & maps I made several years ago, but I have done my best to make sure that everything is correct.
Let us go, valiant adventurers, it is time to get under way!
Back to menu
I - Creation and equipment of the characters.
I recommend a team of the following type: 3 warriors (useful at the beginning), 2 magicians (essential throughout play), and 1 thief (to open the chests).
Try to obtain characters with a large amount of life and magic; the warriors can thus sometimes learn the spell Aseko before they start (one needs 40 in magic force). This spell is very useful when the team begins... Do not accept a character who has less than 13 lifepoints. A good magician at the beginning can have up to 52 in magic force, eliminate all those which have less than 48.
Now create some other characters, which will allow you:
- to make a rescue squad to go & recover the party (or its remnants) in the event of disaster,
- to obtain some more gold at beginning, the useless character giving their gold to another adventurer,
- to have a character which can store an object which an adventurer does not need at the moment, but may wish to keep for later on. (Characters have a limit of 8 objects each).
You can, if you create an excellent character, clone them by using the transfer function of the Utilities program. All you have to do is save your scenario, to select the adventurer to be cloned, and to transfer it to the scenario which has just been saved. One can advantageously benefit from this option by cloning a character who is very rich (by giving him the gold of the others), or who has interesting objects (magic objects, rare weapons...). It is therefore necessary to leave a little space in the character list and avoid creating too many useless characters, to allow these cloning operations. This is all part of good party management.
However, sometimes the message " impossible transfer " is displayed; I believe that this occurs from the moment that the sceptre is recovered. It can be wise therefore to not solve the first puzzle immediately, which gives you the aforesaid sceptre, but to start off by "fishing for magic objects", then cloning useful characters en masse, as their equipment will also be cloned. It is a little difficult, because the team is relatively weak when starting out, but the result is worth it (money and powerful equipment!).
Your characters will increase in level with each resolution of a puzzle, while progressing in the field of your choice (combat, magic or handling).
Otherwise, equip your heroes with as much protection as possible (helmets and clothing, generally a simple cape for the beginners...), carry a targe (very small shield) if you want, but I don't find it very useful. It is sad to say, but you will often begin with a ridiculous dirk for a weapon... Learn also the spells Aseko and Ypafet for all those who can. Always leave with some rope (nothing worse than to remain wedged at the bottom of a hole).
Back to menu
II. Villages
Nothing special to say, just some tips.
Sleeping within the tavern enables you to relearn your spells. The gambling game contains small a bug: when you bet on odd, you gain even if 5 comes up (it's a win for the bank normally); you thus have a better probability of gaining. The mage allows a character to rid himself of cursed items as these cannot be thrown away. The cost seems to be in relation with the magic power of the object, and can represent a fortune (into 4 figures...). Never use a negative figure when paying the mage, the game will crash. It is more tiresome but much more economical to look after the wounds of the party with your own spells than to visit the mage. When you travel, a star followed by points appears: it indicates the duration of your journey (one point = one day of travel).
Back to menu
III. Objects / Spells ************************************************
I will now quickly describe some of the more useful spells & objects.
Objects:
- The Flute: it makes it possible to cross walls facing you (as the spell Inoxat; both can be used to escape a pit without a rope, therefore...)
- The Oil Lamp: use it during combat. It contains Bokloom, a very powerful magic being who will join you for a while. It can learn the most powerful spells. That said, do not spend too much on equipment for him, because it will eventually leave you, taking any items with it.
- The Striking Glove: the ultimate weapon in my opinion, the Striking Glove attacks all your adversaries at the same time and causes a large amount of damage. A true bloodbath in the first levels. It is a good idea to use the utilities to make many of them as soon as you find one - each player must have one! Keep some ordinary weapons however, because certain monsters are unaffected by it.
- Swords: there are some swords which seem banal, but which have magic abilities (paralyse the adversary, etc). Therefore check the price that you get from the merchant for each sword you find, it is a good indication of any hidden ability.
- Magic Wand: seems to launch attack spells at random. Practical for the characters weak in magic. (I think the magic animal and the small bell may also work in a similar way).
- Feeler: allows you to see the contents of a chest without opening it. This item works in the same way as the spell, Hiso.
- Tools for Manipulation: to open the closed gates (like a crowbar, but more useful - lasts longer!).
- Special Case (Thieves toolkit): allows a character to open the chests more safely.
- Rings, necklaces & other collars: sometimes magic, sometimes cursed, sometimes just intended for selling. You will have to try them out. They can sometimes modify your characteristics, so back up the party before testing!
- The Sceptre: do not lose it, it is on this that you will have to fix The Iron to fight Nargaloth.
- Engraved Key: opens the gates to recover The Iron. It is also necessary to have solved all the puzzles beforehand...
- Compass: sometimes very useful. Red = North, Yellow = South, Green = West, Blue = East
- Board: allows you to cross a river without taking damage, and to keep your torch dry!
Certain objects require a character to be at a certain level in order to use them, it is the reason why sometimes you will not be able to have some of them. In addition, they can give an extra bonus to the character, with the result that only the player who has collected it will be able to make use of the item (he will not be able to give it to anyone else, but he will be able to drop it). It is important to note that objects wear out at varying rates, and certain monsters can steal them during fights. Lastly, be wary of the Kadeo Wand, it is supposed to give you your position in the labyrinth, but which seems quite whimsical.
Spells:
Your characters can memorize only 15 spells, and there are 30. Work out which characters will remain average or weak in magic, and these should learn all the basic spells (even the least useful), and those which will become strong in magic and will learn only the most essential spells! Caution: on arrival at a certain level, your characters will not be able to learn the weakest spells any more.
The essential spells in my opinion are: Aseko (First Aid), Ypafet (puts enemies to sleep), Sirul (antipoison), Okoy (paralysis), Kenit (antiparalysis), Mefuxo (rain of blades), Tenuh (silences your adversaries, who will not be able to launch any more spells), Inoxat (to pass through a wall), Oxales (antiillusions, when the labyrinth appears " impossible "), Xoluk (total heal, except for death), Zebat (mind attack), Lofis (teleportation), Teluk (resurrection), and Kerr (Word of Death - the ultimate attack). That makes 14!
Other spells are quite practical: Kadeo (indicates the position of the team, but useless when one has a map :-)), Kempy (ball of fire, for beginners in magic), Hiso (see the contents of a trunk, for beginner also), and all collective spells of attack or defense.
The most useless spells are: Nixis, Madek, Subeli (spells of improved vision), Sigam (evaluation of adversary. Myself, I do not evaluate them, I just fight them anyway! ;-))...
Back to menu
IV - Puzzles... And maps!
The basis of this game is to solve a series of puzzles in order to find the Iron of Amnukor, which, once assembled with the sceptre of Tyrann, will constitute the only weapon that can be used to fight the Chaotic Nargaloth, incarnation of Volgor the Cursed One (TERRIBLY cursed, not beautiful, the hideous one, etc!), who threatens our beautiful land.
The puzzles are as follows: "When the sacred fire has found its hearth, when Miriath can see its growing son at its side, when the sword of Volgor is held up in front of its effigy, when Eomir plays with the wind of Manoriath, when the jewel of siren gleams on the water, when Galeoth makes his forest sing... Each puzzle solved will open a gate of Ered Alendil."
Each problem involves 2 different cities. Here is what the cities contain:
Telutir: Sacred Fire, Sceptre (where the Iron is to be placed), and the engraved key (to open the gates of Ered Alendil)
Mirandor: Hearth of the Sacred Fire, and Eomir
Darendel: Tower of the Winds, sword of Volgor
Zarach: Heir to Miriath (a seed), statue of Volgor and... Nargaloth itself, for the final combat!
Meresh: The Miriath patriarch, Ocean Pearl
Morod-Alazul: The Iron of Amnukor... behind the gates of Ered Alendil
Segolane: Galeoth living crystal (in several specimens!), cliffs of Erel Goron (for the pearl)
Balar-Duin: Place of the living crystal here (crystal forest).
For the maps, a commentary and legend will help you. "T" shows the traps and not the treasures; in the same way, "C" shows the chests and not a combat, do not be misled! The "S" are there for special notes (messages, etc), some are missed out in my maps. I did not indicate all the closed gates (on my maps); they should be opened with the "tools for manipulation" or a crowbar (except the gates of Ered Alendil). Moreover, gates opening in one direction can be closed in the other. For the pits, the use of a rope enables you to pass through the wall which you face, with the result that in a hole, you can go out any side, wall or not.
There are also "false walls", or "secrete ways": in fact invisible walls appear once you have crossed them, preventing you from going back. There are also gates which are passable only in one direction. On the map, I could have labelled all these separately, but the result is the same.
Each map is made up of 20 rows & 20 columns, numbered from 0 to 19. This classification is generally easy to transcribe for the first levels (the staircase is at 0,0, etc), but is more difficult thereafter, therefore forgive me if they are not always displayed. Note that you cannot teleport to the resolution of a puzzle.
Ah yes, I must draw your attention to the wandering monsters: if you remain still without moving for too long a time, they will come to attack you (their speed increases with the levels). The solution to this is to make a camp with each pause. Finally, note that when you change village, all the monsters and chests will have reappeared, even if you had cleared the level before.
Onwards then & happy hunting!
At this point I would like to thank Fabrice Francès for having sent the game in cassette image format to me for the Euphoric emulator. Thank you also for the Dump/Restore facility of Euphoric, which makes it possible (with an editor) to create quasi-invincible characters... But I will not divulge the details of this, because the interest of the game would be greatly reduced! Thank you also, of course, to the authors of this wonder...
Thank you also to Romain and François-Xavier for the time devoted to this game and the drawing of the maps, and to Jim Groom for the English translation of this guide...
(This article has been published in the French CEO-Mag 75-76 and 77)
Back to menu
1- Teluitr
 Telutir is the first village & the easiest. It is wise to start here. You will have to recover the Sacred Fire (with a torch to be found at the village), which will give you the sceptre at the same time. Note that a series of serious combats awaits you. Equip your team with several ropes, because you will have to fall into a hole to reach the room of Fire (and to get out again!). Recover also the key of Lorimel, although it is useful only at the end of the game.
2- Mirandor
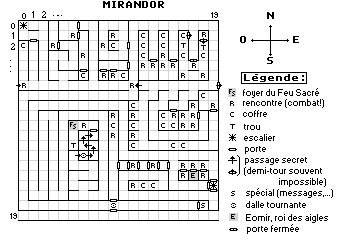 At Mirandor, equip your team with a compass and a rope, to carry the Sacred Fire to its hearth (you will have to fall into the hole to get back up). Seek Eomir, the king of the eagles, but be careful with fights. The 2nd staircase is very useful. Note that you always go back into the dungeon via the last used staircase. On the revolving flagstones, use the compass to locate your position. A small curiosity exists on this level, note the corridor without end in the bottom of the map.
3- Darendel
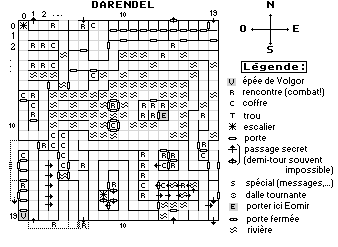 This village is beside a marsh, hello to the boards! (they will prevent you getting wet). You will find here the first monsters insensitive to magic. The secret way in 15-01 will give you access to most of the labyrinth. You can use the staircase into 08-17 without fear of becoming trapped, the half-turn is possible with the secret ways in this corner. Release Eomir at its Nest, and then seek the sword of Volgor. The map starts to become complicated: it is not locked up neatly into a square anymore, therefore map should be imagined to be wrap-around at the edges (if you go off the bottom, you reappear at the top). I have put dotted lines to help you, but I will not do it any more on the following cards.
4- Zarach
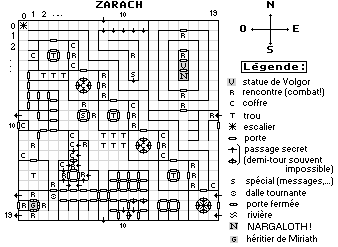 Above all, avoid the staircase at 18-18, as it is a trap (unless you can cross the walls): the walls trap you every time you descend. You are then obliged to leave the village then return to explore further. In the same way, avoid crossing the " gates " towards 06-06 and 12-12. In 03-03 and 09-09, you could use a rope to get out, but why go there? The Inoxat spell is thus strongly recommended from now on, especially if you want to venture into the maze of gates in the south... Use the Sword of Volgor in front of its effigy, and take the Heir to Miriath (a seed). It is useless to try & fight Nargaloth without The Iron, you should only flee. If you have it, it is here that the quest finishes: you will be able to fight Nargaloth with all your weapons, and not only with The Iron. (Phew!)
5- Meresh
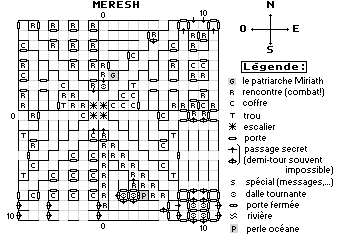 It now becomes very complicated. You start with the staircase at 0-0. I hope that you have a compass, because it is easy to become lost in Meresh with its quasi symmetrical drawing. Moreover, there are some dodgy flagstones. Ignore any messages of the type " turn left ", it may or may not be true. Do not forget your tools for manipulation because many of the gates are closed, like those where you will find the pearl, when you want to leave... Take the seed to the roots of the Miriath patriarch, and take the Ocean Pearl. Try to avoid the fights which start to become serious...
6- Morod-Alazul
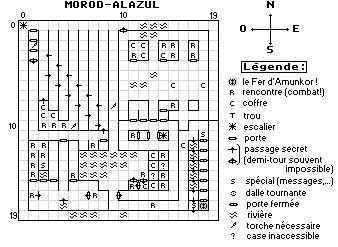 No puzzle here: this village contains only The Iron. A torch (and a lighter!) will be necessary. I tried to note the places where the darkness starts (with a torch), but they seem variable, so do not trust them too much. Inoxat, Lofis and the flutes are often inoperative in this labyrinth; 2 areas seem inaccessible (14-14 and 13-15), I tried to cheat, but in vain... If you have succeeded with the 6 puzzles, you will be able to open all the gates of Ered-Alendil with the engraved key & be able to get the Iron. Assemble it with the sceptre, and head for Zarach! A message which I will remember a long time is found in 02-14, after 6 difficult combats:
" You've been through some hard times to get here, but there is nothing to find! "...
No puzzle here: this village contains only The Iron. A torch (and a lighter!) will be necessary. I tried to note the places where the darkness starts (with a torch), but they seem variable, so do not trust them too much. Inoxat, Lofis and the flutes are often inoperative in this labyrinth; 2 areas seem inaccessible (14-14 and 13-15), I tried to cheat, but in vain... If you have succeeded with the 6 puzzles, you will be able to open all the gates of Ered-Alendil with the engraved key & be able to get the Iron. Assemble it with the sceptre, and head for Zarach! A message which I will remember a long time is found in 02-14, after 6 difficult combats:
" You've been through some hard times to get here, but there is nothing to find! "...
7- Segolane
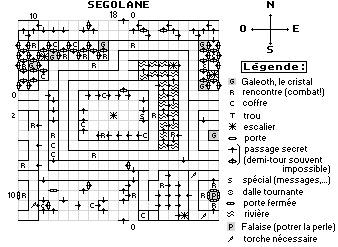 The ultimate horror. To hope to explore Segolane it is necessary to learn the spells Oxales and Inoxat. The underground rooms are peppered with doors and magic walls which appear behind you, and if you do not cast Oxales as soon as you can, each crossing of a door will randomly teleport you in the labyrinth... You'll also need a torch and lighter here. Note that the starting staircase is not at 0-0, but at 18-02. Carry the pearl to the Cliffs of Erel-Goron, but note: the doors will be closed on your return. Only the engraved key of Lorimel or Inoxat will enable you to pass. Take Galeoth (a crystal); any, only one is needed. I'm sorry if the map sometimes appears to not correspond with what you see: it is not easy to make a good map of the doors and magic walls.
8- Balar-Duin
 Balar-Duin is a ghost-town... You will realize that at the beginning when you fall inside, and lose up to 15 points of life! The walls are replaced here by false doors. The staircases, once again, are not into 0-0, and you do not even start, at the time of your first descent, within sight of one of them, but into 10-09. Curiously, it is not necessary to have a rope to escape the pits of Balar-Duin... But if you use one anyway, you will be able to cross a closed wall. Torch, lighter, & tools for manipulation are useful here, like Lofis or Inoxat if you wish to visit all of the labyrinth... But the most important place is accessible normally: the place of the crystal, in 06-03. Now, return to seek the Iron of Amnukor at Morod-Alazul!
Here, I hope to have helped you to finish this quest. A last tip: when your heroes have a large amount of charisma, do not hesitate to speak to the enemies, some will join you, thus you will be seven strong! (it is rather effective with Triogres, which, according to the manual will fight who they are told to!).
You will note that at the end of the game, a backup is carried out automatically. It would appear therefore that the authors had envisaged a third chapter... So if somebody one day finds Matthias Wystrach or Rémy Gosselin, then please ask them about it!
Contact me if you have any question: Simon Guyart,symoonmyself@hotmail.com