Introduction
SprintPCS, a cell phone provider in the US, is now offering wireless web access for use with the newer wireless web phones. Below is a description of how I connected my Palm V (running OS 3.3) to my dual-band TouchPoint (dTP) phone for connection with my Internet Provider. Although my description is for a Palm V setup, you can use a similar setup for other Palm devices (Palm III, IIIx, etc.) and possibly with other wireless web capable phones.
Note: If you have a Wireless
Web (WW) capable SprintPCS phone, then you should already have access to
Sprint's WW service. There are two different ways Sprint will bill
you for using their WW service:
- You can sign up for the WW plan which costs $9.99 per month for 50 WW minutes and 50 text messages. If you go over the 50 WW minutes in a single billing cycle, you will then be charged 39 cents for each additional minute. You can also stack multiple 50 WW minute increments (e.g., I pay $19.98 per month for 100 WW minutes and 100 text messages).
- If you do not sign up for a WW plan, then you will be charged 39 cents per minute for each WW minute used.
- Note:
I was informed by a person via email that you need to sign up for a Wireless
Web billing plan before the dialout modem points will be given authorization
to let your phone dial out of them.
For additional information on
pricing, see Sprint's web site: http://www.sprintpcs.com/wireless/pricing.html
Problems
connecting to certain ISPs - I have heard
from several users that they cannot connect to the internet using their
SprintPCS phone and their specific Internet Service Provider (ISP).
The problem is that several ISPs are using modems with V.90 X2 protocol,
which is incompatible with SprintPCS's bank of modems. The solution
to this problem is to use a dialup access phone number which does not
use V.90 X2 (usually the 33Kb speed or less modems using V34 protocol).
Check with your ISP on this situation. I have been told that mindspring.com
users should use the 33Kb or less dialup access phone numbers listed on
the netcom.com
web site (MindSpring and NetCom merged together last year). ![]() [update
5-25-00] Someone relayed to me that the requirement of using a 33kb dialup
phone number for MindSpring has been fixed. You should be able to
use any of the dialup numbers.
[update
5-25-00] Someone relayed to me that the requirement of using a 33kb dialup
phone number for MindSpring has been fixed. You should be able to
use any of the dialup numbers.
Hardware setup
First, you need to buy a cable specially designed for data transfer from your dTP to a 9-pin serial connector. The SprintPCS web site sells such a "Connnectivity Kit" (between $99 and $299 US!) which contains a cable for your dTP phone and a null modem adapter, but a cheaper alternative is to buy the cable from PhoneEssentials for $27. If you choose to use a PhoneEssential cable, then You will also need a 9-pin male-to-male null modem adapter which you can buy at most electronic stores (e.g., Radio Shack, Fry's Electronics) or you can make your own (see my instructions).
Note: the Null modem adapter is not mearly a straight-thru adapter or gender changer, but a special adapter which has the send and receive signal wires switched. Make sure you buy a true "Null Modem Adapter".
Connect up the hardware as shown in Figure 1.
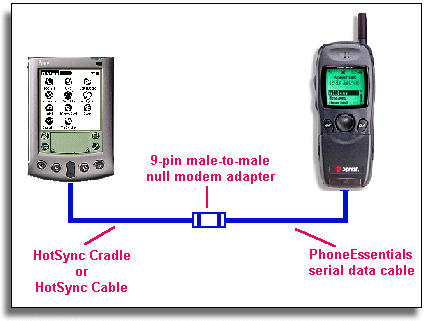
Figure 1
Hardware setup
The nice thing about this setup, is that you don't need a Palm modem! If you plan to use a HotSync Cable instead of the HotSync Cradle, then make sure you use a Palm V HotSync Cable with your Palm V device (The Palm III HotSync Cable has a different connector which will not fit the Palm V). If you really want to use a Palm III HotSync Cable with your Palm V, you will need to use the "Bridge" adapter.
If you can't find a Palm V hotsync cable or don't want to lug around a Hotsync cradle, you can follow my instructions and build your own Palm V modem cable. Since this is a true modem cable, you won't need to use the null modem adapter!
Configuring the dTP phone for data transfer
To use the data transfer capability of your dTP phone, you need follow the menu path below to activate data mode:
Setup -> Data/Fax (in) -> Incoming dataNote, the connectivity cable needs to be attached to the phone to be able to select the "Incoming Data" setting. If you disconnect the cable, the dTP phone will automatically go back to voice receive mode.
Configuring Palm "Connection" Settings
Once you've connected your dTP phone to your Palm, you need to configure the connection settings on you Palm. This is done under the "Prefs" app on your Palm. Once you have started the "Prefs" app, select "Connection" using the dropdown list in the upper-right corner of the Palm screen. You should see a screen similar to Figure 1.
Tap on the "New" button to configure a new connection device, and enter the information as shown in Figure 2. Next, tap on the "Details..." button to bring up the form shown in Figure 3, and set the connection speed to 19,200 baud (Currently, the SprintPCS wireless web has a maximum data rate of 14,400 baud). Tap "OK" to save and exit from the connections setup.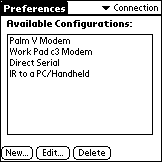
Figure 1
Connection settings in the "Prefs" app
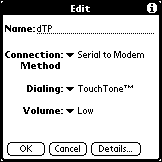
Figure 2
|
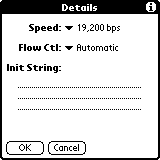
Figure 3
|
Configuring Palm "Network" Settings
![]() Using SprintPCS and the wireless web option, there are two ways to making a
connection to the internet: (1) SprintPCS Quick Net Connection (QNC), (2)
Standard ISP dialup. The QNC method allows you to make a quick connection to the
internet without the need for an ISP dialup number. This is convenient since you
won't need to find a ISP local phone number when out of town! For details, check
out this web page: http://www.geocities.com/bobstro/sprint_pcs_qnc.htm
Using SprintPCS and the wireless web option, there are two ways to making a
connection to the internet: (1) SprintPCS Quick Net Connection (QNC), (2)
Standard ISP dialup. The QNC method allows you to make a quick connection to the
internet without the need for an ISP dialup number. This is convenient since you
won't need to find a ISP local phone number when out of town! For details, check
out this web page: http://www.geocities.com/bobstro/sprint_pcs_qnc.htm
The following describes how to make an ISP connection using the standard dialup method:
To make a connection to your ISP, you need to configure your Palm's Network settings. From the "Prefs" app, select Network from the dropdown list in the upper-right corner of the Palm screen. You should see a screen similar to Figure 4.
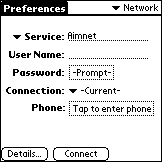
Figure 4
Network settings in "Prefs" appThis is where you will specify your ISP dialup phone number, login name and password, etc. As an example, we will use the following information about a fictitious ISP to illustrate how to enter the necessary data for Internet dialup connection.
ISP: davenetStart by filling in the info as shown in Figure 5. Next, tap on the "Details..." button, which should bring up the screen shown in Figure 6, which is the default settings. In most cases, you will not need to modify this screen.
Connection type: Point-to-Point Protocol (PPP)
Local PPP dialup phone number: 968-1111
User name: Pdave
Password: doggie9
Primary DNS: 201.11.11.2
Secondary DNS: 201.11.11.3
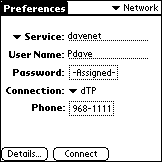
Figure 5
Example Network setup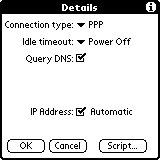
Figure 6
Example details Network setup (Default)If you know the IP Addresses for the Domain Name Servers (DNS) on your ISP, you can enter them as shown in Figure 7. This can usually speed up login connection.
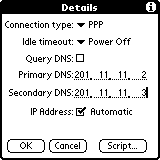
Figure 7
Example DNS entry in Network setupThis should be sufficient for making a PPP connection to your ISP. In some cases, you will need to make some entries in under the "Script..." screen to specify when to send the login name, password, etc.
Now, to actually make the PPP connection with your ISP, you will go back to the Network screen shown in Figure 6 and tap the "Connect" button. Your Palm should then dial the specified phone number and make your connection!
Note: When you're Palm device is dialing the access number, you won't hear anything from your Touchpoint phone (no scretching modem connect sounds as with some external modems). The display on your Touchpoint phone should look like Figure 8.
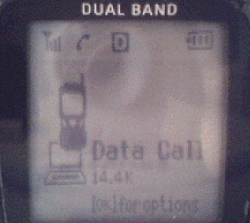
Figure 8
Touchpoint display during connectionOnce you make a PPP connection, you will see a small vertical line flashing in the upper right corner of your Palm display (Figure 9). When you disconnect your PPP connection (by either turning off your Pilot or tapping the "Disconnect" button in the Prefs - Network screen) the flashing vertical line should disappear.
Configuring "Network" settings which require a login script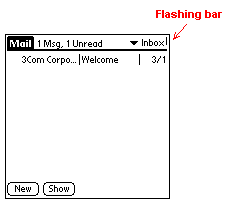
Figure 9
Flashing vertical bar indicates network connectionIn some cases, it will be necessary to create a login in script on your Pilot to connect with your ISP. For example:
Your company has a secured Network, and to login you must use a "SecureID Card". This card will generate a random numeric password based on the PIN number you punch in and the current date/time. Because this password will always be different when you login, your Pilot must wait at the proper moment during the login sequence and prompt you for the password. Also, after you enter your login name and password, your company's login procedure allows you select from 3 different types of connection, so you must answer with the proper selection to make the necessary PPP connection.
The best thing to do is use Win95/98's HyperTerminal program to determine the ASCII text strings your company's server sends you during initial login. The text listed below illustrates what you might see for the example described previously:
atAfter you select the "TCP/IP via PPP" option, you should see some garbage text scrolling across the display. At this point, exit the HyperTerminal program. Using the text above, you should be able to create the necessary login script on your Pilot to make a successful login connection.
OK
atdt 1-111-523-6643
CONNECT 14400====================================
| XYZ Company Dial in server |
| Authorized access only |
====================================Access Verification
Username: smith
Enter PASSWORD CODE: *******
PASSWORD CODE AcceptedWelcome to XYZ Company Server
Enter a selection:
1 VT Terminal Emulation
2 TCP/IP via SLIP
3 TCP/IP via PPP
4 Exit menuSelection: 3
Your IP address is 111.22.33.45
~ }#À!}!º} }4}"}&} }*} } }%}&Ò¥õ}'}"
After you setup your Network dialup phone number and DNS (as illustrated in Figures 5 thru 7), tap the "Script..." button shown in Figure 7. This will bring up the script window shown in Figure 10. You can then use your stylus to make the appropriate entries as shown in Figure 11 for the example problem.

Figure 10
Blank login script screen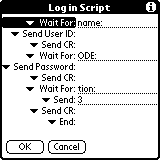
Figure 11
Login script for example problemIn this login script, the following sequence happens:
- Once dialed into the Server, the Pilot waits for a "name:" prompt to be sent from the server. It then sends the username specified in the screen shown in Figure 6, followed by a carriage return character.
- Next, the Pilot waits for a "ODE:" string from the server, after which, it trys to send the password string specified in the screen shown in Figure 6. Since this password is set for "-Prompt-", the Pilot will pop up a dialog box asking for the password you want to send to the server (Figure 12). If you are using a SecureID card, here is where you put in the generated numeric password. After you enter the password, the Pilot will send it followed by another carriage return character.
- The Pilot then waits for a "tion:" string, and then automatically send a "3" as the response followed by another carriage return character.
- The Pilot should then finish the login procedure by showing the "Signing on" screen (Figure 13) and you should then have the flashing bar as illustrated in Figure 8.
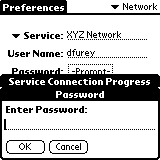
Figure 12
Password screen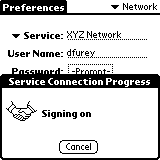
Figure 13
Signing on screenFrom this point, you can use various Palm applications for typical Internet activities, (e.g., read/send emails, read newsgroups, sync with AvantGo pages, telnet to UNIX machines, web browse, etc.).
If you don't have a ISP dialup account, you might consider signing up with a Free ISP and follow my instruction on how to use them with your Palm.