[fig 1]
Part 1. Preparing the Image
1. Start off by opening the photo or art you want to display. I am using an image from the Photoshop 4 CD for this example. It is in the stock art folder photoess>lo-res>flowers.tiff.
2. Set your background color to the color of the page you want to place the image on. If it is a non standard color, you will need to open the image and use the eye dropper tool to select it. I will be using white ..
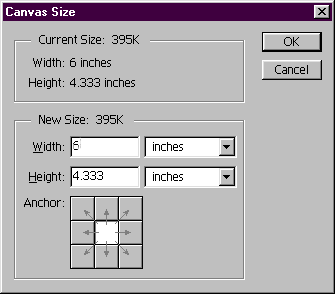
3. Now choose Image>canvas size. Leave the anchor set to middle, and enlarge the width and height by 1 inch each. [ fig.1]

[fig 1]
4. You can use any shape you like, or leave the image in a rectangle and apply the effects to the edges. I will use an elliptical selection for this tutorial.. Click on the elliptical marquee tool and draw an ellipse right inside the image. Make sure none of the background color is included within the selection as illustrated in [ fig 2.]

[Fig 2]
5. Feather the selection by 5 pixels and invert it . . Press delete to fill the rest of the background with white or your background color . you should have something now that looks like a white vignette around the image.
6. Now invert the selection so the oval image is selected, and contract the selection by 5 pixels. [select>modify>contract ] . Feather by 5 pixels and invert again, to select only the white surrounding the image. The feathered pixels will be the area where the effect is applied. The image is now prepared for you to apply the filters to create the edge effects. You may want to duplicate your image at this point, and keep a copy open and minimized if you want to do more than 1 effect.