 .....
.....
Hobbycrafts Workshop
.....
The Saban Bears
Artwork By H Saban
Legend has it that the teddy bear was in 1902 first identified with the incident when the US President Theodore Roosevelt refused to shoot a bear planned as a trophy for his hunting trip. The bear in time became known as Teddy's bear and was popularised by the first bear-making manufacturer- the Ideal Novelty & Toy Company. In Germany Richard & Margaret Steiff were said to have made the first movable teddies at about the same time that Berryman published his cartoon of President Roosevelt and his bear on the front page of the Washington Post. Antique and new teddies are now sold under such brand names of manufacturers like Bing, Chad Valley, Merrythought, Dean's, Hermann and Schuco.
In the 1980s artists' bears became established as bear-making became popular with home-crafters. Artists' bears are characterised by the innovative features introduced so that each bear is individually unique. Such bears are ideally fully handstitched and woven Mohair and glass eyes are used.
Teddies are not only collected but given away as mascots and as symbols of care and concern people have for each other - for children and adults alike. As masccots teddies are known for the therapeautic effect they have on people who are affected by their forelorn looks and cuddly appeal. Safety items like plastic eyes and plastic joints are used for children's toy bears. The market for antique and collectors' teddies are such that these teddies are items which are auctioned off at commercial houses like Christie's and Sotheby's. Teddies are also offered at public and private events and functions where funds are raised for charities. Teddy clubs are launched worldwide. The first Great Teddy Bear Rally was launched in 1979 - organised by the group called Good Bears of the World.
 Making
Collector's Teddy Bears
Making
Collector's Teddy Bears Materials Required
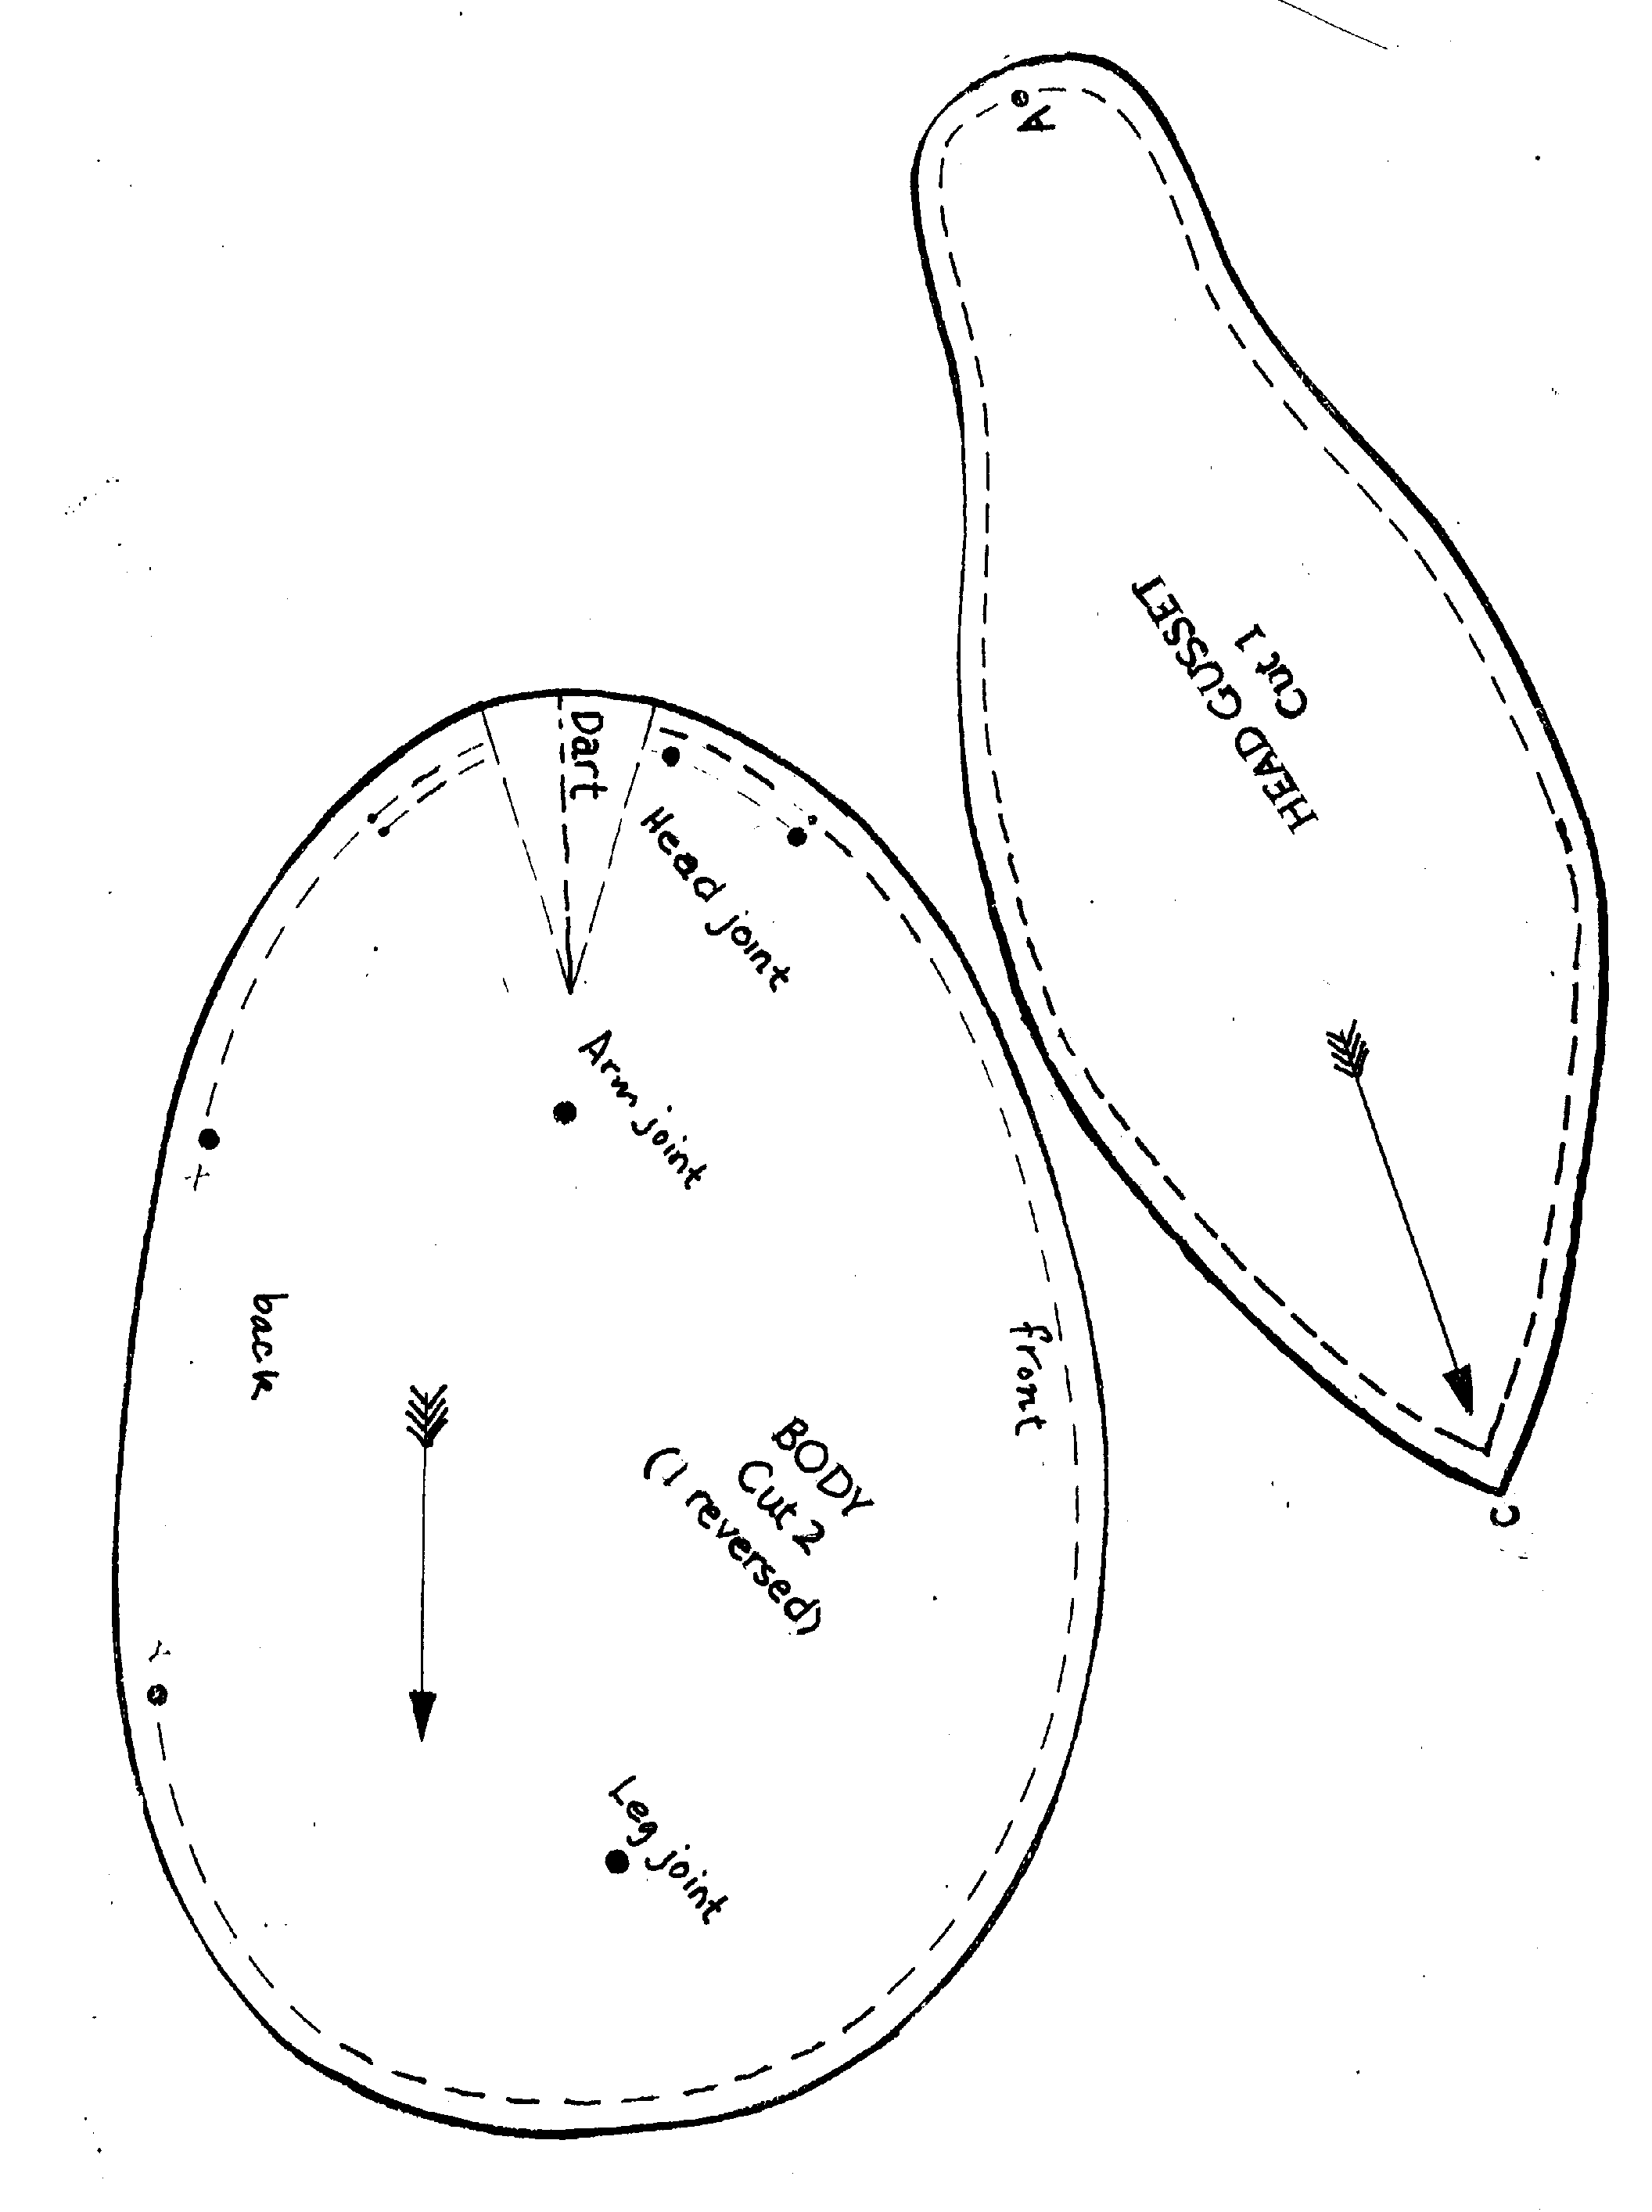
This pattern is for a 12" bear (representation based on an A4 size paper). About a quarter of a metre of fur material is required. You may enlarge or reduce the pattern by photostating it to the desired size.
1) _ _ _ _these dashes indicate the sewing line.
2)-------> the arrows indicate the direction of the fabric parallel to the selvedge. The arrow heads point to the direction the pieces should follow, ie along the flow of the fur fabric not against the flow.
3) the alphabets indicate where each set of 2 matching pieces are to be placed so that A should be place on A, B on B and so on.
4) the thick outer line is the cutting line.
5) Joints may be screw joints, pop rivets or those with cotter pins. The instructions given below refer to the use of the screw joints.
6) Pads may be in felt, suedette, suede or leather.


Instructions
in Brief
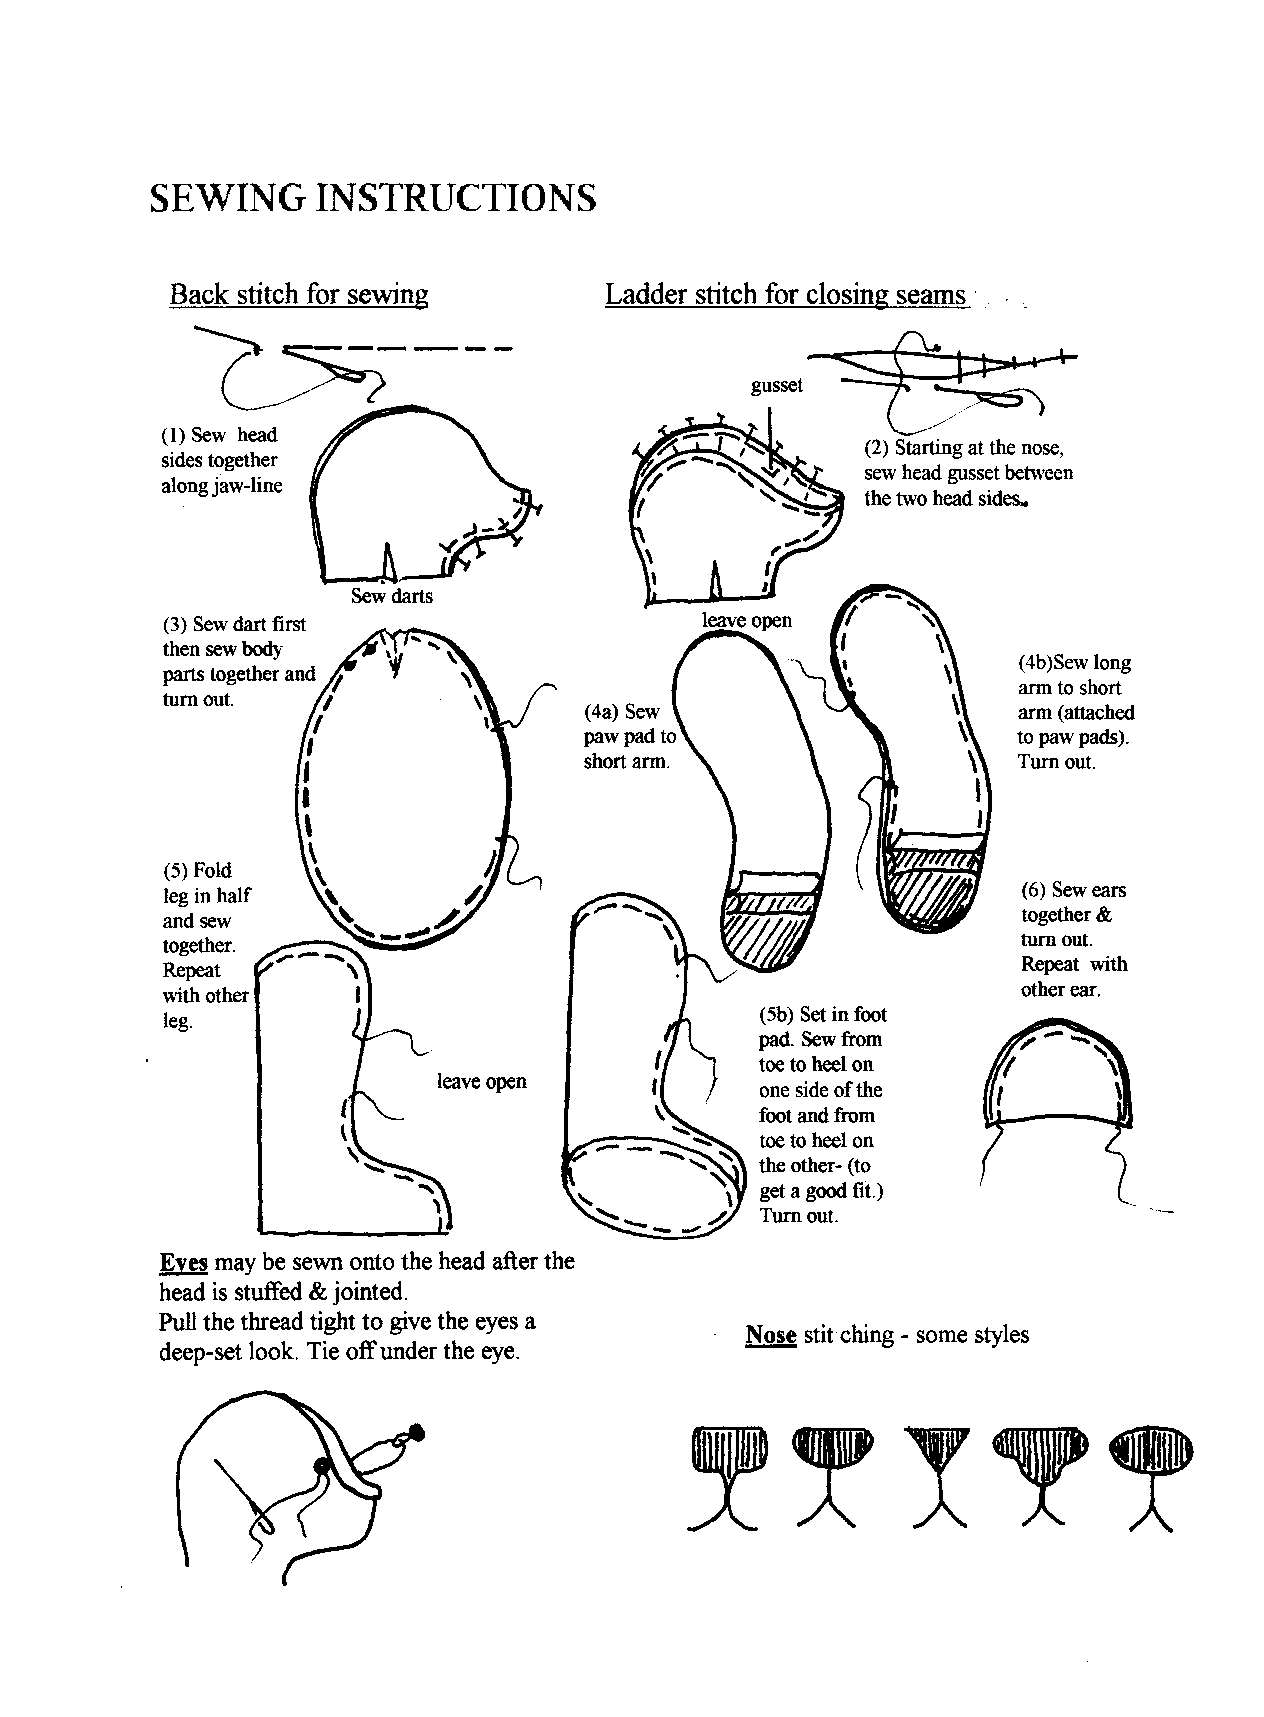
1) Cut out the number of pieces of each part of the bear as indicated on the pattern - eg. two pieces for the head and one for the head gusset.
2) The two matching pieces for the head are placed right sides together with the head gusset eased into place from the tip of the nose (marked A) to the base of the neck (marked B). Put in place using pins, as shown in the illustration. Sew up the three pieces (using back stitch) along the sewing line but leave the base of the neck open for stuffing and for the joint to be inserted here. Turn out the piece inside out.
3) The two body pieces are placed right sides together, front to front and back to back. Sew up leaving an opening at the back for stuffing. Turn out the finished piece inside out.
4) Pin and sew up the short arm to the pad, then place the finished piece to the long arm right sides together. Pin and sew up along the sewing line leaving the opening for stuffing as indicated on the pattern. Turn out the piece.
5) Fold the leg piece along the centre, sew along the sewing line, but leave an opening on the side of the leg for stuffing. Do not sew up the base of the foot; instead place the pad at this opening. Pin up the pad as shown in the illustration and sew all round. When done, turn out the piece so that the right side out.
6) When all the pieces are sewn up stuff the head as firmly as possible. Place the head joint through the opening at the base of the head. Tack along the opening at the base of the neck after the joint has been inserted and pull the string tight to close the opening. Tie up, attach the head to the body pieces (which are already sewn together) and tighten the nut.
7)Put in the joints for the limbs at the places indicated on the pattern. Use awl or any sharp pointed instrument to make a hole large enough for the scew end to pass through. All the screw ends should point inwards towards the body. All the joints should be put in place quite tightly as they will loosen up later after the stuffing.
8) Stuff the body and the limbs after the joints are all in place. Sew up the openings (using ladder stitch), fix the eyes (see illustration) and ears and embroider the nose and mouth. You are now ready to name your bear.
List
of Some Local Teddy Supplies Shops
For
mail order bear patterns and
illustrated note cards (specialty
bear cards) contact Sagittarius (address & fax number given below)
for pamphlet and price list. The illustrations reproduced below are same
samples of the original artwork for the notecards.
 .Family
Bears
.Family
Bears
. Gemini Bears
 Country Bears
All pictures -Copyright of Sagittarius Holdings Pte Ltd.
Fax: (65) 3370846
Books
on bear-making
The Art of Making Teddy Bears by Jennifer Liang- Sally Milner Publishing, Australia.
Making Adorable Teddy Bears by Anita Louise Crane, Sterling Publishing Co Inc, New York.
Creating Heirloom Teddy Bears by Linda Mullins, Hobby House Press Inc. Grantsville, Maryland.
Bear
activities
Activities connected with bear making are:
Email
You may email us on any comments or suggestions at : hsh17@singnet.com.sg