|
Tip supplied
by Rick Nelson
(Spamola)
 Open a new RGB image. Type your text in black on a new layer. In the
 channels palette, drag one of the channels to the "new channel" icon.
This will create channel 4, which looks identical to the other channels.
That's okay. channels palette, drag one of the channels to the "new channel" icon.
This will create channel 4, which looks identical to the other channels.
That's okay.
Duplicate channel 4. Now you have channel 5. Run a gaussian blur over it.
The amount of blur is dependant on the size of your image. For this 200x200
image, I used a blur of 2 pixels
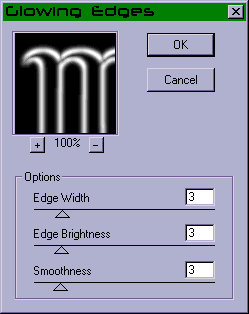
Use the stylize/glowing edges filter on the channel. Make it look similar to the
edges in the image below
Create a new layer and fill it with 50% gray (edit/fill). You'll be using
the
"lighting effects" filter to create the stamped look. If
you haven't worked much with lighting effects, don't get frustrated and
give up. Once you learn how to use it, you'll find it is one of the most
useful filters for all kinds of text effects.
For this effect, I used two spotlights, yellow and a blue. Create a blue
spotlight shining
down from the upper left. When you get it looking about right, hold the
alt/opt key and click on the blue dot in the middle of the light. This
will duplicate the light. Make your new light yellow and move it a few
pixels away from the blue one. Slightly change the angle of the yellow
light until the image is bathed in a medium white light with blue and yellow
around the edges. For the light type and properties, I used the following
settings
Intensity:
100
Focus: 50
Gloss: 100 (shiny)
Material: -100 (plastic)
Exposure: 0
Ambience: -50
Texture Channel: #5
White is high

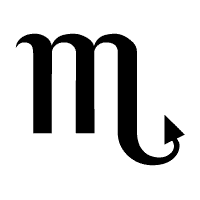
The next step is to tweak the background. Pay close attention here.
To more or
less isolate
the text from the background, go back to the channels
palette and select # 5. Use select/new selection/channel 4 and invert
the selection (ctrl/cmd+shift+i). Fill the selection with white then
deselect (ctrl/cmd+d), and invert the channel (ctrl/cmd+i).

Now, go back to the layer you were working on (should be layer 3) and
load channel 5
as a new selection. You'll probably have to contract it
by a few pixels to get it just right (select/modify/contract). The sky
is the limit for the background texture. I used filter/texture/grain with
an intensity of 20, a contrast of 10, and a horizontal grain type to get
the finished product below.

Good
luck!
|

