The piston bearing aactually goes onto the piston from above so this picture is in serious error. It implies that the piston bottom could fit through the opening in the piston bearing. Of course, it cannot. So I have constructed a picture showing the piston inside the bearing.
I cannot understand how the strut works. Here is what I mean.
The two scrappers are the only thing that keep the air from going above the piston shaft. Is the metal fitting so close that no air gets above the end of the piston??
There are 800 lbs of pressure below the piston and the weight of the plane sits on the top of the piston all of the time. It would only take a tiny leak to let air get on top of the piston. There must be some way for air above to be recycled back down below the piston.
Main gear strut inflation on the SF260.
The SF260 is blessed with a trailing link strut. This makes operation out of an unimproved field very smooth.
However, it does have its drawbacks. Proper servicing of the struts is an art that most people are too lazy to
undertake. I say lazy because care of the strut is quite simple.
I frequently find a SF-260 sitting on the ramp that looks too level. Closer examination reveals that both main gear
struts are over inflated. Pressing on the wing tip will not depress the wing. The major disadvantage is that it has
inactivated the squat switch. However, a more subtle problem exists. Although the strut pressure should be 880 lb.,
once the struts are over inflated the pressure could be 1,000 to 2,000 lb.. This will place a dangerous pressure on the
O rings and seals. Proper operation of the landing gear struts require that the struts contain the proper amount of
hydraulic fluid and the proper nitrogen or air pressure. Unless you have a hydraulic pump to put fluid in the struts
you must use a more time consuming method. This consists of putting the plane on jacks and securing the tail hook
on the plane. Then jack the plane to barely get the wheels off the ground. The Shrader valves are a little complex at
first. First disconnect the gear doors and secure them out of the way. Next you bleed the air out of one strut. Turn
the Shrader valve in a counter clockwise direction for 1/8 of a turn and it suddenly become lose. Then turn until the
pressure starts to release. Then release the jack to compress the strut. As the gear collapses fluid will finally start to
come out. At this point connect the container with hydraulic fluid in it. The hydraulic fluid will be forced into the
container. When the gear is totally collapsed mark the height. Next fill the strut with fluid. This requires putting the
container under pressure and jacking up the plane. You will have to repeat this step several times before the strut is
completely filled with fluid. Now tighten up the Shrader valve and let the plane sit for an hour. During this time you
can service the other strut. After an hour return to the first strut and let fluid out until the strut is 2” above the
original bottom position. Close off the Shrader valve and then fill the strut with Nitrogen. Usually 880 lb. will get a
95% extension of the strut. Repeat on the second side and then measure the height of the wing tip tanks from the
ground. To even them up we suggest bleeding the high side. Now press on a wing and let it go. If it bangs when it
fully extends there is not enough fluid in the struts. Then if all else fails, read the directions.
Personal experiences. When I first took delivery of my SF260 the right gear was very low. The pressure regulator at
out airport only went to 600 lb. so we had to remove the regulator and hook the supply tube directly to the tank. We would crack the tank until the strut extended.
Unfortunately we compressed the strut without removing the gear door so we cracked the gear door. Then we
overinflated the strut. It was only up to 1,300 lb. but pressing on the wing tip was like pressing on the ground. There
was absolutely no give to the strut. Then, when I finally got the pressure balanced and would taxi out the plane would
shift from one side high to the other side high. This was only corrected when enough hydraulic fluid was added to the
strut. It has been a long hard road, but the irony is that when I try to enlighten another SF260 owner, my advice falls
on deaf ears. People can only understand what they already know and if they have been running around with their
gear overinflated they refuse to believe that there is any other way to do it.
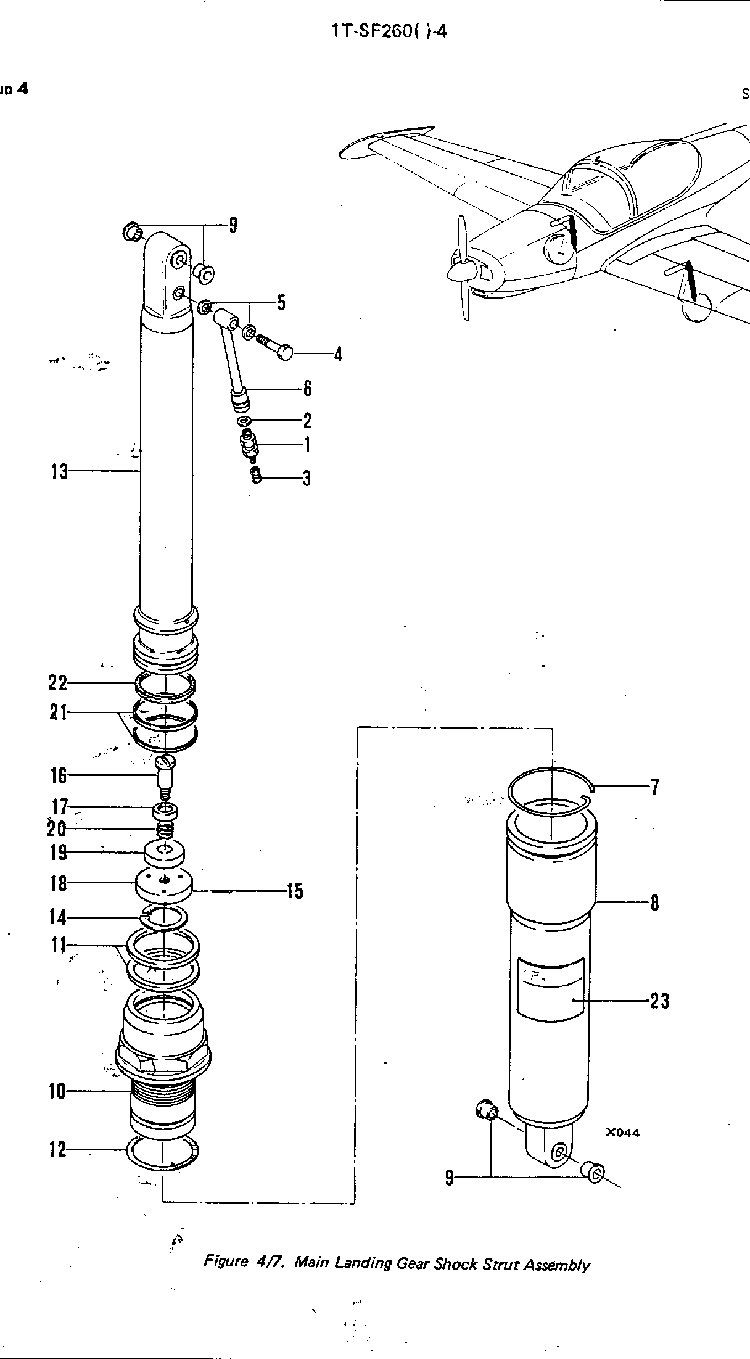
When I added fluid to my shock strut assembly grey fluid returned from the shock. I tried to flush it out with no success so we took it apart. Look at the picture below and especially at the retaining ring #7. This must be removed before removing the piston bearing. There is a hole drilled through the cylinder #8 into the piston bearing. If you do not remove the snap ring #7 it will gnarl the threads of #10 and get brass flakes everywhere.
After cleaning out #7 and washing off #13 I reassembled the strut and then replaced it on the plane. When I added hydraulic fluid it returned completely unchanged as a light red fluid.
You may have noticed that I have not mentioned the nose gear strut. That is because it only requires 125 lbs of pressure and I use even less than this. My nose gear strut seals were replaced just before I got the plane and has given little trouble. If the nose gear strut seals have to be replaced the entire nose gear must be removed from the plane.


 You may have noticed that I have not mentioned the nose gear strut. That is because it only requires 125 lbs of pressure and I use even less than this. My nose gear strut seals were replaced just before I got the plane and has given little trouble. If the nose gear strut seals have to be replaced the entire nose gear must be removed from the plane.