There are a number of uses for a modem connected to a Palm including the following:To date, I have successfully remote hotsynced and made Internet connections for web browsing and Emailing using both a standard external modem and a Palm modem. Below are some notes on how I made the modems work with my Palm and how I configured the Palm and applications to access the Internet.
- HotSync your Pilot data while away from your computer
- Make an Internet connection to send/receive Emails, browse the web, logon to another machine using telnet
- Make a terminal connection to a remote computer system
Method 1: Using a standard external modem
You can use nearly any external modem with your Palm to make an internet connection with your Internet Service Provider (ISP) or remote computer system. To save on cost, I would suggest going to a computer swapmeet or look through your local newspaper classifieds for a used external modem. Of course, you should try to get a modem with 14.4kb or 28.8 kb speed, but slower modems will also work. Make sure the modem has a 25-pin or 9-pin RS232 serial connector. I was able to find a Zoom 28.8k battery-powered Pocket Modem at a computer swapmeet for $25.00.
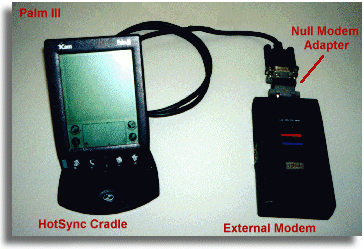
Figure 1.
Palm connected to external modem using HotSync cradle and null modem adapterYour external modem will be used in conjunction with your Palm and HotSync cradle (see Figure 1). The trick to making your Palm and external modem work, is a device called a "null modem adapter". Essentially, this adapter will switch the send and receive signals between the Palm cradle and modem. You can either buy a null modem adapter (at most electronics stores) or make one yourself. Figure 2a and 2b shows the simple null modem adapter which I've created using two end connectors (about 40 cents each), some wire and a soldering iron. Note, that I needed to use two male 9-pin RS232 connectors to properly mate the modem with the HotSync Connector. A similar type null modem adapter can be created which has a 25-pin connector on one end of the adapter (see this web site for a wiring schematic and directions: http://www.axios.de/palm/palm_adaptor.html). To enclose the wiring, I carved up a plastic backshell to fit the two end connectors. Another idea, is to use shrink tubing to serve as a semi-rigid enclosure.
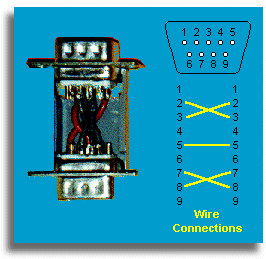
Figure 2a.
Homemade 9-Pin to 9-Pin Null Modem Adapter
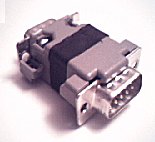
Figure 2b.
Homemade Null modem adapterAn alternative to using your HotSync cradle and null modem adapter with your modem is to buy a Palm modem cable (approx $18.00 US). One end of the Palm modem cable connects to your Palm device while the other end (25-pin RS232) connects to your external modem. If your modem has a 9-pin connector, you will need to buy a 9-pin to 25-pin adapter to use the Palm modem cable.
If you have a Macintosh Modem, then you will need to make a 8-pin DIN to 9-pin RS232 connector adapter to use the Mac modem with your Palm. See this web site http://www.fastlight.demon.co.uk/jg/pins.html for instructions on making such an adapter. I've also noticed such an adapter sold by Palm Computing for $5.95 at Fry's Electronics (you may still need to use a null modem adapter).
If you are using a US Robotics external modem with dip switches, you may need to set the DTR switch to "always on" for the modem to work properly with your Pilot device. If you don't have dip switches, then you might try to issue a AT&D0 command to turn DTR on and then save the settings with AT&W0. Do a search on www.deja.com with the keywords "palm usr modem" for more details.
Method 2a: Using a PalmModem
The simplest modem to use with your Palm is the PalmModem. This battery-powered (2 AAAs) 14.4k modem was designed specifically for the PalmPilot, Palm III, and IIIx models (see Figure 3a). Although the PalmModem appears to only fit the older, curver PalmPilot models, it will fit the newer Palm III and IIIx models as well.
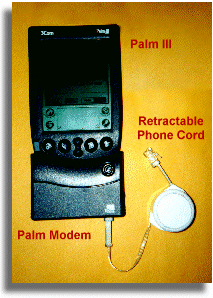
Figure 3a
Palm III connected to a PalmModemYou simply clip the modem to the bottom of your Palm and connect a analog phone line to the bottom of the modem. I found that using a 3-ft. retractable phone cord (approx. $10.00 US) is very handy when traveling.
Note: When using your PilotModem in a hotel room, make sure you are using a analog phone line. Most hotel phone systems are based on digital lines which can possibly damage your PilotModem. I've noticed that the hotels I have recently stayed at (La Quinta, Sheraton, Marriott Courtyard, Hilton) have modem or data port jacks built into the phone.
Also, if you are having difficulties making a connection with your ISP, check the batteries in the PilotModem. The modem should beep a few times if the batteries are low, however, I've noticed that even before the beeping signal occurs I have had some problems making a good connection with my ISP.
Method 2b: Using a Palm V Modem

A Palm V modem can only be used with a Palm V device. This 33.33 k battery-powered (2 AAAs) modem simply snaps on the back of the Palm V unit (Figure 3b). The analog phone line attaches to the top of the Palm V modem.
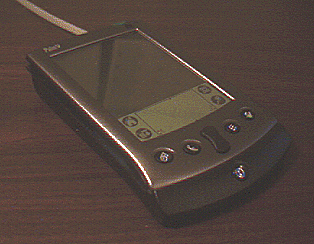
Figure 3b
Palm V and Palm V ModemMethod 3: Using your PC's Modem to connect your Pilot to the Internet
If you don't want to buy an external modem or PalmModem but still want to connect your Palm to the internet, you can try using a Windows-based application which utilizes your PC, HotSync cradle, and PC internal modem. These windows programs will fool the Palm into thinking your PC modem is a connected to it's COM port! Essentially, data sent from your Palm through the HotSync cable to your PC is captured and redirected to your PC internal modem. This allows you make a PPP connection to your ISP using your PC modem when your Palm is placed in the HotSync cradle.
There are two such Windows-based programs, PilotNet and Palm ReDirector (which can be downloaded from the http://www.pilotgear.com site, or you can download PilotNet from this site). I don't believe there are any Macintosh equivalent applications.
PilotNet is a simple freeware application written in Visual Basic. I've tested version 0.6b and it worked fine using my PC's internal US Robotics 56k modem. The figures below show the application's main window and configuration setup. For my case, the HotSync cable is connected to COM1 on my PC and the PC internal modem is set for COM3.
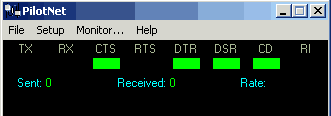
PilotNet main window
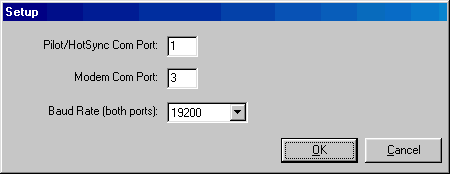
PilotNet's Setup Window
Note, that the maximum modem speed for PilotNet is 57600 baud, which means the maximum modem speed you can set your Palm "Modem" settings is 57600 baud. Make sure the baud speeds are set for the same value in both the PilotNet application and on your Palm Modem settings. You must also quit the HotSync Manager program before running PilotNet.
Once you've specified the necessary settings, your PC internal modem should be accessible to the Palm (when placed in the HotSync cradle) whenever you start the PilotNet program.
Similarily, you can use the shareware program called Palm ReDirector to allow your Palm to access your PC's internal modem. The main and configuration windows for this application are displayed below:
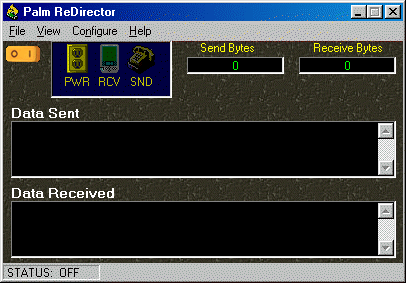
Palm ReDirector's main window
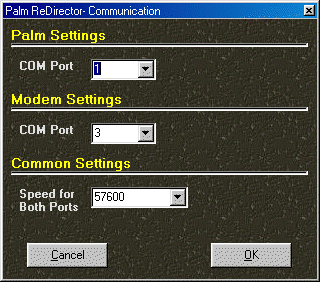
Configuration window
The downloadable version of Palm ReDirector is a trial version which expires in 15 days from initial usage. Unlike PilotNet, this program allows for a maximum modem speed of 115200 baud.
Configuring Pilot "Modem" Settings
Once you've connected your external or PalmModem to your Palm (or started the Windows-based COM redirection program), you need to configure the modem settings on you Palm. This is done under the "Prefs" app on your Palm. Once you have started the "Prefs" app, select "Modem" using the dropdown list in the upper-right corner of the Palm screen. You should see a screen similar to Figure 4.
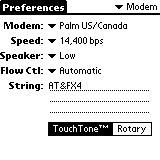
Figure 4
Modem settings in the "Prefs" appIf you are using a PalmModem, select "Palm US/Canada" for the modem type and select a speed of "14,400 bps". If you are using an external modem, Either choose from the selection on the Modem list or pick "Standard", and then select the appropriate modem speed for your modem.
If you are using a Windows-based COM redirection program, remember to set the same modem speed in the Pilot's "Prefs" and windows application.
Note to Palm V owners:
On the Palm V, the Modem selection is set for "Palm V Modem" only. If you want to use your Palm V + Cradle with an external modem, you need to set the Country setting to "other" (Don't ask me why... it just works).
Configuring Pilot "Network" Settings
Finally, to make a connection to your ISP, you need to configure your Pilot's Network settings. From the "Prefs" app, select Network from the dropdown list in the upper-right corner of the Pilot screen. You should see a screen similar to Figure 5.
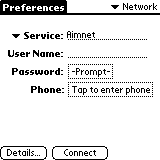
Figure 5
Network settings in "Prefs" appThis is where you will specify your ISP dialup phone number, login name and password, etc. As an example, we will use the following information about a fictitious ISP to illustrate how to enter the necessary data for Internet dialup connection.
ISP: davenetStart by filling in the info as shown in Figure 6. Next, tap on the "Details..." button, which should bring up the screen shown in Figure 7, which is the default settings. In most cases, you will not need to modify this screen.
Connection type: Point-to-Point Protocol (PPP)
Local PPP dialup phone number: 968-1111
User name: Pdave
Password: doggie9
Primary DNS: 201.11.11.2
Secondary DNS: 201.11.11.3
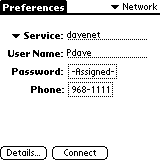
Figure 6
Example Network setup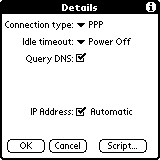
Figure 7
Example details Network setup (Default)If you know the IP Addresses for the Domain Name Servers (DNS) on your ISP, you can enter them as shown in Figure 8. This can usually speed up login connection.
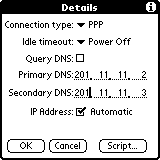
Figure 8
Example DNS entry in Network setupThis should be sufficient for making a PPP connection to your ISP. In some cases, you will need to make some entries in under the "Script..." screen to specify when to send the login name, password, etc.
Now, to actually make the PPP connection with your ISP, you will go back to the Network screen shown in Figure 6 and tap the "Connect" button. Your Palm should then dial the specified phone number and make your connection! Once you make a PPP connection, you will see a small vertical line flashing in the upper right corner of your Pilot display (Figure 9). When you disconnect your PPP connection (by either turning off your Pilot or tapping the "Disconnect" button in the Prefs - Network screen) the flashing vertical line should disappear.
Configuring "Network" settings which require a login script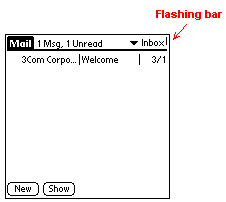
Figure 9
Flashing vertical bar indicates network connectionIn some cases, it will be necessary to create a login in script on your Pilot to connect with your ISP. For example:
Your company has a secured Network, and to login you must use a "SecureID Card". This card will generate a random numeric password based on the PIN number you punch in and the current date/time. Because this password will always be different when you login, your Pilot must wait at the proper moment during the login sequence and prompt you for the password. Also, after you enter your login name and password, your company's login procedure allows you select from 3 different types of connection, so you must answer with the proper selection to make the necessary PPP connection.
The best thing to do is use Win95/98's HyperTerminal program to determine the ASCII text strings your company's server sends you during initial login. The text listed below illustrates what you might see for the example described previously:
atAfter you select the "TCP/IP via PPP" option, you should see some garbage text scrolling across the display. At this point, exit the HyperTerminal program. Using the text above, you should be able to create the necessary login script on your Pilot to make a successful login connection.
OK
atdt 1-111-523-6643
CONNECT 14400====================================
| XYZ Company Dial in server |
| Authorized access only |
====================================Access Verification
Username: smith
Enter PASSWORD CODE: *******
PASSWORD CODE AcceptedWelcome to XYZ Company Server
Enter a selection:
1 VT Terminal Emulation
2 TCP/IP via SLIP
3 TCP/IP via PPP
4 Exit menuSelection: 3
Your IP address is 111.22.33.45
~ }#À!}!º} }4}"}&} }*} } }%}&’Ò¥õ}'}"
After you setup your Network dialup phone number and DNS (as illustrated in Figures 5 thru 8), tap the "Script..." button shown in Figure 8. This will bring up the script window shown in Figure 10. You can then use your stylus to make the appropriate entries as shown in Figure 11 for the example problem.
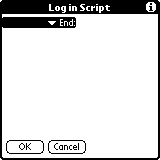
Figure 10
Blank login script screen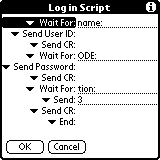
Figure 11
Login script for example problemIn this login script, the following sequence happens:
- Once dialed into the Server, the Pilot waits for a "name:" prompt to be sent from the server. It then sends the username specified in the screen shown in Figure 6, followed by a carriage return character.
- Next, the Pilot waits for a "ODE:" string from the server, after which, it trys to send the password string specified in the screen shown in Figure 6. Since this password is set for "-Prompt-", the Pilot will pop up a dialog box asking for the password you want to send to the server (Figure 12). If you are using a SecureID card, here is where you put in the generated numeric password. After you enter the password, the Pilot will send it followed by another carriage return character.
- The Pilot then waits for a "tion:" string, and then automatically send a "3" as the response followed by another carriage return character.
- The Pilot should then finish the login procedure by showing the "Signing on" screen (Figure 13) and you should then have the flashing bar as illustrated in Figure 9.
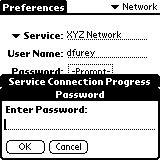
Figure 12
Password screen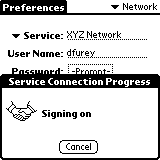
Figure 13
Signing on screen