Figure 4
Connection
settings in the "Prefs" app
Modem & Network Settings for OS 3.3
Last updated: 5-18-00
Instructions for Palm OS 3.3[ Palm ] [ SprintPCS ] [Home Page]
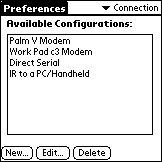
Once you've connected your external or PalmModem to your Palm (or started the Windows-based COM redirection program), you need to configure the modem settings on you Palm. This is done under the "Prefs" app on your Palm. Once you have started the "Prefs" app, select "Connection" using the dropdown list in the upper-right corner of the Palm screen. You should see a screen similar to Figure 4.

Figure 4
Connection
settings in the "Prefs" app
If you are
using a PalmModem, make the appropriate modem selection and specify a speed
of "14,400 bps". If you are using an external modem, you should
define a new modem configuration by tapping on the "New..." button which
will bring up a form shown in Figure 5. Type in a description for
the modem name and then tap the "Details..." button which will bring up
a form similar to Figure 6. Specify the proper modem connection speed
and init string (if necessary).

Figure 5
|
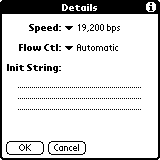
Figure 6
|
If you are using a Windows-based COM redirection program, remember to set the same modem speed in the Palm's "Prefs" and windows application.
Configuring Palm "Network" Settings
Finally, to make a connection to your ISP, you need to configure your Palm's Network settings. From the "Prefs" app, select Network from the dropdown list in the upper-right corner of the Palm screen. You should see a screen similar to Figure 7.
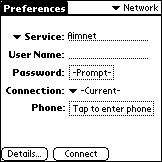
Figure 7
Network settings
in "Prefs" app
This is where you will specify your ISP dialup phone number, login name and password, etc. As an example, we will use the following information about a fictitious ISP to illustrate how to enter the necessary data for Internet dialup connection.
ISP: davenetStart by filling in the info as shown in Figure 7. Next, tap on the "Details..." button, which should bring up the screen shown in Figure 9, which is the default settings. In most cases, you will not need to modify this screen.
Connection type: Point-to-Point Protocol (PPP)
Local PPP dialup phone number: 968-1111
User name: Pdave
Password: doggie9
Primary DNS: 201.11.11.2
Secondary DNS: 201.11.11.3

Figure 8
|
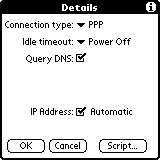
Figure 9
|
If you know the IP Addresses for the Domain Name Servers (DNS) on your ISP, you can enter them as shown in Figure 10. This can usually speed up login connection.
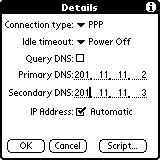
Figure 10
Example DNS
entry in Network setup
This should be sufficient for making a PPP connection to your ISP. In some cases, you will need to make some entries in under the "Script..." screen to specify when to send the login name, password, etc.
Now, to actually make the PPP connection with your ISP, you will go back to the Network screen shown in Figure 6 and tap the "Connect" button. Your Palm should then dial the specified phone number and make your connection! Once you make a PPP connection, you will see a small vertical line flashing in the upper right corner of your Palm display (Figure 11). When you disconnect your PPP connection (by either turning off your Palm or tapping the "Disconnect" button in the Prefs - Network screen) the flashing vertical line should disappear.
Configuring "Network" settings which require a login script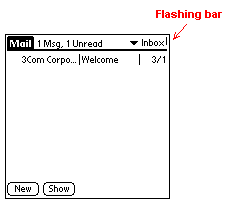
Figure 11
Flashing vertical bar indicates network connection
In some cases, it will be necessary to create a login in script on your Palm to connect with your ISP. For example:
Your company has a secured Network, and to login you must use a "SecureID Card". This card will generate a random numeric password based on the PIN number you punch in and the current date/time. Because this password will always be different when you login, your Palm must wait at the proper moment during the login sequence and prompt you for the password. Also, after you enter your login name and password, your company's login procedure allows you select from 3 different types of connection, so you must answer with the proper selection to make the necessary PPP connection.
The best thing to do is use Win95/98's HyperTerminal program to determine the ASCII text strings your company's server sends you during initial login. The text listed below illustrates what you might see for the example described previously:
atAfter you select the "TCP/IP via PPP" option, you should see some garbage text scrolling across the display. At this point, exit the HyperTerminal program. Using the text above, you should be able to create the necessary login script on your Palm to make a successful login connection.
OK
atdt 1-111-523-6643
CONNECT 14400====================================
| XYZ Company Dial in server |
| Authorized access only |
====================================Access Verification
Username: smith
Enter PASSWORD CODE: *******
PASSWORD CODE AcceptedWelcome to XYZ Company Server
Enter a selection:
1 VT Terminal Emulation
2 TCP/IP via SLIP
3 TCP/IP via PPP
4 Exit menuSelection: 3
Your IP address is 111.22.33.45
~ }#À!}!º} }4}"}&} }*} } }%}&’Ò¥õ}'}"
After you setup
your Network dialup phone number and DNS (as illustrated in Figures 4 thru
10), tap the "Script..." button shown in Figure 10. This will bring
up the script window shown in Figure 12. You can then use your stylus
to make the appropriate entries as shown in Figure 13 for the example problem.
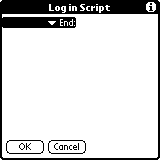
Figure 12
|
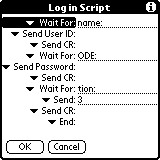
Figure 13
|
In this login script, the following sequence happens:
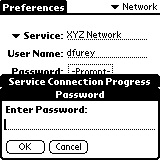
Figure 14
|
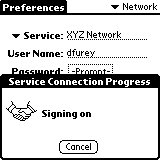
Figure 15
|