
FAQ
Location: Imperial Detention Facility, Orinackra
Difficulty: High
Trivia: General Crix Madine is from Corellia. He specializes in covert operations, and was responsible for engineering the mission of a strike team taking the shuttle Tyderium to destroy the shield generators which protected the second Death Star in Return of the Jedi.
There are six levels in the detention centre. I won't refer to their symbols, but rather to their level provided by the map. Thus, Madine is believed to be on level S1. For the record, here are the colours of the symbols and the corresponding levels:
There are two elevators: the west one and the east one. The west elevator cycles between levels 0, S2, S4, S5, 0, etc. The east elevator cycles between levels S5, S3, S1, S5, etc. The only level with access to both elevators is S5.
Summon the floating platform by hitting the switch at (0144/128.0/0002). Get on the platform and as it travels back, shoot a switch at the other end at (0118/128.0/0202) to open the doors where the platform docks. Enter the facility. The switch at (0116/128.0/0224) opens the wall behind you, allowing access to the compartment containing the switch you just shot.
The switch at (0169/148.0/0383) opens access to another switch at (0147/110.0/0427). Go up to Floor 0 (green detention level). There is a door requiring a Red Key at (0102/128.0/0467).
SECRET 1: Throw a TD at the crack in the wall at (0113/128.0/0146) to blow it open. Go into the newly opened hole and get supplies.
SECRET 2: Blow open wall at (0114/148.0/0355).
SECRET 3: Blow open wall at (0179/110.0/0369).
SECRET 4: Blow open wall at (0106/128.0/0433).
SECRET 5: To get to the "Smoking Room", blow open the wall and jump up to the hole at (0090/128.0/0447).
Take the west elevator to level S2. An officer here carries Code Key 3. Use this code at (0141/65.0/0477) to open door at (0185/64.0/0487).
SECRET 6: Blow open wall at (0103/64.0/0504).
SECRET 7: Blow open wall at (0143/64.0/0515).
SECRET 8: Blow open the wall at (0108/64.0/0441).
SECRET 9: Blow open the wall at (0155/64.0/0441). The switch at
(0134/64.0/0429) triggers an elevator down. Go down to find stuff.
SECRET 10: Note that in one of the secret areas, there is a "shaft" pointing to a blue switch. Hit this switch at (0094/64.0/0461) to briefly open the last secret area. Run to (0095/64.0/0500) to get a revive.
Take the elevator down to S4. Jump into vent at (0160/-2.0/0507). The switch at (0182/-1.0/0502) briefly turns off the magnetic lock at (0207/-1.0/0536). Run through. A switch at (0232/0.0/0559) toggles the doors at (0195/0.0/0566) and (0195/0.0/0551): one open, the other closed. This new area contains prisoners. To deactivate the maglock to leave, crouch and press the switch at (0246/-1.0/0523).
Take the elevator down to S5. When the maglock at (0066/-32.0/0476) flickers, it is dangerous. Wait until it is on steadily, it is safe to walk through.
SECRET 11: Blow open the wall at (0023/-32.0/0400).
Go through this level until you see a switch through a window. Shoot the switch through the window to open the door at (0176/-32.0/0373)!
SECRET 12: Open secret door at (0114/-36.0/0354) to get gas mask.
Pass through the door at (0232/-32.0/0443) and put your gas mask on. Go through the maglock while flickering, and pick up the Red Key at (0356/-32.0/0444). Go to the east elevator.
Take the east elevator up to S3. Get Code Keys 4 and 5 from officers. Enter Code 5 at (0252/33.0/0570) to open door at (0270/36.0/0456). Enter Code 4 at (0252/33.0/0570) to open door at (0341/48.0/0463).
Take the east elevator up to S1. Get Code Keys 1 and 2 from officers. The door at (0159/96.0/0554) will not open for you.
Take the east elevator down to S5. Use the switch outside the elevator to send it up once, to level S3. Go through level S5 to the west elevator (remember to shoot the switch through the window to open the door again). Take the west elevator to level 0. Get out and use the external switch to send the elevator to the next level down (to S2).
You have a choice of ways to enter the elevator shaft: 1) Open Red Key door at (0102/128.0/0467) -- note the schematic on the wall: it will help you through the next part. 2) Go to hole at (0108/128.0/0439) and jump through another hole into a vent at (0112/128.0/0444).
Crouch to open door at (0121/115.0/0456). Jump onto top of the west elevator; open door at (0128/76.0/0466). Drop down into the chasm between elevators; open door at (0148/52.0/0467); then go across the top of the east elevator. Go through the vents. You will find the graffiti "Ewoks Suck" on the walls at (0190/46.0/0466).
SECRET 13: In the room with the Gun Turret, blow open the wall at (0195/62.0/0544).
Continue through the vents and into the garbage compactor.
SECRET 14: From the safe area to the east, blow open a crack in the wall in the main chamber containing the central "press-o'-death", at (0234/59.0/0615). Then (carefully!) enter the hole to get a revive.
Jump onto the moving "press" in the north chamber. Run and jump over the central "press-o'-death" onto the south moving press. Run and jump over it again to the northwest press. Finally, jump across to the platform on the west end. Go through the door at (0175/90.0/0623).
Set off the mine to blow the wall at (0203/91.0/0647). Enter Code 2 at (0165/98.0/0594) to open the doors. Madine is at (0135/95.0/0614). Note that entering Code 1 will open the doors at (0145/97.0/0669). Entering a code of "XXX" (some people see it as "KKK"!) will open the doors at (0145/97.0/0641).
Location: Ramsees Hed Docking Port, Cal-Seti
Difficulty: Moderate
A switch at (-225/-40.0/0729) opens the big door at (-215/-40.0/0701). The switch at (-182/-41.0/0691) will lower the door. Watch your head!
Find the Yellow Key at (-287/-40.0/0576).
SECRET 1: To get some shields, shoot the Power Generating Units to open a secret hole at (-277/-40.0/0639).
SECRET 2: Shoot the switch at (-182/-41.0/0691) to close the big door, then call down the elevator at (-255/-40.0/0744). Go up, then east across the walkway formed by the big door. Stop before you get completely across. Run and jump into the room to the southeast to get items.
Go through the door at (-150/-40.0/0628). The switch at (-086/-56.0/0523) shifts a couple of "barriers" west (watch your map!). A switch at (-057/-56.0/0540) shifts them east. A switch at (-051/-56.0/0458) shifts them further east. Taking the platform at (-034/-54.0/0466) up will shift the barriers the rest of the way east. One of the crates, at (-026/-36.0/0476), lists '1 Ton Rubber Duck' as its contents. Walk over the left barrier and go south; go south, then west to the rising platform. Jump down. Take another platform up at (-136/-40.0/0445). Jump to the platform along the south end, which will rise.
SECRET 3: Run along the rising platform and jump into the room to the south of it (it's tricky!). From here, start following a ledge at (-259/-16.0/0436) until you come to a room at (-257/-16.0/0500) with items.
After the rising platform has gone up, you may enter a door at (-177/8.00/0368).
Head south. Find lots of items behind door at (-237/8.0/0288). The infamous "Imperial Bathroom" is at (-160/8.0/0161). To find the Red Key, go through door at (-212/8.0/0197) and take elevator down. Jump into pit. You'll find the Red Key at (-215/-16.0/0068). Jump into small "closet" at (-216/-16.0/0152) and find an extra life.
SECRET 4: Continue south, to where Gran are bombing you. Shoot switch at (-154/15.0/0020) to lower platform. Go up and pick up items.
To get back to the Red Key area, stand on the 'platform' and shoot the switch at (-215/-16.0/0154). The Red Key is used on the door at (-144/8.0/0169). You'll find the Blue Key at (-239/11.0/-144). Go back the way you came, north.
SECRET 5: Blow open crate at (-238/17.0/0588) to get mortars.
SECRET 6: Blow open crate at (-238/9.0/0571) to get mortars.
SECRET 7: Blow open crate at (-238/25.0/0483) to get items.
Continue north. One of the crates on a ledge at (-286/-8.0/0661) lists '1 Ton Rubber Duck' as its contents. You need the Blue Key at the door at (-223/9.0/0594). Go through doors at (-203/16.0/-011) and (-180/9.0/0843). Hit [space] at (-222/9.0/0944) to affix the device.
EXTRA SECRET SECRET: If you use the LANTFH cheat to teleport yourself, you'll find an extra life at (-099/-51.0/0516). Toss a TD north and you'll find another chained Ewok prisoner!
There is another way to get to the Ewok without cheating. You'll recall that you flip several switches to move a "crate" along a narrow passage, then use a elevator to cross over that "crate," and move to another area. The platform in front of the "Extra Secret Secret" is tied to that final lift. When it is down, run like a madman back to the FIRST switch, and the crates will be lowered to let you in. You have to hurry since it rises as soon as the elevator rises.
Location: Robotics Construction Facility, Anteevy
Difficulty: Moderate
Trivia: Snowtroopers are the elite stormtrooper corps trained to operate in frigid climates. Oddly, there are no snowtroopers at Ice Station Beta.
SECRET 1: When you start the level, inch westward and drop down onto the ledge in front of you (044/2.0/493). Head north and crouch to enter the passage at (0039/2.0/0488). Note that this cave is shaped like the head of Max the rabbit, from LA's Sam & Max Hit the Road game.
Head west along the south end of the complex; take a right at a fork at (-083/0.0/0326). When you get to the chasm, carefully drop down to get the Ice Cleats at (-346/-10.0/0342). Jump out; then run and jump across the chasm.
SECRET 2: Crouch to find items at (-203/-7.5/0235).
SECRET 3: Jump into stream at (-094/-2.0/0234). Get out on your left and head west, ducking under beams. Take the next left, at (-280/-7.5/0259). Turn left again to get items at (-274/-7.5/0234).
SECRET 4: If you just got secret 3, simply turn around and go west to get more items.
Keep going until you get to the waterfall at (-036/-2.0/0200), and enter the passage behind it. Pick up ammo and supplies. Go up the stairs at (-042/2.0/-0160) and jump into the stream. Jump out to your left and find the Blue Key at (260/17.0/0222). You can now either go back to the Blue Key door (337/16.0/0170), or jump to the conveyor from this ledge. Either way you will end up on this conveyor, which takes you west.
SECRET 5: Run, crouch, and jump through open windows into room on your right at (0009/17.0/0272) to get items.
Look through the window on your right side at (-138/16/0243). Shoot the switch at (-182/14.0/0289) to open the door ahead of you. (You may jump into this room to get items, but this is not a secret.)
SECRET 6: Shooting the switch to open the door and making it through to (-353/14.0/0247) counts as a secret!
Get onto the next conveyor. Be careful when you make the next right: run through the doorway when it opens, or you'll get caught in a crusher at (-213/18.0/0179). Jump to a narrow ledge that will prevent you from going into the industrial waste; get onto the three rising platforms at (-271/6.5/0191). Get onto the next conveyor.
Jump to the switch at (-452/13.0/0152) and pull it: this will open another door that otherwise blocks your path at (-433/13.0/0210). Get the Shield Supercharge, then jump back onto the conveyor.
SECRET 7: Jump into the room with the rotating "humanoid" holo, and get supplies.
You'll have to run and jump across the gap in the conveyors ahead, then through the window into the room on your right at (-415/10/0247). Shoot the officer here and get the Red Key. The switch at (-398/10.0/0262) activates a ventilation system which clears the room in which you set the charges of poison gas. Hitting the switch precludes the use of the gas mask.
SECRET 8: Go through the south door at (-410/10.0/0247) to get supplies.
Exit the room through the north door at (-410/10.0/0274). Get gas mask at (-376/10.0/0306). Hit the switch at (-366/10.0/0306) to briefly open the door at (-371/10.0/0287). Enter the passageway. Head north. Around a corner a switch (-335/10.0/0289) will open a couple of doors at (-301/16.0/0287) and (-300/16.0/0293) that allow access the fan shaft. But first shut off the fan by hitting the switch at (-295/16.0/0287). Go into the fan shaft and drop down between the blades. At the bottom, pick up the Revive, which you'll likely need.
Run and jump over the industrial waste in each of the three chambers to set the charges, at (-128/-44.0/0392), (-128/-44.0/0193), and (-300/-44.0/0293) in any order. Turn around and fight off the Stage 2 Dark Trooper which is now attacking you (the DT will be released in the chamber in which you set your final charge). Enter a hallway at (-210/-40.0/0340).
SECRET 9: A panel will open near the entrance to this area at (-220/-40.0/0391) after you pass it, revealing some supplies.
Depending on the level of difficulty you selected for this mission, 1 to 3 DTs will attack you here. A switch at (-346/-40.0/0309) opens the door. Run and jump across to the steps and return to your ship at (050/8.0/0452).
Location: Nar Shaddaa, The Vertical City
Difficulty: Moderate
Trivia: Nar Shaddaa spaceport is located on a moon orbiting the planet Nar Hutta. This "vertical city" is home to smugglers and pirates. It first appeared in the Dark Horse Comics series Dark Empire. Nar Shaddaa is a "wretched hive of scum and villainy". :)
Drop down to the floor of the chamber.
SECRET 1: Run past the moving block; shoot or hit the switch at (-021/0.0/-082) to stop the block. (You can also shoot this switch once the block has stopped to get it to move back out of the way.) Get the Mortar Gun and shells by crouching at (-020/0.0/-101).
Hit the switch at (0138/0.0/-082) or (-021/0.0/-110). Crouch to enter at (-031/0.0/-131); get the Yellow Key at (-051/-4.0/-111). Take the elevator up. Open the Yellow Key door at (-040/27.0/-087). Head west; take the door at (-140/12.0/-156); continue west; take the door at (-358/12.0/-172). Take the rising half-circle platform up.
Open hidden door at (-349/36.0/-142). Take elevator down. Find extra life at (-295/0.0/-120). Go back the way you came. Go south; take door at (-281/36.0/-198). Cross the bridge. Get Fusion Cutter from room at (-239/36.0/-154).
SECRET 2: Open "door" at (-214/36.0/-166). Go under crushers; to your left is a secret area with items.
SECRET 3: Continue east under all the crushers for more supplies. Go back west under the crushers again.
SECRET 4: Open door at (-280/36.0/-140). Get a running start and jump across to (-316/36.0/-094) to get supplies. Drop down and go back up to the room you first jumped from.
SECRET 5: Go to (-257/36.0/-160) and point yourself south. Run and jump across to a dark room at (-245/36.0/-199) to get items.
Go back to the bridge; jump to the platform to the west. Go through the left door. Go through the repulsor fields: left, right, left.
SECRET 6: After going left and right through the repulsor fields, open secret door at (-296/24.0/-235) to get items.
Go around the corner and kill the Trandoshan, and get his Concussion Rifle. Go back out to the platform; go through the right door. Go east. Enter building at (-046/24.0/-307) up stairs. Get Red Key at (-048/32.0/-334). Enter another building through the Red Key door at (-109/24.0/-325); go up stairs.
SECRET 7: Open secret door at (-191/32.0/-361) to get supplies.
SECRET 8: Open the door at (-202/32.0/-393). Before it closes, run and jump through the opening south into another building to get mortars and quickly jump back into the building you came from.
SECRET 9: Run and jump through the window north into another building, and north again into yet another building. From (-157/40.0/-227), looking east, jump to the narrow ledge on your right. Follow the passage; jump north and get the extra life. Go through the door and take the elevator down to get more supplies. Retrace your steps back to the open area.
Head southwest. If you go through door at (-395/30.0/-448), DON'T try to jump across: you won't make it! Hit switch at (-561/30.0/-434) to release Trandoshan behind you.
SECRET 10: Throw TDs at any of the five corrugated metal panels here to obtain access to supplies--and more Trandoshans.
Go down stairs at (-485/30.0/-461). Find the Blue Key at (-468/22.0/-391). Open Blue Key door at (-370/27.0/-360). Head north, then east around the semicircular hallway, then across the catwalk. Get Imperial Nava Card at (-043/24.0/0002).
Location: Jabba the Hutt's Ship
Difficulty: Medium
Trivia: A scene of Han Solo meeting Jabba the Hutt was filmed for the original Star Wars film. In this scene, Jabba is merely a human. George Lucas intended to create a more exotic-looking Jabba, but didn't have the budget. Dissatisfied with the scene, it was cut from the film. In the end, though, George got his wish: the scene was redone for the Star Wars: Special Edition using the original footage, but with a computer-generated Jabba the Hutt.
Kill the Kell Dragon(s) with your bare fists, then kill the Gran and take his TDs. Go into east chamber. Hit switch at (0474/-48.0/0046), which raises the dark "trim" along the bottom of the outside of the structure in the middle of the chamber. Jump up onto this trim, on the west side. Go along it, hugging the wall, then go to the other side. Jump across the "hallway" to get Blue Key (0474/-36.0/0125). Open Blue Key door (0479/-48.0/0246) and go through it. Run and jump west to niche.
SECRET 1: Open secret door (0317/-47.0/0213) to get items.
Edge along the wall on the narrow ledge, heading south. Hit the switch (0264/-46.0/0170) to open the door (0356/-47.0/0237). Enter this room and get your gear back by jumping at (0337/-47.0/0278). Hit switch at (0313/-47.0/0242) to raise the floor outside, which allows you to go further west.
Hit switch at (0249/-46.0/0361) to lower stairs at (0264/-46.0/0323) outside. Go up stairs, and go through door (0383/-40.0/0340) and find the Red Key (0361/-40.0/0464). Go back out and through the Red Key door at (0424/-40.0/0346). Take elevator (0558/-39.0/0501) up. Hit switch at (0505/-28.0/0516) to raise bridge briefly. Run north across it.
SECRET 2: Turn back towards the ledge you came from while on the bridge. Hurry and jump into the room just east of it.
SECRET 3: While on the bridge again, run and jump to the right into room at (0539/-24.0/0574).
SECRET 4: While in previous secret area, open door and go up stairs. Jump across to other room. Find items at (0492/-14.0/0655).
Go west. Take elevator up (0319/-27.0/0573); run and jump north across gap. Drop down the triangular hole to (0363/-44.0/0759). Find Yellow Key at (0381/-38.0/0737). Get back up by hitting switch (0428/-44.0/0754), which briefly brings down the elevator. Open Yellow Key door at (0444/-16.0/0781). Go up spiral stairs and keep going!
SECRET 5: Open the fresco of Jabba at (0302/0.0/0291) to get items. Thanks, Jabba!
SECRET 6: Go to (0403/3.0/0244) and jump up. Open secret door to access items.
Nava Card is in a room through door at (0471/5.0/0352), at (0461/5.0/0375). Leave this room and go through door at (0484/1.0/0129). Drop down and kill Kell Dragon(s).
SECRET 7: Open door (0422/-6.0/0049) to get stuff.
Hit switch at (0368/0.0/0096) to raise floor level. Head north.
SECRET 8: Hit switch at (0391/0.0/0155) to get supplies.
Head west, down stairs. Go around pit on a ledge, hugging the wall. Go to the northeast corner, face south. Run and jump to the second (southmost) compartment. (If you fall into the pit, hit switch at (0278/-18.0/-007) to get out.)
SECRET 9: While falling down the second compartment, you must hit a switch. This will open a secret door at (0243/-48.0/-019) in the pit with the Gammorean guards. Welcome to Jabba's Jacuzzi (a pool in the shape of a Hutt)! If you neglect to hit the switch while falling, you can set a mine under yourself which will blow you up high enough to reach the switch -- go to (0274/xxxx/0009) and face north. Remember to go LAIMLAME first!
You're now in the detention area. Run and jump across to the west side. (If you fall into this pit, go to the southeast corner elevator.) Jan is behind the door at (0191/-32.0/-048).
Location: Imperial City, Coruscant
Difficulty: Medium
Trivia: Now the home of the Emperor, the Imperial City on the planet Coruscant was also the seat of power for the Old Republic. It is continually being rebuilt upon old layers of itself. This city was first described in Timothy Zahn's book Heir to the Empire, and also appeared in the comic series Dark Empire.
Leave landing area. Head east, then north to get supplies.
SECRET 1: Drop onto platform east of you. Open door (0924/170.5/0478) and take elevator up. Collect items. Go back the way you came.
Head south into square area. Take southwest elevator, then head south.
SECRET 2: Hit hidden switch in Emperor's Mural at (0385/100.5/0043) to reveal a switch. Shoot this switch to raise platform. Get items. Hit switch at (0386/124.5/0038) to lower platform. SECRET 3: If you face the Emperor's Mural, to the right is a platform above you. Shoot the red switch (0463/115.5/0064) on this platform to bring it down. Get on it and hit the switch at (0465/100.5/0058) to take it up and get items.
Go west; then up stairs at (0323/100.5/-042). Get items. Head east. Take elevator; head south. Get Blue Key at (0302/196.0/-312). Go south and get items. Run and jump east to other rooftop. Take door at (0370/196.0/-251).
SECRET 4: Go into the northeast alcove as the platform descends. Open hidden door at (0531/148.0/-228) to get items.
At the bottom, go east through two doors and up stairs. Open door at (0932/105.0/-207) and go up elevator. There are two doors ahead: enter the right door first and get items. Then take the left door. Hit switch at (0894/142.0/-129) to open vent shaft to the left. Crouch and hit switch a few times at (0925/142.0/-131) to move centre block closer to the vent opening so you can run and jump into it (check your map). Hit switch at (0813/152.0/-188) to open access ahead of you. Get Red Key at (0802/143.0/-291). Hit switch at (0818/142.0/-265) to open door to courtyard.
Open Red Key door at (0859/142.0/-251). Go east and take elevator.
SECRET 5: Go to ledge along the northwest of the level; move along it and open a secret door at (0758/194.0/-135).
Open door at (0829/194.0/-334); hit switch at (0814/194.0/-384) to reveal door at (0811/194.0/-190). Take elevator down. Welcome to the Hexagon!
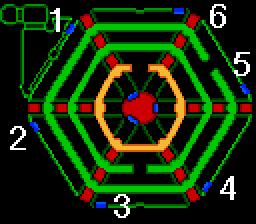
   Switch Locations:
    1: (0882/64.0/-186)
    2: (0852/64.0/-262)
    3: (0901/64.0/-325)
    4: (0982/64.0/-313)
    5: (1011/64.0/-238)
    6: (0962/64.0/-175)
There are six switches around the hexagon, each of which sets the position of the adjacent door. The hexagon consists of three concentric rings around a central core, as illustrated. Each door initially blocks all three rings, but may be opened to allow passage around one ring.
First, open all doors in the outer ring (i.e., set each switch to open, closed, closed; or black, red, red) by going around the ring clockwise. Now you'll have to set the switches to allow you access to the Computer Core. Start at switch 6, and go around the outer ring counter-clockwise, setting the switches according to the chart below.
Switch  Position
======  ========
  6.    closed, closed, open
  1.    closed, closed, open
  2.    closed, closed, open
  3.    closed, closed, open
  4.    closed, open, closed
  5.    closed, open, closed
In other words, open the innermost doors at switches 6, 1, 2 and 3, and the middle doors at 4 and 5.
In the Computer Core there are three switches, at (0925/66.0/-262), (0925/66.0/-238) and (0945/66.0/-250). Once all three have been activated, the floor will lower. Head west; press the switches at (0853/44.0/-233) and (0852/44.0/-268) to reveal another switch at (0858/44.0/-250). Take the data tapes from (0860/44.0/-239). The door behind you (0827/44.0/-248) will open. Follow the tunnel, then head northeast. Go up the elevator, then north to your ship -- which is gone! Then, to quote a certain former smuggler: "Boba Fett!? Where!?" :) Shoot down the bounty hunter, and Jan will return.