Now we begin the mad dash to Christmas, trying to get in as many projects as we can. In the monthly newsletter, I offered you the first of two Merrie Bunnies as cross-stitch Christmas ornaments. In this supplement, I present the second with some ideas and how you may finish these ornaments.
(Stitch chart on at the end of this newsletter) |
|
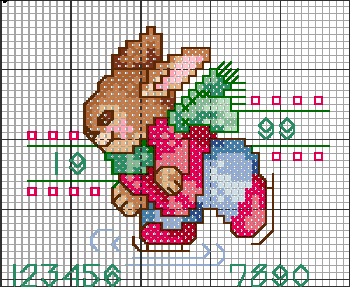
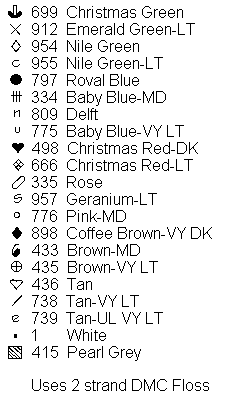
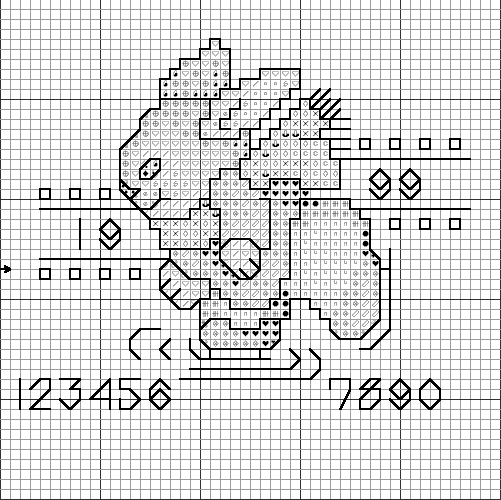
Yes, the color chart above right is the same as was printed in the newsletter for this month. So is the source information regarding the maker of this pattern.
Tools and Material required:Option 1:
pantyhose (used are fine if clean)
potpourri mix (good Christmas blend with cinnamon and cloves)Option 2:
Quilt batting or fiber fillUsed in both:
backing cloth (green or red felt or Christmas print broadcloth)
edging trim (optional)
loop material (embroidery floss, gold fringe loop, burlap cord)Non-filled Option:
card board/shirt board
wrapping paper/butcher paper
decoupage glue
loop material
edging material
glue gun
Option 1:You are created Christmas ornaments pleasing to the sense of smell as well as the eye.
Step One. Cut a piece of pantyhose leg twice the width and length of your ornamat plus 1 inch both dimensions. Fold bottom to top. Pin folded edges and side edges together and stitch to create a double thickness bag.
Step Two. Stuff the bag with potpourri mix, packing it well and stitch closed. Do not worry if the bag is over large; potpourri has lots of air pockets and loses volume over time and handling.
Option 2:Cut several pieces of quilt batting (about three depending on thickness) the size of your ornament plus one inch either dimension (if you are using loose fiber fill, skip this step).
Assembly:Step One. Cut your backing material to the exact size of your ornament.
Step Two. If you are using an edging material that covers the edges, you can now insert the fill from option 1 or 2 above, insert loop material, and, with right sides out, stitch all edges closed. Cover the raw edges with your edging material. (You may have to eyelet hole the edging at the top so that the loop comes through properly.)
If you are not using an edging material, pin wrong sides out and stitch along the sides and bottom. At each corner, do a lockstitch a couple of times into the bag material to ensure crisp corners. Clip the corners diagonally to the bottom of the locking stitch and turn the bag right sides out (you may want to poke the corners a bit with a pencil eraser to turn them out properly).

Attach your loop material to the right side edge of the top. Insert your filler (potpourri bag, quilt batting, fiber fill.). Turn the top edges in, making sure that the loop is out and stitch closed.
Non-Filled Finish.Another method for finishing your ornament, particularly suited for mailing, is to glue it to shirt board or notepad backing cardboard. In this method, you will require a good fabric/decoupage glue, looping material, edging material, Christmas wrapping paper (optional for shirt board), and a glue gun (also optional). You will also require a press of some kind to prevent the cardboard from warping (placing the ornament between two flat objects that may be cleaned of glue after with a heavy object on top is sufficient).
Note: If you are not familiar with the term "shirt board, it is the cardboard used to package men's shirts and underwear and is usually white on one side. If you do not have shirt board available, a standard department gift box is usually the same material.
Step One. If you are using ordinary notepad cardboard, cut to the size of your ornament plus one inch. Cut wrapping paper (or butcher paper) to the same size as the cardboard. Apply glue evenly to both sides of the cardboard. Do not over saturate.
If you are using shirt board, cut to the size of your ornament plus one inch. Apply glue to the non-white side only. Do not over saturate.
Note: the one inch extra allows you to trim more evenly to the edge of your ornament rather than trim your ornament. It is important to note that fabric tends to size when glued, you must have a little excess to trim properly.
Step Two. If you are using an ordinary notepad cardboard, apply paper back and roll out bubbles. Center your ornament on the non-white or non-papered side, and work out bubbles.
Step Three. Press the ornaments between two flat objects as noted above and allow to dry completely overnight. You want to make sure that there is as little warp or curl as possible.
Step Four. Trim to the edge of your ornament using a straight edge and an Exacto knife or good utility knife.
Step Five. Attach the loop at the top using a dab of glue or hot glue gun. Attach edging to form a frame around the ornament (same process).
Note: If you have used a white backing or shirt board, you may add a Christmas message or otherwise sign the back of your ornament or paste a pre-printed label to the back.
More ornament patterns are forthcoming. I hope you enjoy them.
Notes:
© 1992 The Vermillion Stitchery
This design is for your personal use only and not for resale in any form.Additional designs are available from The Vermillion Stitchery
7 Bird Wing, Irvine, CA 92714Only one half of the design has been reproduced here.
For PatternMaker, see the website http://www.hobbyware.com
The Crafter's Place Newsletter is publication of The Yahoo! Crafter's Place Chat Club.
This edition was edited by AngelPie_Mouse. Copyright ©1999.
This page and its graphics were created by
exclusively for The Yahoo! Crafter's Place Chat Club
on 08/01/99.You are visitor #
since this page was created.
It is best viewed on a 800x600 screen set for True Color
withor
and
is hosted by. Get them NOW!


