Mauler
Mobile Hill
Time: 20s/Point
2. Falcon 2 (scope)
3. MagSec4
4. Mauler
5. DY357 Magnum
6. Disabled
Score: No Limit
Team Score
ĀĀĀ1P: 10
ĀĀĀ2P: 20
ĀĀĀ3P: 25
ĀĀĀ4P: 30
YELLOW: DarkSims
| Overview | Simulants | Hills | Tips |
|---|---|---|---|
| Settings | Basic Information | Balcony | The Mauler |
| The Arena | Individual Characters | Dead End | Teamwork |
| JoSim Tactics | Center | Videos | |
| Pyramid | |||
| Sandy |
| Scenario | King of the Hill |
Basically you are playing a king of the hill game against a number of dark sims. The Options are normal, don't pay attention to the fancy wording that the game may use. The weaponry as you probably noticed is a pistols fight, some may say that's the hardest setting. I think quite the opposite. Use the mauler to your advantage, without the charged up shot this challenge would be nearly impossible. Learn the Mauler locations, they'll become your friend for life. These are in the tips section.
Mauler
|
| Options | Hill on Radar Mobile Hill Time: 20s/Point |
|
| Arena | Skedar | |
| Weapons | 1. Falcon 2 2. Falcon 2 (scope) 3. MagSec4 4. Mauler 5. DY357 Magnum 6. Disabled |
|
| Limits | Time: 10 minutes Score: No Limit Team Score ĀĀĀ1P: 10 ĀĀĀ2P: 20 ĀĀĀ3P: 25 ĀĀĀ4P: 30 |
|
| Simulants | --see chart below-- | |
| Teams | RED: JoSim and Humans YELLOW: DarkSims |
 ABOVE: The wording got cut off, and, well, my handwriting isn't all that great. Dotted lines are areas that are either below or above the darkened areas. It is also hard to tell between falcon2 (scope) and the regular falcon, but that shouldn't be a problem because each are equal in strength, and you shouldn't be using the aimer anyway. Hopefully after a few runs you'll get the idea. Basically look at this map to get a quick idea of hill placement, although with multiple stories this probably wont help much at all. Once you play the challenge you should get an idea of the arena, and then this will make about 100 times more sense to you. Also look to find quick doubles, I can think of the 2 falcon2 (scopes) right next to eachother, and even closer together are 2 magsecs.
RIGHT: Those 2 are a lot less confusing than my map, to good proportion as well as showing the ammo. Buuuut, it shows inaccurate gun positions, which is why I recommend using mine (if you can) for guns. Also you should have noticed this NP map doesn't have hill placement. They have no skill, it's all me
|
 
|
Challenge 30 deals with the toughest simulants of the game, Dark Sims. Some would say they are a considerable step up from the Perfect Sim, but I arguably disagree. What you need is good strategy, ambushing skills, and most importantly to predict what they are going to do, before they can do it. In challenge 30, you play 1 more simulant than there are human players, as well as a normal sim on your team. Here is the simulant breakdown, by character. NOTE: on all player difficulties, you get 1 normalsim: JoSim.
| Humans | DarkSims |  DarkSim Outfit |
|
|---|---|---|---|
| 1 Player | CassSim | BlondeSim | |
| 2 player | CassSim | TrentSim | |
| BlondeSim | |||
| 3 player | CassSim | TrentSim | |
| BlondeSim.1 | BlondeSim.2 | ||
| 4 player | CassSim | TrentSim | |
| BlondeSim.1 | BlondeSim.2 | ||
| BlondeSim.3 | |||
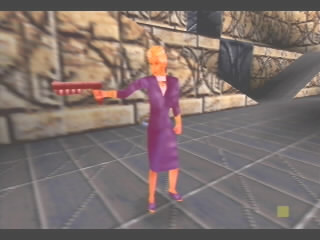 |
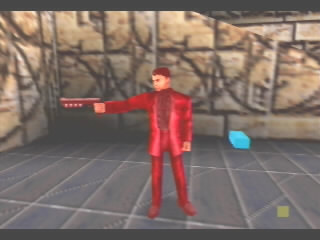
CassSim Cassandra, my worst nightmare. Maybe it's just me, and everybody else who I've talked to, but she is incredibly better than any other simulant you will face in this challenge. Her quick spurts of bullets normally all hit, a usual gun she likes to hold seems to be double magsecs, also double maulers. The magsecs, those are lethal. Three round burst, 1 from each gun, half the time you are dead before you can get a shot off. Keep away from Cassandra at long distances, she enjoys that the most. If you want to run, take her out first, you'll regret it later. Also her amazingly skinny body makes for a nearly impossible target, even with autoaim. Speaking of which, it doesn't do much on her. The key for her is to get the head, and you need to do it fast enough so that she's dead in a clip, or less. Basically, you want to avoid this simulant as best as possible, if possible at all. |
 |
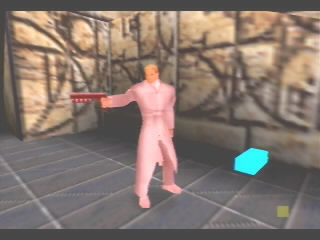
TrentSim Trent Easton, he in my opinion is the second hardest character, in that his aim is right up there with Cassandras. He is, however, a much easier target, with a wider body, although much shorter. His weaponry often includes magnums, and doesn't seem to be very stable in holding the hills. Very often he is seen running out of a hill to grab the nearest magnum at the instant the gun spawns, and sometimes can't even make it back in time. It is a good idea to leave magnums laying around for him, you don't need them anyway. Also, don't underestimate the power of his magnums! This guy can aim, and 3 magnum shots from a DarkSim can take just seconds, and can be lethal. I'd say however that it is safe to run from him, if you have somewhere to go fast to get ready for him. Going toward him, on the other hand is a good idea as well, especially when he's in a hill. If you know you can't take a hill, atleast don't let them get maximum points. Go toward the hill, and more often than not you'll see good 'ol Trent leaving the hill. Not for a magnum this time, but for you! Yes, Trent leaves the hill to get you, and is an easy picking if you camp correctly. Overall, Trent is not consistant, and can't be underestimated. Probably the hardest to predict, but that comes later. |
 |
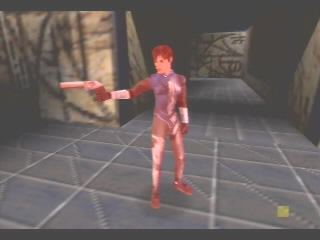
BlondeSim MrBlonde, you'll learn to love him, especially once the player difficulty goes up and you see more of him instead of Cassandra. Lets start with the accuracy, and that is lower than the average DarkSim. For some reason, he misses many shots. He prefers double falcon2 scopes, double magsecs, I rarely see him with other guns, although be prepared. Conversly, his accuracy goes down while yours goes up. You may wonder how, and that is because he is 7 feet tall, 3 feet wide. Well not really, but if you haven't noticed he's huge, from all angles. If you are crouching, autoaim sticks to this boy like a rock, and even the least accurate guns will hit him. I'd like to note this is the only simulant that you can consistantly kill with a magnum, easily with 2. He'll come barraging around corners, missing his first shots, and you will sometimes barely be hit, no matter the gun you have. Compare that to Cassandra when you're hit before you see her! The hill situation, he is many times the first to a hill, and sticks to it. I have never seen him leave a hill under any circumstances, unfortunately. But don't back down from a fight from this guy, because you'll win. If you can't wait for a fight, then don't, this time it wont come back to haunt you! |
Reader Comments Some say that I'm giving JoSim too much credit. Well yeah, I guess I am. She's a normalsim, and starts to play the part of luck. I'd say a good ratio is 2 hills to 1 hill with her. Or 1/2 the time she's with you. I've been lucky enough to have her in *all* hills on a 1 player game, while at worst on my 3 player victory (funny, horrible luck the one time I win) she was in 2/11 hills! |
JoSim's Role JoSim's basic role in your quest for completion on challenge 30 is to get you points. She's not there to get kills, to help you in attacks, she is simply getting you points. Some may say she's completely random, but if you know how to herd JoSim, mixed with some luck, you'll need nearly half the hills to beat this challenge. Keeping JoSim alive There is nothing you can do really, except if you know she's following, don't pass up the sim. Maybe if you know a sim is about to get between you and JoSim, go out of your way to kill that simulant. But basically, there is nothing you can do but hope. The surest way is to keep the simulants dead as long as you can. Getting JoSim in the hills
Hold A, press Z twice to access the command menu Final Tips Check JoSim's life! Go into the command menu and look at the bottom, that is her life. If she is almost dead, kill her, maybe she'll have a gun you can use. If you need to take a hard hill and josim is with you, kill her, maybe she'll have a gun you can use. An extra mauler is better than a josim who will not even get halfway to the hill, right? |
 ĀĀĀĀĀĀĀĀĀĀ
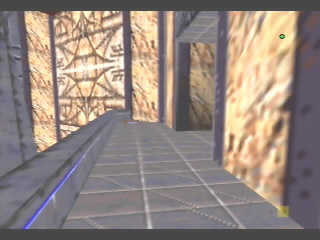
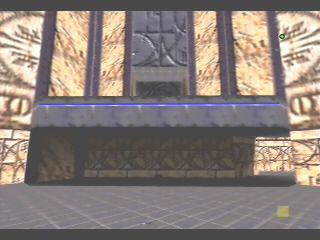
The balcony is the skinniest hill located at the top of the arena in the map above. It is very far to get to from most places, and hard to be the first one there, which is vital. When you know the other team will get the hill, hang around between here and the center. When looking around the arena, don't confuse this with the other balcony that is across from it. Looking on the map above, you can see 2 balcony's, make sure that you go on the path to the correct one, the other is staring straight at the hill, but a good 10 second walk away, and can cost you either a point for your team, or many for them.
|
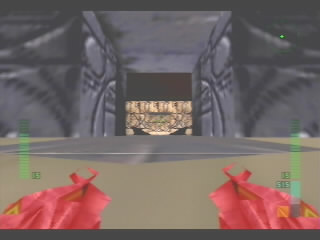
Hold
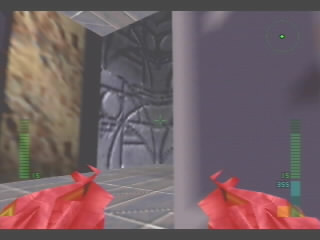
Depicted to the left is the stance you will want to take when attemping to hold this hill. It is quite easy, watch your radar, and when they come, fire 1 and only 1 shot as you swing the controller to the left. It takes some good timing, but you shouldn't be hit too often. Beware, if 4 or more are coming and you only have 1 mauler, no time to reload, you have exactly 1 shot per kill. If you need to reload, back up into the corner of the hill and face down the middle of it for the final kills, it is still an easy stance. Similarly, if a sim gets by you, swing back into this position. If you have 2 or more players, stick all others in this location, and have the strongest player in the stance depicted. Taking Oh wow, they just don't want to leave this hill. The basic simulant pattern is back and forth accross the hill. You can get to the other side and fire off lucky shots if you wish, but that is nearly suicide and hard to pull off. A more recommended strategy is to run into the hill, firing down toward one side as you position yourself on the other side. If you can, get double maulers in the middle on your way. Look down, and keep firing and firing. If you get in, you'll be fine. But most likely, you wont. |
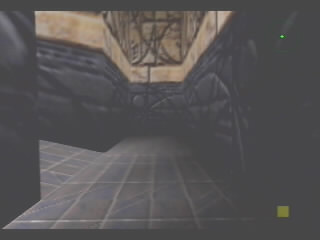 |
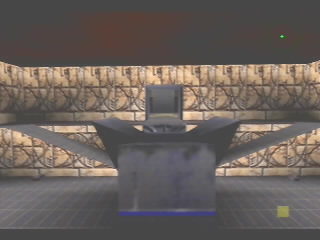
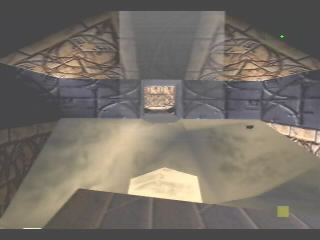
This hill is one of those gimme hills. You see it on your radar and start jumping for joy because you know you get easy points. You can normally get here in time from anywhere in the arena, and even if you are pressed for time it wont matter, you should be able to clear the hill in seconds if you have a mauler. Tactics are below, and you'll see how easy it is. This hill is named the "dead end" for obvious reasons, there is basically one entrance, although if you can think of it as 2 because there are 2 entrances you must guard. Sometimes it is hard to tell if it is this hill or the pyramid from the sandy. The first hint, if you are at the exit of the sandy, it will appear bigger, because it's not "off the radar" as all other hills are. Coming out of htis hill, always go up the ramp, even to the sandy. |
 ĀĀĀĀĀĀĀĀĀĀ
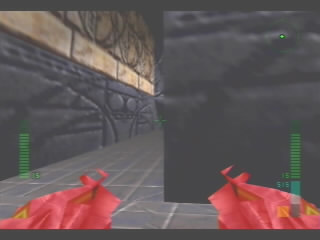
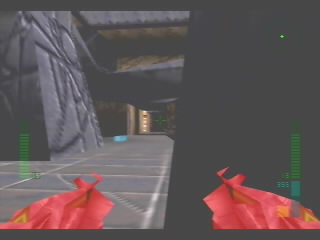
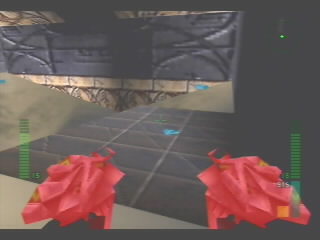
Hold
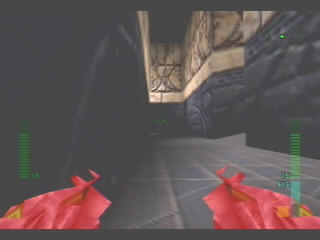
Both places to stand are depicted above, and you can easily move from one to the other in a quick, fluid motion. When they come from the first image, basically stand and shoot as the come around the corner. They do move to your right, then diagonally toward you, so if you wish as they come, strafe right yourself to keep up with their body, and for easier aim as they run toward you...if they make it that far. It is obvious which side they are coming from, if from the ramp, basically wait until they are half down, then edge out and shoot. It is better for you to create the shot than for them to create your shot, meaning don't let them run into your screen, you need to move as well.
Take
Run from either entrance looking at the back center of the hill, and start firing. I'd write more, but there seriously isn't more to it. If you wish, double duck and peer, if you feel you have the time. 3P and up this is recommended, and if you don't have a mauler it is strongly advised in any situation. Also beware that trent has a strong tendancy to run out of this hill toward you, in which you need to back up, take him out, then try to take the hill. If you need to take the hill fast, don't pay attention, kill the people in the hill and he'll take you out. Hopefully your other player will be there to clean up.
Reader Comments CaptZEEBo says: On 3-4 player, get 3 people stationary in the hill. This will stop their clock from moving. Situate a player down the shortest hall, where a steep ramp goes up. This is heading toward the back of the balcony, not down the very long hall. From here, you can look into the center of the hill, and sims run across your path, not shooting at you but the other team members. Reload by ducking behind the wall on your left. Don't stand at the back, but rather halfway up, by the ramp. |
Hold
Oh jeez, where do I begin... On 1 player, sit where depicted. You can see if they are coming from the long hall, and can also spin to your left and see them coming down the ramp, while having cover from the long hall if you back up. Also, you can look about 45░ right and see the corner they drop from, you need to recognize on your radar what this will look like, because once they are in, chaos begins. When playing with more than one player, stick on or more on an entrance, and be closer to the immediate wall on either side, using it as cover. This player should stick to his spot and not help the other, if an entrance is left open, the sims will walk in right behind your back. They time their attacks, just wait. If you can't depend on your other players, stop trying to challenge. Take I cannot give a worthwhile strategy for this, besides keep moving, and have maulers. If you can, get against a wall and just sit, and wait to shoot. Get a good shot lined up, even if it means getting hit, and fire one charged up shot. They move in random patterns, well it is a patter but way too hard to get to know. It is not smart to drop from the top, it is nearly suicidal. If you do, as you fall immediately pull back to get out of the eye of this room. The eye of the room you are vulnerable from all 8 sides of this room, not a good thing. I recommend coming down either of the 2 hallways, hopefully you can pick some off before you get into the hill, it will make life a lot easier. If you are simply going for a win, forget about the hill, and get double maulers, and be near the balcony and sandy, and pray it's not the pyramid. |
| The pyramid is hard to get to first, unless you had a close hill such as the dead end or center. That can be a problem, so it's a smart idea to camp around near it if the other team is about to hold the sandy. Depicted in the large map, it is the bottom left corner, and is named the pyramid hill because of the stacked pyramid in the center of the room. To get here, you will probably pass a mauler in the center, so pick it up. If you are coming from the dead end, your best bet will most likely be simply a falcon, which doesn't do much. In this hill is a magsec, and looking at the map you can see that exiting away from the dead end into the room to the right there is another magsec, easy quick doubles. |
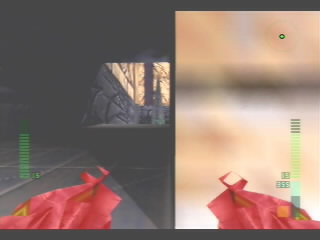 |
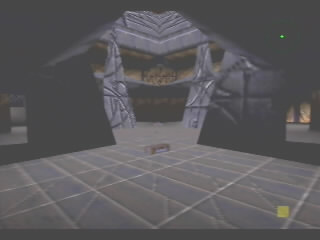
Hold Holding is easier than some people make it out to be, and the most common mistake is not using cover. Even this picture is peering out to far, and this stance should only be taken when the simulant is in full view. Hide behind the wall as they run up, and step out when they come. You can do this on either side. If playing with more than 1 player, one should cover each side, and any others be backup, and run to the side with simulants. On 1 player, they like to plan attacks, and at this time, you should take out the one coming from the dead end without using cover, then quickly run to the other side and take the other out coming up this ramp, once again you can't use cover. The one from the dead end appears first. Try to watch the radar, and see what it looks like when they come. From the magnum, they'll be the close look on the radar. From the other side, distance is not judgeable, but location is obvious. Take What can I say, besides grab a mauler. This one is quite hard, but I find if you crouch and stay behind the pyramid in comparrison to their body, they have a hard time hitting you, while you can sometimes get good shots off. If you can get more than one in at once, split up, sit in opposite corners, the pyramid prevents you from hitting eachother. Try not to be standing. Once again, taking them out before you get into the hill is vital, if they come into view start firing away, use your radar if you cannot see the actual simulant. A very, very good strategy is shown in my 1 player video, linked below, at around 2:20. Wait outside, I knew I had time, and get both in a nice lined up shot, with my good friend maulers. |
 |
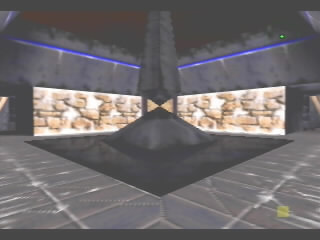
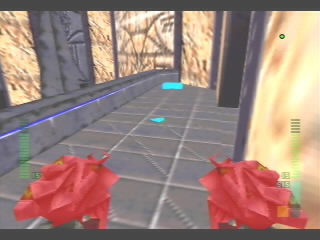
Hold
Basically on 1 player or 2 player, sit in the spot shown in the picture. If they are coming from the location with a falcon2 scope, across the large room, back up behind the slope for cover. When they come, they should hit the floor, and you should hit them. If you are too far up, or too far down, they can hit you and you are rocketed down the hill, not a good thing. That is why on 3 player or 4 player we slap a player in the back, on top of the mauler, who also has easy shots, and if the sims get in has a much much larger chance of cleaning up, while atleast 1 front player can continue to guard the front. Never commit both players to a sim on the inside, you need to depend on one player to take the sim out while the other guards the outside. Never let an entrance be unguarded unless you want to double the trouble. Take It has been done to take this hill from 3 from the far far spot, directly across the large room from the hill. You can continously shoot and the tiny objects if you don't have time to get there, and it is easier than you'd think. But more practical, run up to the hill, and barely get in. Stand here and wait for them to come on up to you. Some very nice demonstrations are done in my 2 player video, playing alone. If you cannot get in, wait outside the hill, at the top of the ramp in the corner. They'll flood out and you can kill them after the hill alteast, to clear the way to the next hill. Don't fear, the sims have a tendancy not to have more than 2 people in this hill, rarely 3 on 3P. If you die trying to take the hill, it's over. Trust me, get a gun, you can't make it in time under any circumstances. |
 |
Sandy This mauler is normally not accessed throughout the course of the game unless under certain circumstances. I'd say avoid this location unless you spawn in this room, or considerably close to it. If this is the hill, run straight to the mauler, you can guard from back here if they are on your tail. Don't underestimate how vital it is to have a mauler, and doubles are more than double the advantage, once you have 2 you are unstoppable for quite some time. Also, if you know the other team is going to get a hill, you can walk around this area, pick up the mauler, and pray it's the next hill. It is a hard one to take, so hanging around this are is a good idea. It is better to hang around the balcony, where we take you for the next mauler. |
 |
Balcony As previously mentioned, it is a good idea to hang around this area if the other team is going to score the sandy, pyramid or dead end. You normally wont be getting this mauler, like the Sandy, unless you spawn near it, or under the circumstances that there is nothing better to do than rack up on the guns. If this is the hill, obviously pick it up, unless you already have 2. If your friend doesn't have a mauler, and you have one, let him pick it up. 2 sets of 1 are better than a set of 2, unless your partner(s) have double of any other gun besides the magnum. If both of you have 1, let the one with the most life take the double, or say your friend has full red, no mauler, don't let him have it, he'll lose it anyway. |
 |
Center Finally, the mauler that you'll be getting time after time. You always want to continuously be picking this up, even if you already have 2. This way close trailing sims wont take it, and will be there for later. Normally a sim is close enough behind you to pass it before the next one appears, and it will always be there for you. You normally return sooner than it respawns if you let the sims pick it up, and it's best to keep guns like this out of their hands. Go out of your way to pick up this mauler, the start of the game, it is more important than the hill. Obviously this is a hill, so take it, and follow the same guidlines for "who gets what" as stated in the balcony section. If they are going to get a hill, camp here and wait for the mauler. If nobody is in the hill, camp here and get a mauler. If your friend is holding a close hill (pyramid, balcony), camp here for the mauler. It is probably the most important key to winning this challenge, for a strong arsenal. |
Teamwork is a vital key to winning this challenge, because if you don't use your teammates, it is like you and him playing 2 different games, just the same hills. You don't want that, do you? Didn't think so. Here are some tips to get you started.
One Player
Teamwork
Videos
Videos always help, right? Of course, and if you are having trouble, get as many as you can. It's good to see how a handful of skilled players across the world handle the challenge, and it would be a good idea to watch each more than once to get a stronger idea of how to take and hold each hill.
11-0 OctoInky
11-0 ParagonX9
11-0 ExpertGamer64
Two Player
20-4 top: OctoInky bottom: Master
17-5 OctoInky playing alone
19-2 ParagonX9 playing alone
21-0 top: Discombobulator bottom: ParagonX9
Three Player
13-11 OctoInky playing alone
15-14 ParagonX9 playing alone
Four Player
32-0 topleft-bottomright: Discombobulator, ParagonX9, CaptZEEbo, Perfectdarklich
Credits
ĀĀĀĀĀ-Expertgamer64
ĀĀĀĀĀ-www.perfectlydark.com
Videos
ĀĀĀĀĀ-Expertgamer64 for uploading
ĀĀĀĀĀ-BlueDogGreen for hosting
 ĀĀĀĀĀĀĀĀĀĀ
 ĀĀĀĀĀĀĀĀĀĀ