
Cross Weaved Background
INFORMATION & SUPPLIES
This tut came about after a very talented lady asked how I achieved this effect after she saw it in a stationery that I sent to her group. She asked if I could write a tut on it.
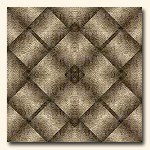
The tile that you see to your left is what the end result will be.
This tile can be muted so that you can use it to compliment the original tile on a tabled background or on stationery. The possibilites are endless.
All the images on this page have been optimized for faster loading.
To achieve the exact same results that I have you will need to have a few filters.
• Texture; • VM Natural; • FM Tile Tools; • Graphics Plus
THE TUTORIAL
1. Choose an image. Alternatively, use the image shown here by right-clicking and saving. Open that image up in PSP.

(not shown at actual size)
2. Take your dropper tool and select a foreground colour from your image
by left-clicking on the colour you have chosen. I would suggest a darker complimentary colour but that is ultimately up to you. The colour that I chose is: #574725.
(Quick tip for you here: if you want to use the same colour as I have, highlight the colour code, go to edit > copy and then in PSP open up your colour pallete and delete HTML code that's currently in there, place your cursur in the space provided and right-click > paste and there you'll have the code without trying to remember a bunch of letters and numbers that really don't belong together!)
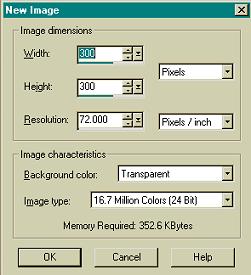
3. Open a new image. I used 300 x 300 because its a good workable size for me, but you can use whatever size suits you.
4. Take your flood fill tool and fill the blank image with your choosen colour.
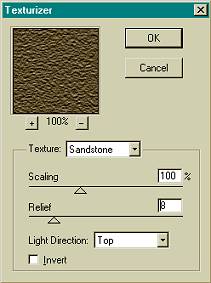
5. Now we need to apply the Texture filter. Effects > Plugins > Texture. Apply the following settings. As with everything else in this tut, you can vary it to your own liking, these are just what I thought looked good at the time.
6. Duplicate this texturized layer. Layers > Duplicate.
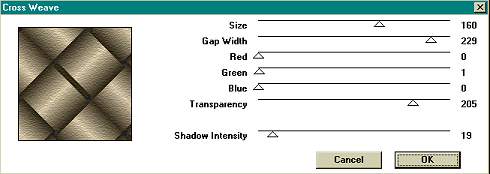
7. Now we apply the VM Natural Cross Weave filter to this duplicated layer. The settings that I used are shown below, though again, play aroud with these, see what you can come up with.
8. Add another layer.
(Quick tip hold down the shift key while clicking on the new layer icon in your layer palette and you can avoid the screen that asks you to name the layer and all that.)
![]() 9. Now we use our image of the lady (or whichever one you've chosen).
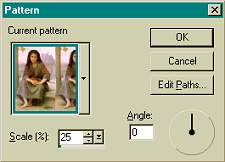
Pick up your flood fill tool again and this time change the foreground to pattern. (Highlighted in pink in the screenshot you see to your right.)
9. Now we use our image of the lady (or whichever one you've chosen).
Pick up your flood fill tool again and this time change the foreground to pattern. (Highlighted in pink in the screenshot you see to your right.)
10. Next comes the use of the FM Tile Tools Collage - Linear filter. With this filter its just a matter of choice really. I just click on the randomize button until I get a look that I like.
11. Again, go back to your FM Tile Tools filter, this time however we are going to apply the Blend Emboss feature. Just use the default settings, I do, its easier.
12. Now lower the opacity of this flood filled layer to about 30%. If you want to see more image then keep it higher, if your after more background, then go lower than 30%. For this particular exercise keep the blend mode normal. You can muck around with the blend mode settings aswell. Dodge gives a really interesting effect.
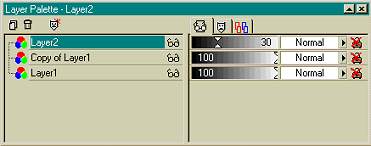
13. Merge all layers now. Layers > Merge All (flatten) then we go onto the last couple of steps.
14. We need to make it seamless now. For this particular tut I applied the Graphics Plus Quick Tile I. I just used the default settings but I guess you could move these around a bit aswell.
15. To finish it off I sharpened the image a bit. Effects > Sharpen > Sharpen. And that pretty much does it.