Bryce 4 to Imagine for Windows
|
Bryce 4 has beefed up
their import and export capabilities. Terrain type objects can be exported to dxf,
lwo, or 3ds formats with accompanying bitmaps. Below is a step by step transfer of a
Bryce 4 terrain into Imagine for Windows.
|
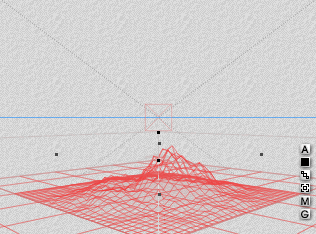
This is the default terrain object in Bryce.
It is 81.92 by 81.92 by 20.48 Bryce Units. This default object can then be edited in
the terrain editor.
|
 |
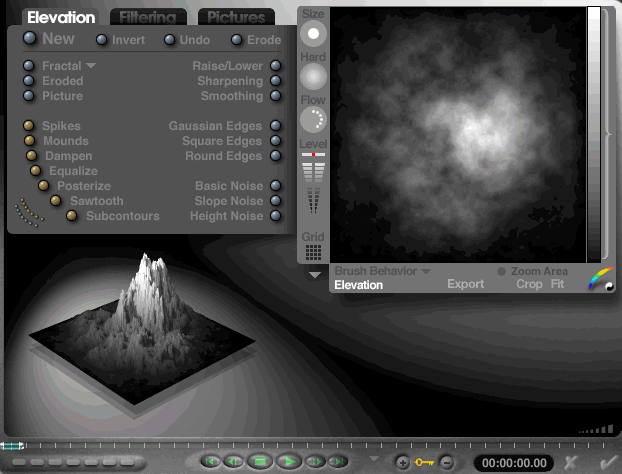
The terrain editor in Bryce is the whole reason for
importing Bryce terrains into Imagine. The editor is superb for creating and
manipulating terrains. You basically draw real time in 3d with 2d tools. Any
picture can be imported and KPT can be used to create and modify terrains.
|
 |
There is a wonderful set of basic materials that
can be directly applied to the objects including the various terrains which are displayed
to the right side. I chose a desert style terrain called Arizona. No
modifications were made.
|
 |
This is the export module for terrains. You
have complete control over the export process. Number of polygons, object size, and
the numerous image maps including bump, color, clip, specularity, transparency, etc.
may be exported also.
|
 |
IFW uses a coordinate system with the z axis
pointing up or altitude. Bryce has the y axis pointing up or altitude.
|
Bryce exports the
object with a width of 256 and a height of 256. This can be increased but the object
size in Bryce is different that the export size. I exported two terrain objects -
one with the standard elevation and size. The next one was flattened to 810.92 by
810.92 by 2.048 - more of a imagine ground object.
|
Imagine imported the standard terrain above as a
200 x 200 x 50 object with a centrally placed resized axis. Reposition the axis to
the center of the object and resize the axis to fit the object size. Then resize the
object to 256 x 256 x 50.
|
Imagine imported the
flattened ground object as 94 by 94 by 1.87 imagine units. The axis was centrally
placed and resized. I needed to resize the object so the axis must first be adjusted
to fit the object. Reposition the axis to the center of the object and resize the
axis to fit the object size. Then resize the object to 940 x 940 x 2.
|
The exported Bryce bitmaps look upside down to me
when viewed with any viewer. The picture to the right is a specific orientation
terrain of the letter "A" which I exported for alignment purposes. The
"A" is upside down.
|
 |
How to apply the image maps to the imagine object.
|
1. The terrain has x
and y length and width while the default placement is flat x and z. So... exchange
the y and z brushmap sizes.
2. Rotate the texture axis 90 degrees around X.
3. Translate the texture axis the length of the object
in the y axis which for the standard terrain of 200 x 200 - 200 units.
4. Fine Tune the placement by hand to make sure the
edges are covered.
5. Duplicate this map for all the needed maps so the
map placements are identical. Then change the maps and usage to fit the different
brushmaps.
|
Mountain Object with Brushmaps
|
Ambient Color Bitmap
Diffusion Color Bitmap
Specular Color Bitmap
Bump Amount Bitmap
|
Flattened Ground Object
|
Ambient Color Bitmap
Diffusion Color Bitmap
Bump Amount Bitmap
|
Sky Background
|
Bryce Preset saved as a
bitmap and used as a backdrop picture.
|
Fog Object - Just used to somewhat confuse the
picture with an Imagine tool.
|
1000 x 1000 x 10 fog box - foglength 4000, color
229, 221, 62
Two textures - rjjmarble and rjjaffectother
rjjmarble - defaults but turn off affect color
rjjaffectothers - defaults plus affect foglength
|
