None
Analog-Digital Converter, this electronic components are used to digitize analogous measuring-signals and make them readable to microprocessors. Depending on the required accuracy the digitizing is performed with 8, 16 or 24 bit resolution.
an important message, sent imediately to the central monitoring system
Dragging is used to move an object on the screen from one location to another. Dragging is also used to resize an object by moving the objects border. Click and hold down the mouse button to move or resize an object.
A focus is a visible border or color-effect emphasizing preselected controls
A filter is used to prevent invalid character-input. The set of valid characters are usually annotated with rectangular brackets, for instance
[0-9], [ASCII 32-127]
Final-Values are the result of the signal-postprocessing. Post-processing is used for data-correction by applying calibration-values, or if the use of different technical units is required for data-evaluation (i.e. ppm versus µg, or m/sec versus km/h).
A Graphical User Interface (GUI) allows the user to interact with the system in a shophisticated way.
Halfhour-Meanvalues (HMV) are the result of the standard data-processing. The environmental monitoring system is capable to store up to 21 days of HMV for up to 48 components.
A component may be a physical or a logical component. For instance the wind-gust is described by 3 logical components: wind-gust, related wind-direction and related time-marking of the occurence.
A progress-bar is an indicator showing the progress of timeconsuming operations
Raw-Values are the result of the signal-conversion - the electrical input-signal is converted in technical units by use of a polynomial. For instance the signal-voltage of the temperature-sensor is converted in °Celsius.
RS-232 is a communication-link used for data-transfer over short distances (suitable for up to 15 meters of cable-length).
The sub-identifier is used to distinguish devices of same type. The unique Device ID consists of two digits describing the type of measuring device (ie. temperature sensor = 13) and a sub ID from 1 - 9.
The task-bar is used by the operating system (ie. Win98, WinNT) to indicate running user-applications. A small part of the task-bar is provided for system-activities, for instance time-display.
A hooverhelp or tooltip is used to explain abbreviations or technical expressions
A User Password is required to access data or execute operations
Variable-Meanvalues (VMV) are the result of user-defined data-processing. VMVs may be established for up to 8 components. The storage of VMVs depends on the number of components and the choosen time-interval.
The environmental monitoring system is capable to store exactly 3 days of VMV for 8 components with measuring-intervals of 1 minute. If the number of components is decreased, or the time-interval is increased, the storage-capacity will increase accordingly.
For detailed information see the W3C homepage at
www.w3.orgNot yet implemented
Uwedat® Servicetool
Device Parameter
Introduction
The environmental monitoring station is equipped with a number of measuring-devices (components) and each device is described by a set of parameters. The equipment and the parameterization is designated with the term configuration. The Device Parameter work-view is provided to manage the configuration. The device-menu includes controls to install and remove measuring-components, to manipulate parameter-sets and to start and stop the measurement of individual components. The device-parameter determines both the characteristics and behaviour of the measuring-components and the data conversion of the measured values.
Overview

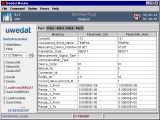
The Device Parameter view is a tabbed pane divided into five editable tables. Each table contains a set of parameters, the tables are selected by click on the table-tab.
If you want to view the parameter-set of a component, you must specify the component. You can enter the component-number directly or you can use the Device-Selector

Device Selector
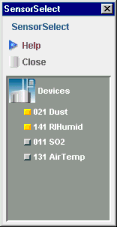
The Device Selector is a external, floating window which is always on the top of the work-view window. The device-selector shows both the equipment (device-inventory) and the state of the individual devices (measuring, idle, edited). A device is selected via mouse-click, and unambiguous user-actions can be started with double-click.
The Device Selector is used with a couple of user-actions. For detailed information see Device Selector .
|
Parametertable
The parameters are grouped into three columns. The first column shows the meaning of the parameter and the second column shows the value of the parameter. The third column contains editable datafields which allows you to edit the parameter-value.
 | You can always view the parameter-set of individual components, but any changes to the parameter set are denied unless the measurement of the component is stopped (command Device Off). |
|
Parameter Edit
The third column (titled Parameter New) contains editable entryfields which allows you to edit the parameter-value.
 | Entryfields are usually combined with formatters to prevent invalid data-input. If a formatter is applied with an entryfield, the used [formatting-rule] is described in rectangular brackets. It is important to know, that such entryfields doesn't accept data-input which violates the formatting-rules. |
|
Calculationtable
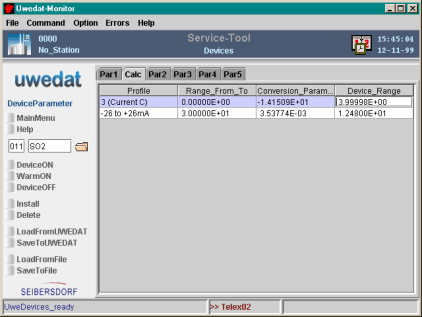
The calculation table gives the possibility to autocalculate the conversion parameters by the prior selected profile number, measuring range and manually edited device ranges. For detailed information see Calculationtable.
|
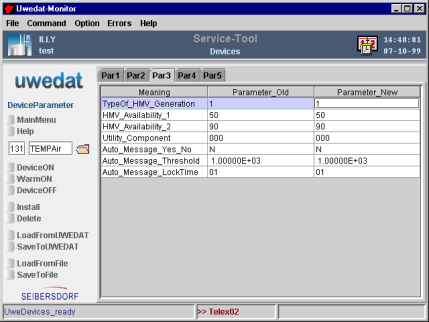
Parametertable 3
The parametertable 3 comprises parameters for data evaluation (mean values) and data-qualifying. For detailed information see Parametertable 3.
|
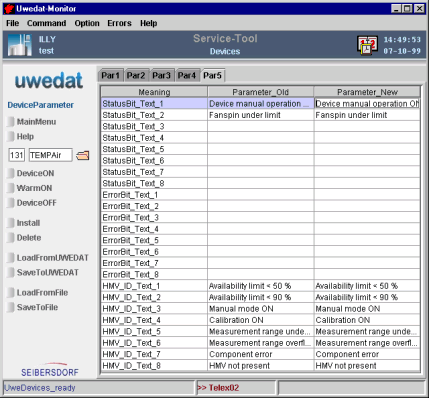
Parametertable 4
The parametertable 4 comprises the description of individual bits of device-statusbyte, device-errorbyte and HMV -statusbyte. For detailed information see Parametertable 4.
|
Menu

The Device Parameter Menu is used
 | to manage the equipment
(install and remove devices) |
 | to change the state of devices
(measurement On, Off) |
 | to load, manipulate and save device parameters |
 | to copy device parameters to a backup-archive (harddisk or floppy) |
All menu-actions requires the preceeding selection of one or multiple devices.
 Device Number
This entry-field is used to specify one single device directly by component-number. If you don't know the approbiate component-number, use the Device-Selector button Device Number
This entry-field is used to specify one single device directly by component-number. If you don't know the approbiate component-number, use the Device-Selector button  to open the Device Selector . The Device Selector can also be used to make multiple selections at once. to open the Device Selector . The Device Selector can also be used to make multiple selections at once.
|
 Install Installs a new device. Requires a new unique component number. The install will be denied if the component-number already exists. This function is not applicable for multiple device-selections, you have to install devices step by step. Install Installs a new device. Requires a new unique component number. The install will be denied if the component-number already exists. This function is not applicable for multiple device-selections, you have to install devices step by step.
 | A usual approach to setup a new device is to load a prepared or a standard device-configuration from your backup-archive, set the proper device number and device-name whith the Servicetool and save the configuration to the station.
|
|
 Delete Removes an existing device. The device must be "switched Off", otherwise the removing is denied. Multiple device-selections are allowed for this function. Delete Removes an existing device. The device must be "switched Off", otherwise the removing is denied. Multiple device-selections are allowed for this function.
|
 Top of document
Parametertable 1
Image

Parameter
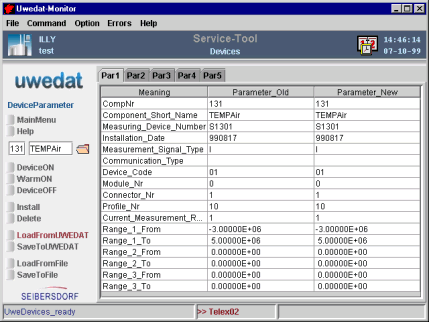
The parameters are grouped into three columns. The first column shows the meaning of the parameter and the second column shows the value of the parameter. The third column contains editable datafields which allows you to edit the parameter-value.
 | You can always view the parameter-set of individual components, but any changes to the parameter set are denied unless the measurement of the component is stopped (command Device Off). |
 Component Number
Specifies the component type 01-99 and differentiates the same types with a subnumber 1-9. Component Number
Specifies the component type 01-99 and differentiates the same types with a subnumber 1-9.
 |
LENGTH : 3 char
FORMAT : [Digit 0 - 9] >
EXAMPLE: 011
|
|
 Component Name
A short descriptive name of the component type. Component Name
A short descriptive name of the component type.
 |
LENGTH : 7 char
FORMAT : [ASCII 32 - 126]
EXAMPLE: Dust
|
|
 Serial Number
Serial or inventory number of the component. Serial Number
Serial or inventory number of the component.
 |
LENGTH : 5 char
FORMAT : [ASCII 32 - 126]
|
|
 Signal Type
Defines how the measured value is acquired by the station computer. As an analog/digital value via the Intelligent Measuring Interface (IMI) or as a data string via a serial interface (SIO RS232). Signal Type
Defines how the measured value is acquired by the station computer. As an analog/digital value via the Intelligent Measuring Interface (IMI) or as a data string via a serial interface (SIO RS232).
 |
R = RS232 serial interface
I = IMI Intelligent Measuring Interface
M = Meteodat datatelegram
K = IMKO soil moisture measurement
O = Opsis visual range measurement
S = SSM radioactivity measurement
|
|
 Device Code
Hexadecimal measuring device code, used with components that are connected via the measuring device interface (IMI). The device code is hardcoded in the cable-connector of the device. Device Code
Hexadecimal measuring device code, used with components that are connected via the measuring device interface (IMI). The device code is hardcoded in the cable-connector of the device.
 |
LENGTH : 2 char
FORMAT : [Hexadecimal 0 - F]
EXAMPLE: 01
|
|
 Module Number (0-9)
Bus address of the interface module. Used with the measuring device interface IMI. The module-number is determined by the IMI frontpanel-switch. Module Number (0-9)
Bus address of the interface module. Used with the measuring device interface IMI. The module-number is determined by the IMI frontpanel-switch.
 |
LENGTH : 1 char
FORMAT : [Digit 0 - 9]
|
|
 Connector Number
Used with the measuring device interface (IMI) and the serial interface SIO. Possible numbers are IMI connector 1 - 3, SIO connector 1 - 6. Connector Number
Used with the measuring device interface (IMI) and the serial interface SIO. Possible numbers are IMI connector 1 - 3, SIO connector 1 - 6.
 |
LENGTH : 1 char
FORMAT : [Digit 0 - 9]
|
|
 Profile Number
The profile number specifies what is measured (current, voltage, resistance etc.) with the measuring device interface (IMI). If the component is connected via serial interface (SIO), the profile number specifies the device-driver. Profile Number
The profile number specifies what is measured (current, voltage, resistance etc.) with the measuring device interface (IMI). If the component is connected via serial interface (SIO), the profile number specifies the device-driver.
 |
LENGTH : 1 char
FORMAT : [Digit 0 - 9]
EXAMPLE for IMI: see the measuring station user manual.
EXAMPLE for SIO: 1 = NO, 2 = NO2, 3 = Dust, 4 = SO2, 5 = NOx
|
|
 Current Range 1-3
Defines which of the three measurement ranges is used. Current Range 1-3
Defines which of the three measurement ranges is used.
 |
LENGTH : 1 char
FORMAT : [Digit 1 - 3]
|
|
 Range 1-3
Specifies the measurement limits (in raw value units) for three different measurement ranges. Range 1-3
Specifies the measurement limits (in raw value units) for three different measurement ranges.
 |
LENGTH : 12 char
FORMAT : [Digit 0 - 9] [E + -] noted in exponential format
EXAMPLE: from 0.00000E+00 to 1.00000E+03
|
|
 Top of document
Calculationtable
Image

Parameter
The parameters are grouped into four columns. The first column shows the current profile number and their meaning, the second column shows the current measuring range. The third column contains the current conversion parameters. The fourth column contains editable datafields which allows you to edit the required device range and autocalculate the conversion parameters.
 | You can always view the parameter-set of individual components, but any changes to the parameter set are denied unless the measurement of the component is stopped (command Device Off). |
 Top of document
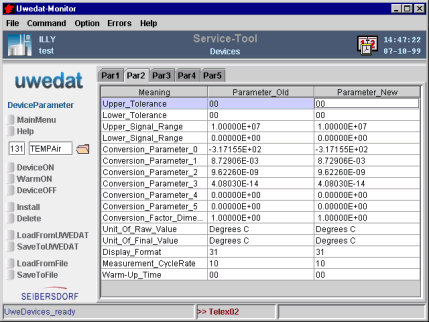
Parametertable 2
Image

Parameter
The parameters are grouped into three columns. The first column shows the meaning of the parameter and the second column shows the value of the parameter. The third column contains editable datafields which allows you to edit the parameter-value.
 | You can always view the parameter-set of individual components, but any changes to the parameter set are denied unless the measurement of the component is stopped (command Device Off). |
 Tolerance
Limitation of the range in which the raw value is still valid, indicated in % of the selected measurement range. Tolerance
Limitation of the range in which the raw value is still valid, indicated in % of the selected measurement range.
 |
LENGTH : 2 char
FORMAT : [Digit 0 - 9] noted in %
EXAMPLE:
Upper Tolerance 05 %
Lower Tolerance 03 %
|
|
 Signal Range
Range within which the measurement signal is valid and will be used for raw values generation. Signal Range
Range within which the measurement signal is valid and will be used for raw values generation.
 | ADC -4 to +4 Volt (-40 000 to 40 000) |
 | Counter: 0 to 65 536 |
 |
LENGTH : 12 char
FORMAT : [Digit 0 - 9] [E + -] noted in exponential format
EXAMPLE:
Upper Signal Range 2.40000E+04
Lower Signal Range 2.00000E+02
|
|
 Conversion Par. 0-5
Parameter (ki) for the polynomial for converting the measurement value (x) into the raw-value (y). For linear polynominals see Calculationtable. Conversion Par. 0-5
Parameter (ki) for the polynomial for converting the measurement value (x) into the raw-value (y). For linear polynominals see Calculationtable.
Y=k5*x5+k4*x4+k3*x3+k2*x2+k1*x+k0
 |
LENGTH : 12 char
FORMAT : [Digit 0 - 9] [E + -] noted in exponential format
|
|
 Conversion Factor
For converting the raw-value into a final-value wich has an alternative technical unit (e.g. wind velocity may be expressed in m/s or km/h or knots). Conversion Factor
For converting the raw-value into a final-value wich has an alternative technical unit (e.g. wind velocity may be expressed in m/s or km/h or knots).
 |
LENGTH : 12 char
FORMAT : [Digit 0 - 9] [E + -] noted in exponential format
EXAMPLE: 3.60000E+00
|
|
 Units
The unit of the raw value and the final value. Units
The unit of the raw value and the final value.
 |
LENGTH : 10 char
FORMAT : [ASCII 32 - 126]
EXAMPLE: ppm
|
|
 Measurement Cyclerate
Sampling rate for the measurement channel. Measurement Cyclerate
Sampling rate for the measurement channel.
 |
LENGTH : 2 char
FORMAT : [Digit 0 - 9] in seconds
EXAMPLE: 10 sec
|
|
 Warm-UpTime
Warm-up time in 10 minutes for components after start or power failure. During this time the final values are not used for averaging. Warm-UpTime
Warm-up time in 10 minutes for components after start or power failure. During this time the final values are not used for averaging.
 |
LENGTH : 3 char
FORMAT : [Digit 0 - 9] in minutes * 10
EXAMPLE: 003 (equals to 30 minutes)
|
 | Use Warm-Start to restart measuring-devices whitout this warm-up period. |
|
 Top of document
Parametertable 3
Image

Parameter
The parameters are grouped into three columns. The first column shows the meaning of the parameter and the second column shows the value of the parameter. The third column contains editable datafields which allows you to edit the parameter-value.
 | You can always view the parameter-set of individual components, but any changes to the parameter set are denied unless the measurement of the component is stopped (command Device Off). |
 HMV Generation
Defines the type of data processing (see list below). Please note that with component groups all the components involved must use the same type of processing. HMV Generation
Defines the type of data processing (see list below). Please note that with component groups all the components involved must use the same type of processing.
 |
1 = arithmetic mean value
2 = summ
3 = peak value
4 = vector mean value
5 = Dust processing
6 = NOx processing
7 = windvector and gust
8 = windvector, gust with timestamp
9 = difference value, ie. NOx-NO
A = wind class distribution
B = triple
|
|
 HMV Availability 1, 2
The HMV-Availability is determined by two parameters: HMV Availability 1, 2
The HMV-Availability is determined by two parameters:
 | The availability 1 (lower limit - HMV invalid) defines the minimum percentage of good final values. Dropping under this value marks a HMV as "invalid". |
 | The availability 2 (upper limit - HMV good) defines the percentage of good final values up to which a HMW is marked as "poor". |
 |
LENGTH : 2 char
FORMAT : [Digit 0 - 9] in %
EXAMPLE : Availability 1 = 50%, 2 = 90%
Good values < 50% availability = invalid
Good values < 90% availability = poor
Good values > 90% availability = good
|
|
 Utility Component
Supplementary information for data generation in coded form, only required in special cases. Currently only used with wind speeds for definition of calm. Utility Component
Supplementary information for data generation in coded form, only required in special cases. Currently only used with wind speeds for definition of calm.
 |
LENGTH : 3 char
FORMAT : [Digit 0 - 9]
000 = calm below 0.5 m/s
001 = calm below 2.0 km/h
002 = calm below 1 kn
|
|
 Auto Messages
Autogenerated messages (alarm) to the central monitoring system when the internal message threshold is exceeded. A scheduled shutdown of measuring-devices by means of relays can be initiated with this parameter. Auto Messages
Autogenerated messages (alarm) to the central monitoring system when the internal message threshold is exceeded. A scheduled shutdown of measuring-devices by means of relays can be initiated with this parameter.
 |
J = Yes, generate auto message if threshold is exceeded
N = No, don't generate automessage
R = Relay, initiate scheduled shutdown
B = Both, auto message and scheduled shutdown
|
|
 Auto Message Threshold
If the measuring-value exceeds the threshold value, a error message is generated. Auto Message Threshold
If the measuring-value exceeds the threshold value, a error message is generated.
 |
LENGTH : 12 char
FORMAT : [Digit 0 - 9] [E + -] in exponential format
EXAMPLE: 1.0000E+03, stated in final value units
|
|
 Auto Message Block-time
Suppresses successive internal messages. Auto Message Block-time
Suppresses successive internal messages.
 |
LENGTH : 2 char
FORMAT : [Digit 0 - 9] in hours
EXAMPLE: 1 hour
|
|
 Top of document
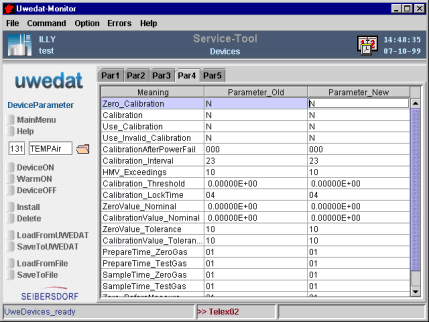
Parametertable 4
Image

Parameter
The parameters are grouped into three columns. The first column shows the meaning of the parameter and the second column shows the value of the parameter. The third column contains editable datafields which allows you to edit the parameter-value.
 | You can always view the parameter-set of individual components, but any changes to the parameter set are denied unless the measurement of the component is stopped (command Device Off). |
 Calibration
The type of calibration is determined by four decisive parameters: Calibration
The type of calibration is determined by four decisive parameters:
 | Zero-point Calibration? |
 | Check-point Calibration? |
 | Use calibration result? |
 | Use invalid calibration result? |
 |
LENGTH : 1 char
FORMAT : [J = Yes][N = No]
|
|
 Forced Calibration
If a power failure exceeds the stipulated time period, a forced calibration is carried out (+warm-up). Forced Calibration
If a power failure exceeds the stipulated time period, a forced calibration is carried out (+warm-up).
 |
LENGTH : 3 char
FORMAT : [Digit 0 - 9] in minutes
EXAMPLE: 030 minutes
|
|
 Interval
Determines the interval for periodic calibration. Normally daily, but <> 24 hours. Interval
Determines the interval for periodic calibration. Normally daily, but <> 24 hours.
 |
LENGTH : 2 char
FORMAT : [Digit 0 - 9] in hours
EXAMPLE: 23 hours
|
|
 HMV Exceedings
Number of HMV-Exceedings. This value determines how often the threshold-value may be exceeded before a forced calibration is carried out. HMV Exceedings
Number of HMV-Exceedings. This value determines how often the threshold-value may be exceeded before a forced calibration is carried out.
 |
LENGTH : 2 char
FORMAT : [Digit 0 - 9]
|
|
 Threshold
 value, stated in final-value units. If the accumulated number of threshold-exceedings reaches the limit given by HMV-exceedings, a forced calibration is carried out. Threshold
Threshold value, stated in final-value units. If the accumulated number of threshold-exceedings reaches the limit given by HMV-exceedings, a forced calibration is carried out.
 |
LENGTH : 12 char
FORMAT : [Digit 0 - 9] [E + -] in exponential format
EXAMPLE: 1.0000E+03, stated in final-value units
|
|
 Block-Time
Prevents multiple calibration within a certain time period. Block-Time
Prevents multiple calibration within a certain time period.
 |
LENGTH : 2 char
FORMAT : [Digit 0 - 9] in hours
EXAMPLE: 05 hour
|
|
 Nominal Values
Nominal values for zero- and check-point values, stated in raw-value units. If they are not reached (including tolerances), the calibration is marked as invalid. Nominal Values
Nominal values for zero- and check-point values, stated in raw-value units. If they are not reached (including tolerances), the calibration is marked as invalid.
 |
LENGTH : 12 char
FORMAT : [Digit 0 - 9] [E + -] in exponential format
EXAMPLE: 1.0000E+03, stated in raw-value units
|
|
 Tolerance Values
Tolerances for calibration Tolerance Values
Tolerances for calibration
 | Zero-point tolerance, in parts per thousand of measurement range (end value) |
 | Check-point tolerance, in % of check-point nominal-value |
 |
LENGTH : 2 char
FORMAT : [Digit 0 - 9]
|
|
 Prepare Time
For rinsing the measuring chamber with zero or calibration gas. Prepare Time
For rinsing the measuring chamber with zero or calibration gas.
 |
LENGTH : 2 char
FORMAT : [Digit 0 - 9] in minutes
|
|
 Sample Time
During this time-period the zero-gas or calibration-gas is measured. Sample Time
During this time-period the zero-gas or calibration-gas is measured.
 |
LENGTH : 2 char
FORMAT : [Digit 0 - 9] in minutes
|
|
 Zerogas Cleansing
Zero-gas after calibration-gas. For the final rinsing (cleaning) of the measuring chamber. Zerogas Cleansing
Zero-gas after calibration-gas. For the final rinsing (cleaning) of the measuring chamber.
 |
LENGTH : 2 char
FORMAT : [Digit 0 - 9] in minutes
|
|
 Recovery Time
Time-delay (idle period), before measurement recommences with sample air. Recovery Time
Time-delay (idle period), before measurement recommences with sample air.
 |
LENGTH : 2 char
FORMAT : [Digit 0 - 9] in minutes
|
|
 Top of document
Parametertable 5
Image

Parameter
The parameters are grouped into three columns. The first column shows the meaning of the parameter and the second column shows the value of the parameter. The third column contains editable datafields which allows you to edit the parameter-value.
 | You can always view the parameter-set of individual components, but any changes to the parameter set are denied unless the measurement of the component is stopped (command Device Off). |
 HMV Status Bits
Meaning of the HMV status bits in plain text. The meaning of the individual bits is defined by the station computer software (identical for all components) - please do not change the original text. HMV Status Bits
Meaning of the HMV status bits in plain text. The meaning of the individual bits is defined by the station computer software (identical for all components) - please do not change the original text.
|
 Top of document


