Now changing interpolation types is all well and good, but if you're trying to concentrate on animating your character, moving between your 3d view and the channel editor can become distracting, or at least it is for me.
What I tend to do is double key. This might appear to be a messier way of achieving the same result, but it's faster in the long run.
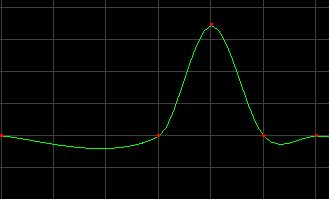
Here's the problem curve, as it was before we fixed it:

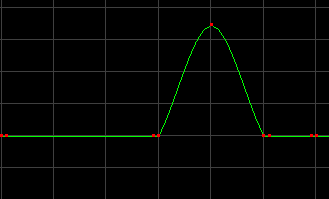
Now if we put two keys at each end of the 'hold' areas, look what happens:

Using two keys at each end of the problem area 'pins down' the curve so the object won't drift. If you want to know why this works, read this explanation.
The advantage of using this method is you can double-key while working in your main viewport, and not have to open a channel editor. When you're moving your object around, and it's come to a point in time where it has to stay still, position it, then ctrl-c to copy the key. Advance one frame (+ on your keyboard), and ctrl-v to paste the key. You've now done one end of the double key. Now move forward in time to where the object will leave the current position, and paste the key again. Go back one frame, and paste it one last time. Between these two double keys, the object will not move. So those steps again: