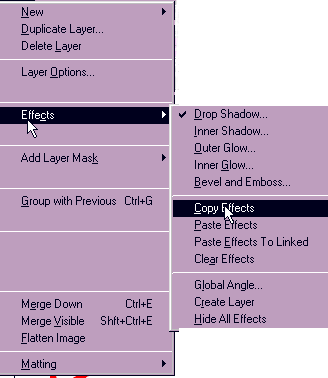
10. After adjusting the drop shadow, I clicked OK..and then went to layers/effect/copy effects (see fig9)
[fig9]

11. Then right click on any
layer in the layers pallet and click "paste effects to
linked" you can also access this from the layer menu above
in FIG9 . WOW! watch the drop shadow be applied to all of the
letters that are linked. which means all the letters here..I left
out the *'s when I linked so there is no shadow. on them.
Now, you are ready to render the type (right click on the T in
each layer and click render layer), flatten the layers and save
the image..!
a few things to consider;
There are endless possibilities here. I have realized this while fooling around with the new features in Photoshop5. Be sure to duplicate the last layer you made and rotate it 15 degrees each time, and if you make sure to place that little circle in the center, it will place your letters where they need to go , no dragging and guessing..all you have to do is duplicate the layer and adjust the angle of rotation..Photoshop does the rest. its not type on path, but it is the best we have been able to do in Photoshop. And Use your imagination,..I could have added a bevel..or rendered the type and flattened all the layers to 1 above the background, and then used other filters on my circle of letters before flattening completely. Have fun!
Tutorials | Links | Books | Photoshop 5 Basics | email