Creating Gems with Blade Pro
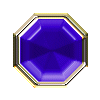
In this tutorial, you are going to make this image:
|

![]() Start
with a new image roughly100 X 100 X 16 million colors
Start
with a new image roughly100 X 100 X 16 million colors
![]() with
a White backgrround. Open the file you downloaded named
ge-gem-blue-master.psp. Within it, you will find the above image. Now, click
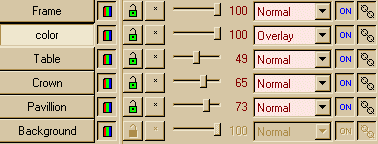
on the first image you made. Add new layers using the names above:
Pavillion, Crown, Table, color, Frame. Now, set the transparency sliders
to reflect the above settings. Pavillion=73, Crown=65, Table=49, color=100,
Frame=100. Make sure to leave all layers with a normal Layer
Blend Mode, except for the color layer which should be
Overlay.
with
a White backgrround. Open the file you downloaded named
ge-gem-blue-master.psp. Within it, you will find the above image. Now, click
on the first image you made. Add new layers using the names above:
Pavillion, Crown, Table, color, Frame. Now, set the transparency sliders
to reflect the above settings. Pavillion=73, Crown=65, Table=49, color=100,
Frame=100. Make sure to leave all layers with a normal Layer
Blend Mode, except for the color layer which should be
Overlay.

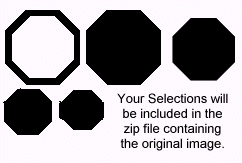
![]() Now, with
the Pavillion Layer selected, click on Selections in the top menu
bar-->Load from Alpha Channel-->ge-gem-blue-master. You will see multiple
selections in the drop down list. Use selection #0 for the pavillion. You
will now see an image that looks like the following one. Flood fill it with
White.
Now, with
the Pavillion Layer selected, click on Selections in the top menu
bar-->Load from Alpha Channel-->ge-gem-blue-master. You will see multiple
selections in the drop down list. Use selection #0 for the pavillion. You
will now see an image that looks like the following one. Flood fill it with
White.

![]() Within
the zip file, there were three Blade Pro presets: GEPavillion, GECrown,
and GEGold Frame. On the Pavillion layer, we will use Blade Pro with the
GEPavillion preset. You may need to experiment with the settings to get a
nice pointed pavillion.
Within
the zip file, there were three Blade Pro presets: GEPavillion, GECrown,
and GEGold Frame. On the Pavillion layer, we will use Blade Pro with the
GEPavillion preset. You may need to experiment with the settings to get a
nice pointed pavillion.

![]() Now, switch
to the Crown layer. Click on Selection in the top menu bar-->Load from
Alpha Chanel-->ge-gem-blue-master. Use selection #0 again. Flood fill
it with White. Using Blade Pro again, select GECrown preset. Your image will
actually have a smooth grey center. We will take care of this in a
moment. Pick up your color selector dropper. Select the color in the center
of the image as the Foreground color. Using your magic wand, select the center
of the image, CUT.
Now, switch
to the Crown layer. Click on Selection in the top menu bar-->Load from
Alpha Chanel-->ge-gem-blue-master. Use selection #0 again. Flood fill
it with White. Using Blade Pro again, select GECrown preset. Your image will
actually have a smooth grey center. We will take care of this in a
moment. Pick up your color selector dropper. Select the color in the center
of the image as the Foreground color. Using your magic wand, select the center
of the image, CUT.

![]() Move to
the Table layer without deselecting the area you just cut. In the top menu
bar, choose Edit-->Paste-->Into Selection. Now, you will see the image
transform into this uncolored gem.
Move to
the Table layer without deselecting the area you just cut. In the top menu
bar, choose Edit-->Paste-->Into Selection. Now, you will see the image
transform into this uncolored gem.

![]() Here is
where the fun begins! In the color layer, Choose a color. I find that darker
colors seem to work best. Here, I used a dark royal blue (#3F02CA).
Purples look great, and so do greens. Be careful of reds as they
tend to bleed. The lighter colors tend to make your gems look extremely
fake, but can add a nice flair to a boring page. As we used Overlay
for this layer, you can play with it, and change it to another Layer Blend
Mode. I like Overlay, Soft Light, Hard Light, and Multiply as they
seem to blend the color the best with your images. But wait! You
are not done yet, unless you want to be. Remember how I had you add
a layer named Frame? Good, that is exactly what we are going to do,
we will add a nice frame to your gem.
Here is
where the fun begins! In the color layer, Choose a color. I find that darker
colors seem to work best. Here, I used a dark royal blue (#3F02CA).
Purples look great, and so do greens. Be careful of reds as they
tend to bleed. The lighter colors tend to make your gems look extremely
fake, but can add a nice flair to a boring page. As we used Overlay
for this layer, you can play with it, and change it to another Layer Blend
Mode. I like Overlay, Soft Light, Hard Light, and Multiply as they
seem to blend the color the best with your images. But wait! You
are not done yet, unless you want to be. Remember how I had you add
a layer named Frame? Good, that is exactly what we are going to do,
we will add a nice frame to your gem.

![]() Making
sure you are in the Frame Layer, hit Selections in the top menu bar-->Load
from Alpha Channel-->ge-gem-blue-master. Use Selection #4 this time.
You will see a "frame" develope around your image. Flood fill
it with White. Using Blade Pro once again, load the GEGold Frame preset.
Hit OK, and you will end up with this. Voila, your gem is
done! Before saving, remember to merge all visible layers. This
image is best saved as JPG, but doesn't do too bad as GIF as you can see
here. Below is a small sampling of some gems I created following the
above process. I changed the shapes though. Remember that if
you decide to use a different shape, you must change the frame to reflect
that shape. The easiest way to do this is to select the area around
the gem, create a new layer named FRAME2. Invert the selection, while
in FRAME2, select Selections from the top menu
bar-->Modify-->Expand. I use anywhere between 5-10, but 7 works
best. Flood fill the area with White, now, choose Selections from the
top menu bar-->Modify-->Contract. Use the same number you used to expand,
but add 1. Say you expanded to 7, you would contract to 8. Now,
cut the selection. Voila, you have your frame.
Making
sure you are in the Frame Layer, hit Selections in the top menu bar-->Load
from Alpha Channel-->ge-gem-blue-master. Use Selection #4 this time.
You will see a "frame" develope around your image. Flood fill
it with White. Using Blade Pro once again, load the GEGold Frame preset.
Hit OK, and you will end up with this. Voila, your gem is
done! Before saving, remember to merge all visible layers. This
image is best saved as JPG, but doesn't do too bad as GIF as you can see
here. Below is a small sampling of some gems I created following the
above process. I changed the shapes though. Remember that if
you decide to use a different shape, you must change the frame to reflect
that shape. The easiest way to do this is to select the area around
the gem, create a new layer named FRAME2. Invert the selection, while
in FRAME2, select Selections from the top menu
bar-->Modify-->Expand. I use anywhere between 5-10, but 7 works
best. Flood fill the area with White, now, choose Selections from the
top menu bar-->Modify-->Contract. Use the same number you used to expand,
but add 1. Say you expanded to 7, you would contract to 8. Now,
cut the selection. Voila, you have your frame.


