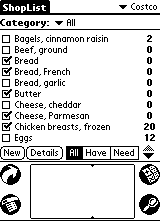
 The
ShopList display is shown at right. There are eight main sections
to the ShopList interface, they are:
The
ShopList display is shown at right. There are eight main sections
to the ShopList interface, they are:ShopList User's Manual
Version 1.01
Gregg Geschke (geschke@itronix.com or geschke@geocities.com)
Table of Contents
1 ShopList
1.1 What is ShopList?
1.2 ShopList Features
1.3 The ShopList Package
2.1.1 Item List
2.1.2 Item Checkbox
2.1.3 Item Quantity
2.1.4 Store Name
2.1.5 Item Category
2.1.6 Command Buttons
2.1.7 Filter Selector Buttons
2.1.8 Scroll Arrows2.2.1 "Jump-stroke" Function
2.2.2 "Find" Function
3.1 Item Details Dialog
3.2 Edit Store Names Dialog
3.3 Edit Categories Dialog
A Release Notes
B Future Enhancements
C Bug Reports
D Acknowledgements
1 ShopList
ShopList is a program for the U.S. Robotics PalmPilot™
and IBM WorkPad™ that can be used to keep track of your
shopping list. ShopList is free. The latest version of ShopList
can be found here.
ShopList has a number of features to help you manage a shopping list.
The ShopList package includes the following files:
| File | Description | |
|---|---|---|
| shoplist.prc | ShopList program for PalmPilot™ and WorkPad™ | |
| shopdoc.htm | ShopList documentation (this file) in HTML | |
| shopxxxx.gif | ShopList documentation graphics |
 The
ShopList display is shown at right. There are eight main sections
to the ShopList interface, they are:
Each of these sections are described in detail below.
2.1.1 Item List
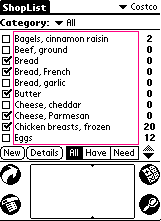 The ShopList item list is
indicated at right. Items are listed in alphabetical order and
sorted by the program automatically. You can use the scroll arrows or the hardware scroll
buttons to scroll through the items in the list. You can also use
the "jump-stroke"
function to quickly jump to an item in the list.
There are two ways to enter new items in the list. Either press the "New" command button at the bottom of the screen or select "New..." from the item menu (or use the /N stroke) to activate the New Item dialog.
To edit an item in the list, tap on the item name to highlight it. Then press the "Details" command button or select "Details..." from the item menu (or use the /D stroke). This will activate the Item Details dialog.
To delete an item, highlight the item in the list and press the "Details" command button, followed by "Delete." The item can also be deleted (when highlighted) by selecting "Delete..." from the item menu (or with the /X stroke). You will be asked to confirm that you want to delete the item.
An item name can be up to 35 characters long.
2.1.2 Item Checkbox
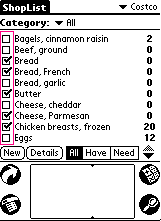 The item checkbox is
highlighted at right. A check mark in the box indicates that you
"have" the item. Items that are "needed" do
not have a check mark.
To toggle an item between the "have" and
"need" state just tap the checkbox.
2.1.3 Item Quantity

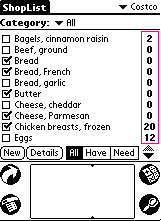 The item quantity is the
right-most column of the item display. Tapping in this region of
the screen will display the item quantity popup list.
The item quantity popup list is used to assign the quantity needed for each item. This can be used as a reminder when more than one of an item is needed.
The item quantity is not used for setting an item to the "needed" state, the "needed" state is only indicated by the absence of a check mark next to an item.
The item quantity value is not cleared when an item is checked off (moved from the "need" state to the "have" state).
The item quantity can be set to any value between 0 and 30.
2.1.4 Store Name

 The store name
is located in the upper right corner of the display. When this
area is tapped, a popup list appears providing a list of store
names. Selecting a store name from the list will make it the
active store.
When a store name is selected, the item list will be updated to display only those items that are associated with the active store.
The first line in the list is always "All." Selecting this will display all items, regardless of their store associations.
The last line in the list is "Edit Store Names..." Selecting this will activate the Edit Store Name Dialog.
A store name can be up to 20 characters long. ShopList allows
10 store names to be defined.
2.1.5 Item Category

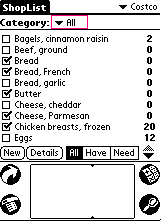 The item category popup list
is located where indicated. When this area is tapped, a list of
the user-defined categories is displayed.
Selecting a category from the list will cause the item list to be updated with items that match the current category.
The first line in the list is always "All" which will display all items in the list, regardless of their defined categories.
The second-to-last line in the list is always "Unfiled." The "Unfiled" category will display items that have not been assigned to a specific category.
The last line in the list is "Edit Categories..." Selecting this line will activate the Edit Categories Dialog.
A category can be 20 characters long and ShopList allows 35
categories to be defined.
2.1.6 Command Buttons
 ShopList has two command
buttons, "New" and "Details," located at the
bottom of the display. An item in the list must be highlighted
(by tapping on the item name) before the command buttons will
function.
The "New" command button will activate the New Item dialog, used to enter a new item.
The "Details" command button will activate the Item Details dialog which is used
to edit the settings for an item.
2.1.7 Filter Selector Buttons
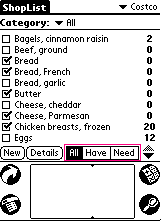 The ShopList
filter selector buttons are located in the area indicated. There
are three filter selector buttons, "All,"
"Have," and "Need." Only one of the filter
selector buttons is active at a time.
The "All" filter button will show all items in the list, regardless of whether you "have" or "need" the item.
The "Have" filter button will show only the items in the list that you "have" (as indicated by a check mark next to the item).
The "Need" filter button will show only the items in the list that are "needed" (as indicated by the absence of a check mark). The "needed" state is only determined by the absence of a check mark next to an item, the item quantity value is ignored.
When the filter selection is changed, the item list is
automatically updated to show only the items in the list that
match the filter.
2.1.8 Scroll Arrows
 The last part of the ShopList
user interface is the scroll arrows, located in the lower-right
of the display.
Pressing the up arrow will scroll the list upward by a single item. Conversely, pressing the down arrow will scroll the list downward by a single item.
The hardware scroll buttons can also be used to scroll through the item list. When pressed, the hardware scroll buttons will scroll the list by an entire screenful (9 items). Use the hardware scroll buttons to scroll through the list very quickly.
ShopList also has a "jump-stroke"
feature that can be used to jump to an item in the list. When
a letter is stroked in the Graffiti area, ShopList will scroll to
the first item in the list with a starting letter that matches.
ShopList has a number of features to make it easier to manage your shopping list, including:
2.2.1 "Jump-stroke" Function
The "jump-stroke" feature can be used to quickly jump to an item in the list. When a letter (or number) is stroked in the Graffiti area, ShopList will scroll to the first item in the list with a starting letter that matches. The item list will be adjusted so that the first item that matches is placed at the top of the display.
The first letter in an item name is the only letter that can be matched with the "jump-stroke" feature. ShopList does not use a second (or subsequent) strokes to further reduce the list. Stroking a second time in the Graffiti area will cause ShopList to jump to a different item that starts with the new letter.
If there are no items that start with the letter that is
stroked in the Graffiti area, the list position will not change.
2.2.2 "Find" Function
ShopList also supports the PalmPilot™ system-wide "find" function. After searching through the item database, ShopList will list the items that match in the find results dialog. Tapping on an item listed under the "ShopList Items" heading will activate ShopList and place the selected item at the top of the display.
To ensure that the item returned from the find function is displayed, ShopList will change the active store name, category, and filter to "All."
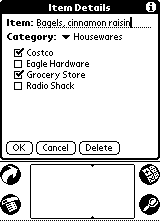 The Item
Details dialog is used to edit the item name, change the category assigned to an item, and
select the store names associated with
an item.
Use the entry field at the top of the dialog to edit the item name. An edit menu is available with the standard "undo" (/U), "cut" (/X), "copy" (/C), "paste" (/P), and "select all" (/S) functions. In addition, the "keyboard" (/K) menu item can be used to popup the on-screen keyboard.
Tap the category popup trigger to change the category for the item. Each item can be assigned to only one category.
Select the store names that the item should be associated with. A check mark next to a store name indicates the item is associated with that particular store. Tap on the check box or the store name to toggle the state of the check box.
A set of scroll arrows will be visible when there are more store names defined than can be displayed in the dialog.
Tapping the "i" button in the upper-right corner of
the display will provide help on the use of the Item Details
dialog.
 The Edit Store
Names dialog is used to add a new store name, rename an existing
store name, or delete a store name.
Press the "New" button to add a store name. The standard edit menu is available when entering a new store name. ShopList allows 10 store names to be defined. Attempting to add more than 10 store names will popup a warning message.
Use the "Rename" button to edit the name of a store. A store name must be highlighted in the list before using the rename function. The standard edit menu is also available when renaming a store.
The "Delete" button is used to delete a store name from the list. The store name to delete must be selected in the list prior to tapping the delete button. You will be asked to confirm that you want to delete the store before it is deleted.
Tapping the "i" button in the upper-right corner of
the dialog will provide help on the use of the Edit Store Names
dialog.
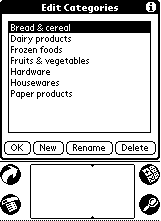 The Edit
Categories dialog is used to add a new user-defined category,
rename an existing category, or delete a category.
Press the "New" button to add a category. The standard edit menu is available when entering a new category. ShopList allows 35 categories to be defined. Attempting to add more than 35 categories will popup a warning message.
Use the "Rename" button to edit the name of a category. The category to be renamed must be highlighted in the list before tapping the rename button. The standard edit menu is also available when renaming a category.
The "Delete" button is used to delete a category from the list. The category to delete must be selected in the list prior to tapping the delete button. You will be asked to confirm that you want to delete the category before it is deleted. Deleting a category will cause all items assigned to the category to be reassigned to the "Unfiled" category instead.
Tapping the "i" button in the upper-right corner of
the dialog will provide help on the use of the Edit Store Names
dialog.
4.1 Item Menu
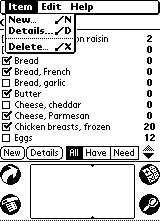 The Item Menu has
three functions. "New..." will activate the New Item
dialog, the same as the "New" command button at the bottom of the
display. The /N command stroke can also be used to activate the
New Item dialog.
The "Details..." menu item will activate the Item Details dialog. The /D command stroke and "Details" command button perform the same function.
The "Delete..." menu item is used to delete an item
from the item list. An item must be highlighted before using the
delete function. A message box will ask you to confirm that you
want to delete the selected item. The delete function can be
activated with the /X command stroke or through the Item Details dialog.
4.2 Edit Menu

 The Edit Menu has
different options depending on the active context of the program.
When the main ShopList display is active, the Edit Menu has two
options; "Edit
Categories..." and "Edit Store Names..." The
/C and /S command strokes (respectively) can alternately be used.
When the New Item, Item Details,
Edit Store Names, or Edit Categories dialogs are
active, the Edit Menu has six functions. The Undo (/U), Cut (/X),
Copy (/C), Paste (/P), Select All (/S), and Keyboard (/K)
functions perform the standard functions.
4.3 Help Menu
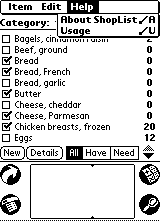 The Help Menu
provides two options. Selecting "About ShopList" or
using the /A command stroke will show the ShopList about box.
Look here to find the author's email address (geschke@itronix.com or geschke@geocities.com)
and the URL for the ShopList web page (http://www.geocities.com/SiliconValley/Haven/1559).
The other option, "Usage" (/U), provides a brief
tutorial on how to use the program.
V1.01 March 24, 1998
V1.00 February 1, 1998
I have a few thoughts on where ShopList could be improved. I
look forward to hearing from users what additional features they
would find most valuable. Please send your comments and
suggestions to geschke@itronix.com
(or geschke@geocities.com).
Please include "ShopList" in the subject line of your
email.
ShopList is my first program for the PalmPilot™ and
there are bound to be some problems. I want to make Shoplist
better and welcome bug reports from users. Please send them
directly to me at geschke@itronix.com
(or geschke@geocities.com).
Include "ShopList" in the title of your email. Please
try to provide sufficient details and step-by-step procedures so
that I can recreate your problem.
ShopList was written with the fabulous tools provided by Wes Cherry (PilRC), Greg Hewgill (CoPilot), John J. Lehett, Jeff Dionne, Kresten Krab Thorup, and many others (GCC for Windows), Darrin Massena (Pila), Matt Peterson (PilotAPI.hlp), and of course 3Com/US Robotics/Palm Computing.
I would like to offer a special thanks to Kathleen for beta testing and providing a steady stream of suggestions. Thanks Kathleen.