| Reports - | Report design |
|
|
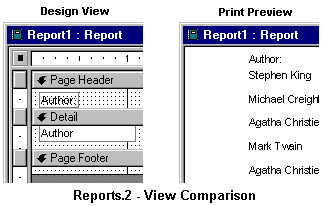
In the designing of a simple tabular report, the same techniques used in the creation of the simple data entry form can be used with some modifications. To begin, select the New button with the Report tab in the foreground or alternatively select the New Report button from the drop-down New Object button. In the dialog box that appears, select Design View and in the pull down box select the table or query that the report will represent. After the selections, click on Ok. Two windows will appear that will help in the creation of the report. The first is a grid with pixels indicated the many points within the report's page. The second window is a representation of the table/query and its respective fields. Begin, like the creation of the form, by selecting a field from the list and drag it onto the details section of the report. The label and a text box which are bound to the table/query are created within the details area. At this point, the label box needs to be cut from the details section and then pasted to the page header section. The two boxes should be lined with the label over the corresponding text box. This should be repeated for the each field that is brought into the details section. The reason the label and the text box are placed into two separate sections on the report is to create the effect of a column header and a listing of row entries beneath the labeled fields. The detail section will repeat as many times as it can within the page. The following illustration shows a sample of one column setup in design view and the report's print preview--take note of the repetition of the details section.
|
||
Access is a copyright of Microsoft, Inc. No infringement of those rights is intended. Questions or comments -- Contact the author |