|
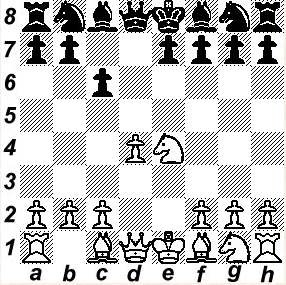
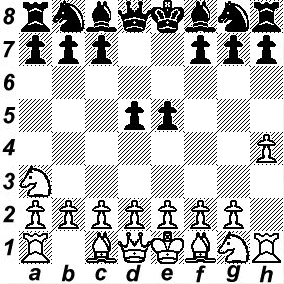
Our goal in the opening is to control the center and develop all of our pieces. If you could make two moves in a row in the beginning of the game, what two moves would you choose?
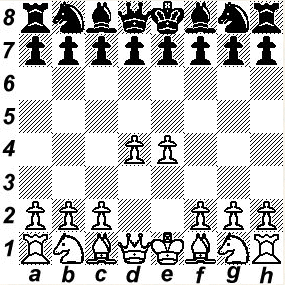
I hope you would choose to move both your e-pawn and your d-pawn forward two squares, just like in the diagram.
By opening this way, you give yourself the best chance to gain control of the center and keep your opponent out of the center at the same time. The center is where the action is! Notice how all of your pieces can now be developed smoothly and by using just a single move for each one!
If your opponent plays a "funny-looking" move in the beginning of the game, remember this diagram. It will help you find a good move!
Of course, our opponents will try to stop us from gaining such a good position. That means we have to work harder on our openings and try to get the best possible position that we can.
When we play White
When we have White, we open with 1. e4! Our goal is to control the center, develop all of our pieces, and then look for targets to attack.
Our opponents have many choices, including:
A. 1. ... e5 (double king pawn games)
Here we are going to choose The Vienna Game, which continues with 2. Nc3. Our second move develops a piece and defends our e-pawn, even before it is attacked!
The "goal" for the Vienna Game is to bring our king's bishop to the c4-square, play f2-f4, and castle on the kingside. By doing this, we will be targeting the weakest square in our opponent's camp - the f7-square!
Let's look at a sample game:
Spielmann - Perlis
Match, Vienna 1910
(opening moves adjusted to fit our repertoire)
1. e4 e5
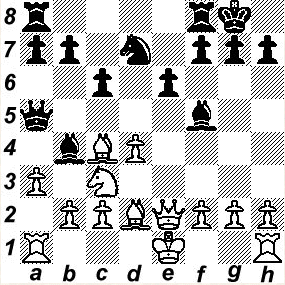
2. Nc3 Nf6
3. Bc4 Bc5
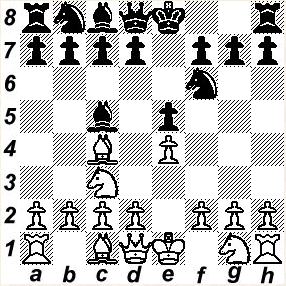
Some of your more booked-up opponents will try the "fork trick" with 3. ... Nxe4!? here, hoping for 4. Nxe4?! d5! with an easy game for Black. But their last move violates the rule about moving the same piece twice in the opening, and it leaves the h5-square uncovered, meaning that White can answer with 4. Qh5!, with a double attack (f7 and e5). Black is forced to give back the pawn by 4. ... Nd6 5. Qxe5+ and the game goes on.
4. d3 d6
5. f4 Nc6
6. Nf3 Bg4
This is a standard book position, judged to be a little better for White. If Black tries to attack prematurely by 6. ... Ng4?! (who could resist making such a move?), White has the very promising reply 7. Ng5! and if 7. ... h6 then 8. f5! cutting communication to the knight. Or just the simple 7. Rf1!?, and we see that Black has wasted time.
This is true also for 5. ... Ng4?! 6. f5! Nf2? 7. Qh5 and White has a strong attack.
Black's move here (6. ... Bg4) is the better one, developing a piece and letting White work to find a way to castle. He decides to eliminate Black's strong Bc5.
7. Na4 exf4
8. Nxc5 dxc5
9. Bxf4 Qe7
10. Bb5 0-0
11. Bxc6 bxc6
12. 0-0 c4
13. Qd2 Rfd8
14. e5 Nd5
15. Bg5 f6
16. exf6 Nxf6
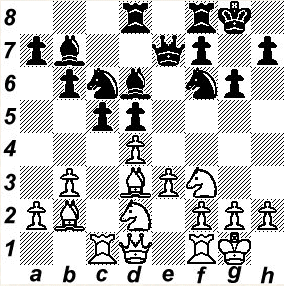
17. Rae1
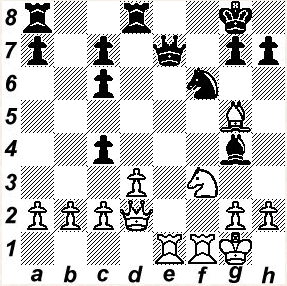
Every single one of White's pieces is working! Notice the control of the open files.
17. .... Qc5+
18. d4 Qd6
19. Ne5 Bh5
20. Rf4 Rf8
21. Nxc4 Qd5
22. Bxf6 Qxc4
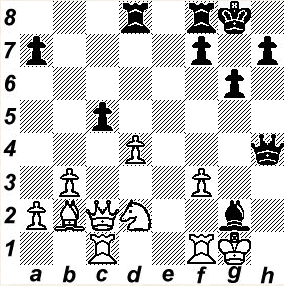
23. b3!
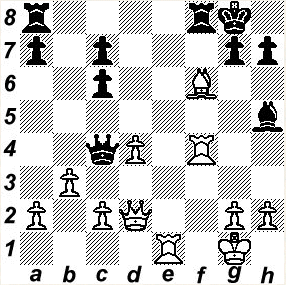
Taking time out to drive the Queen to a bad square. White ends the game by attacking on the dark squares. Do you see why Black resigns at the end?
23. ... Qa6
24. Be5 Rxf4
25. Qxf4 Bg6
26. Bxg7 Qxa2
27. Bh6 Qa5
28. Rf1 Black Resigns
B. 1. ... e6 (French Defense)
Black's idea here is to build a blockade and try to tempt us into grabbing too much space. Variations like 1. e4 e6 2. d4 d5 3. e5 are possible but require a lot of study.
Instead, we will cross Black's plans with
1. e4 e6
2. d4 d5
3. exd5 exd5
4. c4!?

Some players play the exchange variation with an idea of making a boring draw. But we will play it with the idea of getting positions very similar to the Tarrasch Defense that we play as Black vs. 1. d4 (see below).
The game is even but very sharp. All of our pieces can be developed quickly. The better player will win.
C. 1. ... c6 (Caro-Kann Defense)
Black's choice of this defense indicates he or she is a very solid player. Beware of these types of players! They have read some books and will be tough to beat!
Following normal opening principles, we will take the center and then develop our pieces.
1. e4 c6 2. d4 d5 3. Nc3 dxe4 4. Nxe4
White has a space advantage because of his d4-pawn. White will try to maintain his lead in development and extra space. If Black chooses 4. ... Bf5, we play 5. Ng3! saving our knight and gaining time vs. the bishop. Or, against 4. ... Nf6, we simply take it by 5. Nxf6+, and again we stay "on tempo" for our development.
White has a small advantage.
D. 1. ... c5 (Sicilian Defense)
The Sicilian is the toughest opening to meet! Black shows he is in a counterattacking mood, but we must rise to the challenge.
Our plan will revolve around the d5-square. The next few moves might look a bit like the Vienna Game that we studied against 1. ...e5:
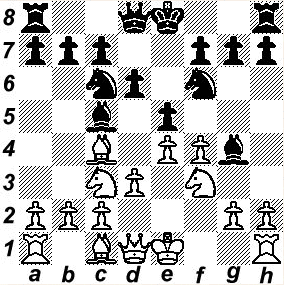
1. e4 c5
2. Nc3 Nc6
3. g3 g6
4. Bg2 Bg7
5. d3 d6
6. f4 Nf6
7. Nf3 0-0
8. 0-0
By his first few moves, White gained control of the d5-square. This means that his opponent cannot react quickly in the center. Our plan is to develop our pieces by Be3, Qd2, etc. and then attack on the kingside with h3, g4, and f5. So long as the center stays closed, we have a good chance of success in attacking the enemy king!
E. 1. ... d6 or 1. ... g6 (Pirc or Modern Defense)
If our opponent chooses a risky opening like this, we will establish the perfect center and then develop our pieces. For example:
1. e4 d6
2. d4 Nf6
3. Nc3 g6
4. Nf3 Bg7
5. Be2 0-0
6. 0-0 c6
7. h3
White has a good starting position and can look forward to a small advantage.
As Black vs. 1. e4
When we have the black pieces, we must be prepared to face both 1. e4 and 1. d4. Against 1. e4, we will choose the Scandinavian Defense (sometimes called the Center Counter).
Our goal is to quickly neutralize White's center, avoid losing too much time with our queen, give the lady an escape square, and keep up with our development. White will get a slight advantage, but it will be a hard game and we have plenty of chances to either trade pieces and make a draw, or to pressure the d4-pawn and look to win in the ending. Our side will usually have knights, and the opponent will have the bishops. That means we need to make sure our knights have good squares to live on!
Let's look at a sample game.
Van der Wiel - C. Hansen
Wijk aan Zee, 1993
1. e4 d5
2. exd5 Qxd5
3. Nc3 Qa5
Our plan is clear: we strike immediately in the center, then look for a safe place for our queen. If we bring her back home immediately (3. ... Qd8!?), then White is ahead in development. So we play 3. ... Qa5!? to avoid that. But we can't waste any more time with our queen, or we will get into big trouble - our other pieces need to play too!
4. d4 Nf6
5. Nf3 Bf5
If Black puts his bishop on the other likely square (Bg4), he'll either have to trade it off or allow White to gain space by attacking it with his pawns.
6. Bc4 e6
7. Bd2 c6 (!)
The key move! Our queen needs a safe way to go back home, and we can play ...c6 on any of the last couple of moves (moves 5, 6, or 7). We need to watch out for sneaky ways that White can try to trap our queen, with maneuvers like Nf3-e5-c4. A quick ...c6 avoids all this trouble!
8. Qe2 Bb4
9. Ne5 Nbd7
10. Nxd7 Nxd7
11. a3 0-0
Did Black's 11th move surprise you? Remember, the a-pawn is pinned to the rook. Stay alert to these kinds of details, so that you can make a developing move at every opportunity instead of mindlessly reacting to the opponent's moves.
12. 0-0-0 Bxc3
13. Bxc3 Qc7
14. Bd3 Nf6 (!)
15. Bxf5 Qf4+
16. Kb1 exf5
17. Bd2 Qe4
18. Qxe4 fxe4
19. Rhe1 Rfe8
20. Re2 b5
21. Rde1 Rad8
22. c3 Re6

Black's knight is just as good as White's bishop, in part because he made sure the knight always had a good square (d5) to live on.
23. Bg5 h6
24. Bxf6 Rxf6
25. Rxe4 Rxf2
26. R1e2 Draw
As Black vs. 1. d4
When our opponent starts with 1. d4, we are going to choose the Queen's Gambit Declined. The variation we will play is called the Tarrasch Defense, named after a strong German player by the same name. Our goal is to stake a claim in the center and develop our pieces quickly and to their natural squares. We will follow the rules of 1) knights before bishops and 2) move each piece once in the opening - do not fall behind in development!
Here is a real game example:
Nimzowitsch - Tarrasch
St. Petersburg, 1914
1. d4 d5
2. c4 e6
3. Nf3 c5
4. e3 Nf6
5. Bd3 Nc6
6. 0-0 Bd6

Look at Black's development. He has staked out a claim in the center by 1. ... d5, and followed up by pressuring White's d-pawn and developing nearly all of his pieces. Note especially that he played c7-c5 before developing his Nb8. Our plan as Black is to play this way whenever White opens the game with 1. d4. We don't mind if our pawns get a little weak, so long as our pieces become very active. See what happens in this game because of those active pieces!
7. b3 0-0
8. Bb2 b6
9. Nbd2 Bb7
10. Rc1 Qe7
11. cxd5 exd5
12. Nh4 g6
13. Nhf3 Rad8
What did you think of White's maneuver with his knight? He forced a weakness (...g6), but lost time. When your opponent loses time, make sure all of your pieces are working together - a combination will not be far behind!
14. dxc5 bxc5
15. Bb5 Ne4
16. Bxc6 Bxc6
17. Qc2 Nxd2
18. Nxd2
Uh oh! All of White's pieces have left the kingside. Our pieces are very active....do you see a way to break through?
19. ... d4 (!)
19. exd4 (?) Bxh2+ (!!)
20. Kxh2 Qh4+
21. Kg1 Bxg2 (!!)
22. f3
If White takes the bishop on g2, what happens after 22. ... Rd5? Does he have any defense?
22. ... Rfe8
23. Ne4 Qh1+
24. Kf2 Bxf1
25. d5 f5
26. Qc3 Qg2+
27. Ke3 Rxe4+
28. fxe4 f4+
29. Kxf4 Rf8+
30. Ke5 Qh2+
31. Ke6 Re8+
32. Kd7 Bb5 mate!
If our opponent opens with some other first move (1. Nf3, 1. f4, 1. c4, 1. b3), we will try to follow the same basic Tarrasch Defense plan.
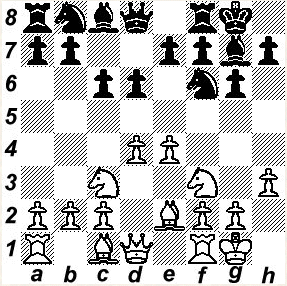
If our opponent chooses a REALLY BAD first move (such as 1. a3, 1. a4, 1. Na3, 1. Nh3, 1. h3, 1. h4), then we will say THANK YOU and pretend to be WHITE and play either 1. ...e5 or 1. ...d5 as appropriate.
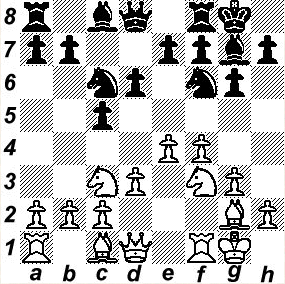
See the diagram below:
1. Na3? d5!
2. h4? e5!
Who do you think is better? Could we say that the player with the black pieces really was playing White in this position? Why or why not?
REMEMBER: These notes about the openings are just a guide for you. During a real game, be sure to check each move carefully and ask 1) what is my opponent threatening?, 2) are my pieces attacked?, 3) are my pieces defended enough times?, and 4) is my king safe?, before making any move.
|