Ceremonial Weapons
Lamps
The Burin
Disk
Order Symbol
Sword
Cup
Wand
Enochian Tablets.
Lamps
We will concern ourselves with two principle sorts of lamps--those that reside at the periphery of the Wards and that which is placed upon the Bomos as a symbol of the most sacred flame. In the first example, we have considered a number of options ranging from the simple and inexpensive to the ornate and precious. To look at the most extreme example, we see that we could get 3 unique lamps for Saturn (perhaps cobalt blue votive lighthouses set in black, 3-legged wrought iron stands), 4 for Jupiter (maybe cubical tin lanterns with blue glass panes) and so forth until we had 42 separate lamps and needed a few crates in which to store them! It is probably a better option to consider a simple collection of 9 lamps which can be fitted with any of a number of colored shades (called a "gel" in stagecrafting terms) to suit whatever planetary mood might be required. This said, we considered the ever-faithful candle lantern, standby to campers and mountaineers the world over for centuries. It's simple, compact and rugged design would serve well, the only difficulty arising from the fact that the glass shade comes only in clear. These cost from $10-$15 for quality fixtures, the glass gels running $2--if you can find them. Creating the correct number and color of "gels" this way is still rather expensive, all things considered, especially when one considers the fact that only a high-temp paint (such as those used on engines) will stick to glass under those conditions.
We experimented also with a number of simple lights designed for the bar and restaurant industry and available at a grocery wholesaler or restaurant supply. They were operated by a lower-temp alcohol-type fuel and could be fitted with a number of different shades, so long as they were colored much as the candle lanterns are above.
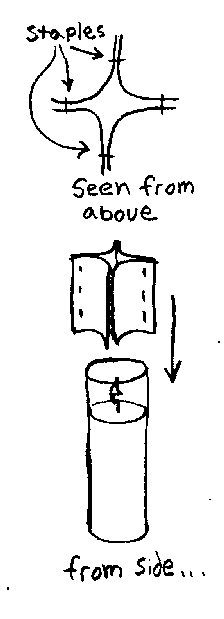
The best thing we've come up with yet is a modified 7-day votive, available at under $2 in nearly any supermarket. For a gel, we obtained a fair thickness of acetate (the sort used as a cover instead of glass in picture-framing material) and cut it into squares about 6" x 6". We joined these squares corner to corner with ordinary stables to create an atractive gel that can be placed on the glass without fear of sudden combustion or melting. The diagram at right should make it clearer:
Of course, we need to give it an appropriate color charge and this we did by hitting it at some distance with the mist of an ordinary PLA enamel paint as can be found in model-shops or craft-stores anywhere. It may take several tries to get the shade you wish without overdoing it, but the best recipe is to spray it on all sides, let it dry thoroughly (maybe an hour, then place it upon a lighted votive, gently expanding it so that it accomodates the glass. Care should be taken that not too much of the acetate towers above the flame and absorbs too much heat--it is better to have the shade ride a bit low and be merely hot to the touch. Repeated sprayings of the shade will get you to where you want to be, hopefully before you reach the point of opacity. Our attorney has reminded us to mention what should be an obvious safety precaution: Do not spray the shade while it is attached to a burning votive--spray paint is explosively flammable!
The votives we use are made inexpensively in a neighboring 2nd-world country and sometimes do not have the wick running right down the center. In view of that, we like to place these lamps in a shallow dish of sand or water in the event that such a wick strays too close to the side of the jar and shatters it, as has happened. Inspect all materials carefully before you buy them...
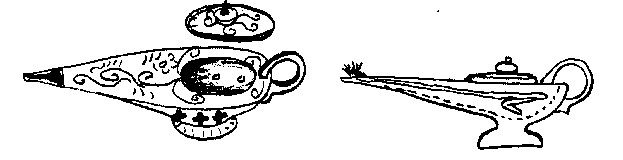
Above, you see the sort of lamp that you might associate with the Tales of the Arabian Nights. Oddly enough, they aren't so hard to find, at least in their kitschy incarnation as miniature incemse burners. While this is probably an import store bargain, ours was bartered to us by a 5-year old from among a number of items at a barter festival some years ago. Problem is, as an incense burner, it was shot full of holes to allow oxygen in and smoke out. we rendered it servicable by taping the holes closed from the outside, then packed them from the inside with a two-part epoxy like Duro-bond or JB Weld. Once dry, we peeled back the tape, painted the gray plugs with a matching paint and Voila!--a classic middle-eastern lamp. Ours runs well enough on olive oil, but canola will do nicely as well, so long as a cotton or hemp wick is used and kept in good trim. We strongly advise keeping it in a stout box unto itself, nestled among a number of rags to absorb the oil that will spill from time to time and to keep it in a good polish. It is not necessary to keep it filled to the top at all time, by the way, as a bit of oil lasts a long time. Do not use anything more volatile than vegetable oils--the aperture at the end is far too loose for petroleum products!
The Burin
Below, you see the outline of a common throwing knife bought for less than $10 at the sort of shop that used to specialize in cigarette papers, posters and marijuana pipes but now is forced by law to specialize in small weapons (this is progress?). It even came with a sheath for your boot.

Starting with this as a sort of "blank", we proceeded to fashion a guard from two peices of thin copper (ours were used in connection with the manufacture of electronic circuit boards, but a craft shop will possibly have the like) in the required shape. They were carefully epoxied together, sandwiching the blade and hilt between, clamped with clothes pins. After it dried overnight, the spaces between the plates were back-filled with epoxy about the consitency of putty and sculpted until there was a bead standing proud of the edges where before there was a gap. After letting this dry overnight and cleaning it up a bit with an emery board, the handle was considered.
While one could wrap the handle with successive turns of leather, we chose to create our handle out of polyresin sculpting compound, fashioning a slender snake that wraps about the hilt from knop to hilt. It was finished with enamel paints and given a keen edge.
Of course, one can just as well use an antique dagger or letter opener too, with little or no artistic modification, but where's the fun in that?
The Disk
There's no real good way around it--you've got to cut a perfect circle about 5" in diameter. If you're lucky, you might find a big, wooden plug at your hobby store or out in back of the local furniture manufacturer, but we never could, so we used a bandsaw, then laboriously ground away the less-than perfect parts with sandpaper and file. We can think of a number of other options less exactling , but we like one option best: obtain the roundest branch one can find (please don't cut it off a living tree) and saw twice through it with parallel cuts with whatever tools you can muster. Birch typically has a very round profile and so does lodge-pole pine, madrone and myrtlewood. Avoid oak, maple and joshua trees for reasons that should be obvious. Once one has a round and polished disk, one needs to decorate it. While one can carefully paint the desired design upon the Disk, we, unabashed children of technology that we are, elected to use a paint program on our computer to create the approriate design, then shipped it to a color jet printer to be affixed to the disk by the technique known as deco page.
Deco page (say "deck-o-pazsh") is an underated medium. It's origins lie in France and a great number of very fine historical objets de art survive which use the technique to good advantage. It is little more than the art of sticking paper and other very small, thin things to surfaces with varnish, lacquer or something similar. While it was once a smelly process for sure, there is now a range of products one can find in an art store which accomplishes the same task with no toxic fumes and a long-lasting, non-yellowing finish.
Once deco paged to the awaiting suface, the entire disk is treated with numerous coats of the finishing material, or perhaps just sprayed over with a few coats of spray varnish or polyurethane.
The exact manner of decoration is up to the person/s employing the device, but, as we follow the methods employed by the Aurum Solis, our is laid out in a manner consistent with their designs given in Vol. 3 of Mysteria Magica. As it is a symbol of the element of Earth, one needn't look too far for a suitable design. The one used by the Golden Dawn is intriguing, especially from the standpoint of the design of our own Glyph project, but one might consider the symbol given to John Dee to represent the Earth quarter. We generally avoid the pentagram in this application, for we are trying illustrate just one element, not the balanced relationship of the five.
The Order Symbol
Similar in character to the Disc is the Order Symbol. This is (typically) a plaque or emblem of appropriate shape which holds a design or symbol illustrating what might be considered the very essence of one's order. While our Symbol appears on our emblem, it is expected that other orders might choose a design unique unto themselves. Such a symbol is permissable to be put on the top side of the display, while if the order is affiliated with the official Companions of the Glyph Lodge, the official symbol depicting that affiliation is placed upon the bottom. If a Companion order sees no need to design a unique emblem for their lodge, they are advised to simply use that which is given unto all companions of the glyph. As our project is dedicated to the egregore associated to the Aurum Solis, we use the sacred Tessera in this manner.
Emblem of the Companions of the Glyph
The Sword
The sword is probably the most difficult project for those of us living in a country that is far more fond of guns than of the more gentlemanly counterpart. Even so, the sword as symbol cannot be replaced by anything so boorish as the pistol or longarm. It must be lovingly crafted or else bought and worked into a more suitable form. But what's that going to cost, really?
Being members of the SCA, we are blessed with the acquaintance of more than one actual maker of swords, who in fact delight in manufacturing them in accordance with the reststrictions placed upon the art by history. Unfortunately, such a gem might easily go for upwards of $300 but we have seen some "bargain" swords making the rounds at the vendors for less that $200. If that figure is too high (and we thought it was for us) one can still search out the occaisional decorative item of the sort that used to grace plaques that typically hung above fireplaces or in trendy bar-rooms. Oddly, these were once easy to find and for not much more than $40, being dulled, made of soft steel and often fairly short. They do often have the bonus of usually being historical replica swords, which we definitely prefer over those that seemed inspired by Conan and fantasy films generally. Our year-long search for such a sword was unanswered, so we considered a number of alternatives before settling on the purchase of a most adequate sword from a mail-order company, for an amount which did not exceed $80, including shipping.
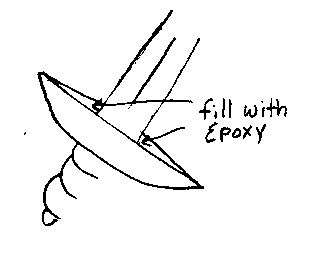
On the way to making that particular decision, we researched a few other possibilities, one of which was to design a small sword from readily available materials which might resemble the classic "magic swords" of the 19th century. Access to a grinder is key. If you don't have one you'll have to buy one, and in doing so you may wish you'd laid out the few more dollars to simply buy a sword and be done with it. If you are fortunate enough to have access to a grinder, and the skill to use it to good effect, consider the fact that a three-foot bar of 1-1/2 x 1/8 mild-medium steel can be had for $5 or less. The illustration below might give you some ideas about what one can do with such a bar.
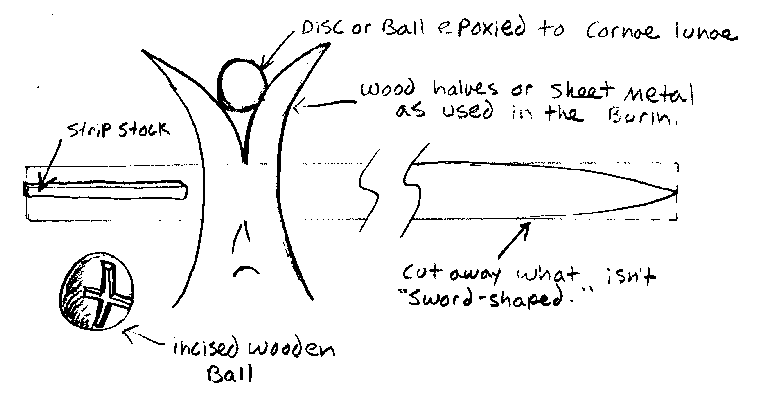
The basic bar was mostly unmodified save for the careful grinding off of the business end and the overall sharpening. A bit of wooden strip was epoxied to the handle to bring up the surface and make for a more rounded and comfortable base for the red leather thong that was to be wound about it. The sphere at the pommel was purchased for less than a dollar and had a few cuts placed at 90 degrees across one face such that it would admit the material of the handle--probably only one such cut is necessary--the whole being secured in place with epoxy. The hilt was constructed of two pieces of 1/4" pine which had been cut to the same shape and had a 1/16th" passage filed out of the middle such that the two could be mated together, sandwiching the blade between them. The other appointments were added with tiny amounts of epoxy before the wooden parts were sanded very smooth and coated with a sanding sealer. Repeated coatings and sandings will soon produce a suface which does not in any way resemble wood and will accept enamel paints quite well. A rouge-wheel and two grades of jeweler's rouge will buff the blade up into some semblance of shine.
All in all, given the cost of the finishing materials and of the tools required to bring this off (not even to mention the sheer number of man-hours) one is probably better off making a mail-order purchase...but what fun is there in that? Just enough, we think.
Cup
Generally speaking, the Cup is the easiest to obtain, being quite possibly the simple result of an import store purchase--there's certainly enough of them out there. Our particular cup however, was not obtained in that way. Desiring to find an 8-fold feature to it, we built ours from a wooden candlestick holder blank and a 8-sided, glass votive holder. The two were attached with epoxy, the whole then carefully painted deep blue before being appointed with a rim of textured white sea-foam (acrylic artist's paints) and a black/orange sea serpent (enamels). The Grail (which, not being a part of every Western tradition, is not treated here in detail) could be dealt with in a similar manner, but we chose to simply purchase an antique silver goblet of the appropriate description, placing it in a silk-lined box of our own construction.
Wand
This is a subject that could fill a page of this size by itself. Let us first consider the elegant, yet simple manzanita or madrone wand, cut from the straightest section one can find of a worthy limb. These woods are quite red and a bit of clever finishing can make them redder still. We have evisioned one such rod intricately carved (and afternoon with a Dremel and appropriate bit) to resembled a long, swaddling of flames, further reinforcing the association of fire.
Moving further up the scale of complexity, we come to a design Frater A. manufactured a few years ago, when he desirde to make a simple, traditional baton-style fire wand. A length of dowel about 1.5" in diameter was cut to about 18" in length. Next, a package of 4 furniture skids sized to fit the dowel were purchased, along with two plastic tips of the sort which are designed to replace those missing from garden furniture. The furniture skids were turned bottom-to-bottom, epoxied together, then epoxied/nailed to the ends of the dowel, the plastic tips being epoxied to the ends. The illustration should make it quite clear:
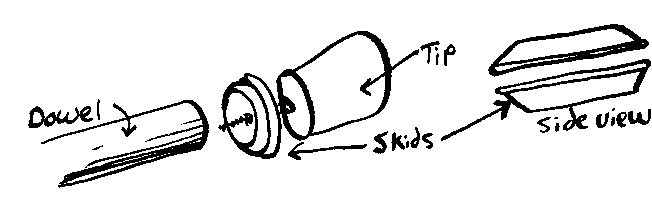
The wand is then primered (because of the plastic) and sprayed down with as many coats of fire-engine red paint as one cares to add. The result is quite elegant.
The wand used by the Aurum solis is quite complex, being two pyramids stuck to a certain depth onto a shaft of copper tubing--not an easy task! While the specific instructions can be found in Mysteria Magica, we can add some remarks about constructing the pyramid...
We considered two methods for the manufacture of the pyramid, one involving the casting of plaster in a form; the other involved sawing them from a block of wood. In the latter, we decided that a chop saw was best, starting with square, hardwood stock, then carefully snagging off each of the faces at the appropriate angle leaving a tiny square at the pinacle--not a point. Cross cut the stock just below the bottom of the pyramid so you have room to make a few mistakes in the sanding. At this point, you have something that's vaguely pyramidal in shape, but the closer it is to perfect, the better. You might plan to cut a number of these to get the hang of it, selecting out the two best ones to carry on into the final stages of construction. This involves a whole lot of sanding on a 60 or 80-grit paper taped to a very flat surface. The size of these peices are such that we cannot recommend using a power tool on them for reasons of safety, with the possible exception of some sort of stationary-mount sanding disk gizmo (...and we don't know anyone who has one, either). As soon as you get the shape right (and check it often), switch up to 180 or 200-grit paper to put a good polish on it.
In the case of the casting method, things proceed a lot differently. We laid out the four triangles on a sheet of corrugated cardboard, cut them out with an exacto, then taped them together such that they formed a pyramid. Before we did this, however, we covered the inside portions of the panels with plastic tape so that the plaster of paris would not stick to our cardboard mold. It takes a great deal of care to get it all taped up so that it will maintain a true form throughout the time required to set up the plaster of paris. The molds are then placed point-down in the opening of a jar that is just about wide enough to accomodate it, then filled with the plaster until it stands well proud of the mold, yet does not spill--you'll need that excess for the subsequent sanding and this is a good time to remind that the entire mold should be made slightly larger than needed, so as to give leeway to the subsequent sanding effort.
Once the pyramid is sanded to shape, regardless of how you achieve that form, you must find the exact center of the bottom and this is done by carefully ruling a line from corner to opposite corner. The center will be where the line cross. Drill the hole to the appropriate depth and of a width that will accept the handle. From here, you are next saddled with the task of attaching the ends to the handle.
One method might involve constructing a precision gluing jig that would hold the parts in correct alignment until the glue dries, but we chose a simpler route. Using epoxy, we were able to mix it a bit in advanmce of when we expected to use it and allowed it to stiffen up quite a bit. Once we got the shaft clamped into a purely vertical position (checking with level or plumb), we mounted the end upon the shaft with a fairly small amount of epoxy, then monitored it over the course of 30 minutes, adjusting the angle all the while as the epoxy hardened. The process is repeated on the other end before painting.
Enochian Tablets
There are easy ways and there are hard ways. Frater A is fond of burning the designs into simple tablets of 'ye sweete woode' (rendering that as apple, pear, ash and cherry) with only the sun and a magnifying glass. Intricate work can be achieved this way, and it doesn't take as long as one would think. We know someone else who is wont to incise the designs into a piece of sheet aluminum with jeweler's saw--spectacular results at the expense of much time.
The simplest method we've found to date is to snag some public domain enochian tablet designs from either the web or a book, then zerox them down to a good size, tint them in the appropriate colors and decopage them to a suitable tablet of wood, sculpey, metal, wax--whatever.
& Boxes in which to put it all...
Two words: white silk. The majority of our gear spends its days swaddled in a few yards of white silk, tucked away in the bomos. A few items, however, should have a more substantial surround in order to prevent damage. Our Grail is a case in point, which resides in a tall, octagonal box that has been fitted within and without with embroidered silver silk. Cases for wands are quite simple to make from 3" PVC pipe, capped at each end and fitted with a few handsful of silk wadding at each end. Of course, all boxes ought to be painted in appropriate motif and color, and made to last. One PVC design that has always struck our fancy is a simple 3" pipe covered with a wrapped sleeve of red leather. The end-caps are actually carved out with a Dremel in a flame motif before being primed, painted and lacquered. The effect is quite stunning.
This Page is part of the Companions of the Glyph Website.