
POV-Ray works by placing elements with in a 3d environment along with a light source (or sources) and a "camera". The camera defines the viewpoint from which the scene will be rendered.
POV-ray uses a text interface to generate its scenes and using it is not unlike using a programming language.
The first step in creating a scene is to place your light source and
camera. The syntax for this is as follows:
light_source
{
<0,0,0>
color red 1.0 green 1.0 blue
1.0
translate <-20, 40, -20>
}
camera
{
location <0.0 , 3.0 ,-7.0>
look_at <0.0 , 0.0 , 0.0>
}
The second part places a camera at 0x,3y,-7z. This camera looks
at the origin of the 3D space.
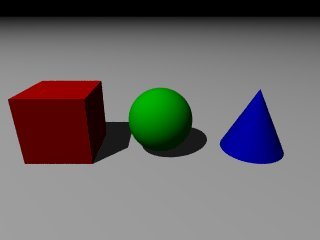
Now lets add some elements:
box
{
<-1, -1, -1> // one corner position
< 1, 1, 1> // other
corner position
translate x*-3
pigment{color rgb<1,0,0>}}
sphere
{
<0, 0, 0> // center of sphere
1
// radius of sphere
pigment {color rgb<0,1,0>}}
cone
{
1*y, 0.0, // one end of cone and
its radius
-1*y, 1.0 // the other end of the cone
and its radius
translate x*3 pigment {color rgb<0,0,1>}}
The scene so far would look like this:
Notice that the renderer has already taken care of the shading.
Now lets add a white plane for our shapes to sit on
pigment {color rgb<1,1,1>}}
Our object look a little lifeless so lets pep then up a little by adding the following
finish {phong .5}
to the sphere and cone.

Brings them right to life!
Now let's add some reflection to the sphere with
sphere
{
<0, 0, 0> // center of sphere
1
// radius of sphere
pigment {color rgb<0,1,0>}
finish {phong .5 reflection .7}}

So far, we've left the cube alone, so let's do something fun with it. We are not limited to solid colors, as POV-ray offers a number of patterns we can choose from so let's modify the cube to something like this:

pigment {
wood
turbulence .05
rotate 2 rotate y*37
scale .1}
finish{phong .3 phong_size 30 reflection .4}}

Now, one aspect (of many) that we haven't touched on is surface normal or 'bumpiness" of our objects so let's adjust this on the cone with

Now let's try one more thing. Objects aren't always opaque, so let's alter the sphere's finish and pigment thus:
pigment {color rgbf<0,1,0,.8>}
finish {phong .5 reflection .7 ior 1.5
caustics .2}}
The extra value in the pigment is the filter,
and sets how much light filters through the object
ior set the index of refraction for the object,
and caustics adds some more realism.

And now our sphere is a green glass marble.
This is just a small sample of what can be done using POV-ray with a little practice. In this demo I've barely touched on the features and capabilities of this software.