![]()
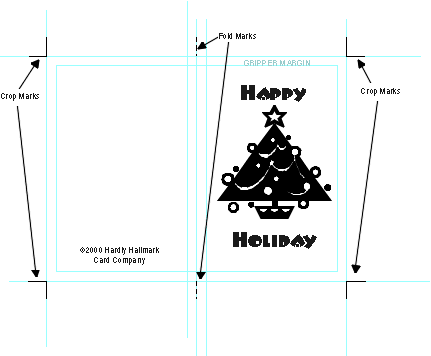
A cut mark indicates to the printer where a job is to be cut after it is printed. A cut mark is ALWAYS placed OUTSIDE the printed area and is always black. This mark used alone, would indicate a cut across the layout area and it is almost always used in pairs. One being placed on each side of the layout.

Crop marks are actually just two cut marks put together. They are usually placed in the corners of a layout to indicate the final cut size, or the printing area allowed for an advertisement. Crop marks are used by the printer to align negatives on a "flat" for making printing plates. It is important that they are perfectly straight. Crop marks also align with the non-photo blue trimlines on a layout to indicate what the final cut or "trimmed" size will be.
![]()
A fold mark indicates to the printer where a job is to be folded after it is printed. A fold mark is ALWAYS placed OUTSIDE the printed area and is always black. This mark used alone, would indicate a fold across the layout area and it is almost always used in pairs. One being placed on each side of the layout.

Registration marks should only be placed on a layout when the final job is to be printed in more than one color. On a traditionally prepared "color separation" layout, the job is produced by placing layers of acetate, each containing a specific color. On a computer generated "color separation", the colors are printed out on separate pages, photographed onto film, and then the negatives are lined up using the registration marks. This allows the printer to align the colors on the printing press, as the job is being printed.
![]()
Trim lines are usually drawn in "non-photo blue" on traditional layouts. They actually indicate the job size. When layouts are computer-generated, designers use an electronic guideline or a page border that is electronically generated. Therefore, when the job is printed on the laser, or to film, the lines are not printed and do not reproduce on the final product.

The "gripper margin" gets its name from a printing press term called the "gripper". It is the part on the press that actually grabs the paper to feed it through the press. A gripper margin is just a measured border around the edge of the layout, to allow for some room between the printed items on the page, and the paper's edge. This measurement varies, depending on the proportion of the job. A business card would use approximately 1/4" gripper margin, and a flyer or brochure might use 3/8 - 1/2". NO MATERIAL TO BE PRINTED SHOULD APPEAR IN THE GRIPPER MARGIN! The gripper margin is considered a "non-printing area" of the layout.
