Help, I Need A Uniform!!
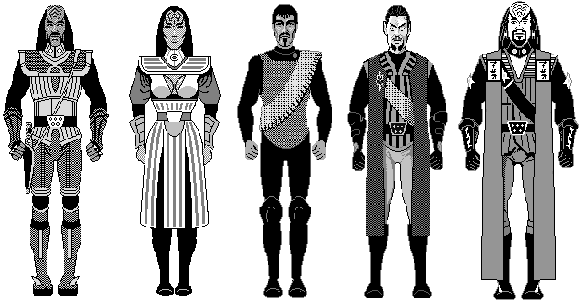
SajQa' 
Ideas about creating Klingon uniforms...Accessories.....and headpieces...
I NEED A UNIFORM!!!
So, you need a uniform. What do you do? How in the (*#&$) do they make that? Well, we hope this little info sheet will assist you in your efforts to become more klingon. This is by NO MEANS, a complete list! Here is some of the information you require in order to construct your own uniform. The exact style of uniform is not crucial. In fact, there are as many styles of uniforms as there are Klingons.
Imperial Klingon, Classic Klingon, ... you can find the information on the type of uniform you are trying to create. If the information you are seeking is not here, it will probably be added soon.
Menu
Classic Male Klingon UniformClassic Female Klingon Uniform
Imperial Female Klingon Uniform
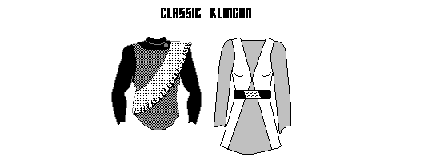
Basic Classic - MEN
The most cheapest and quickest way to be a Klingon. Especially for those who are sewing challenged, and are working on their "other" uniform.
All you need is:
A black Cotton/Polyester Turtleneck Long Sleeve Shirt A pair of Black Long Slacks A pair of Black Knee High Boots A tunic or Silver or Pewter colored shiny fabric. It has no sleeves, and a square neck. It tucks into the pants at the waist. A sash of Gold Fabric, between 3" & 3 1/2" wide. Tie or overlap at hip.
On the turtleneck you can wear your circular rank pins.
And now, you are ready to go!
Classic Female Klingon Uniform
Basic Classic - FEMALE
Unfortunately, the ladies NEVER seem to have it so easy. There are two basic styles of fusion uniforms; and females may wear either one. The first style consists of six basic parts... top, LONG SLEEVE polo neck shirt, trousers, boots, belt, and rank/division pins. The top is of gold coloured cloth, available from jumble sales and charity shops. Trousers and shirt are BLACK. A good thing to get is a black pair of army surplus trousers. If you canít find the black at your local army/ navy store, use black dye on the khaki ones. Boots, belt and pins are easy to get. Boots and belt are BLACK. Again look in the Army and Navy, or try horse riding shops for tall rubber riding boots. On the left side of the polo neck is worn the division pin, on the right side is worn your rank pin.
The other style uniform is like MARA wore in ST It also consists of six basicparts ... black boots and leotard, shorts (or skirt), belt and pins. Theleotard is best if you can get it long sleeved and legged, (black stocking,pullover or turtleneck may also be used). The top is a sleeveless X frontpullover. The X should be done in dark brown. For the shorts, any black oneswill be OK, or a black mini skirt, particularly in shiny PVC would look good.For the boots, belt and pins, see the uniform above. MAKE UP.....Heavy brown with upswept eyebrows.
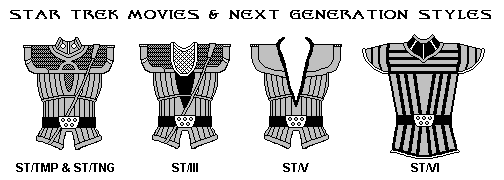
Basic Padded Vest
| Materials | $ US | |
| 1.50 yards of dark grey vinyl @ $10.00/y | ||
| .50 yards of light grey vinyl @ $10.00/y | $5.00 | |
| 1.25 yards of black poly/cotton fabric @ $5.00/y | $7.25 | |
| Misc. (thread, glue, etc.) | $5.00 |
The vinyl for the padded vest should be the soft flexible kind that is easily folded and sewn on a sewing machine.
The black poly/cotton fabric is used as the basis for the padded vest, and
will have the folder vinyl strips sewn to it to form the finished vest. Another
fabric may be substituted if desired, either for cost or other concerns. If you
can come up with another idea for using as a basis for the vest, feel
free.
(The fabric used is the same used to make men's dress slacks)
The black foundation vest is basically created using the design of a standard demin vest. I laid a denim vest out on newspaper, and traced the outline of the sections onto the paper. I then used this paper pattern to mark and cut the black fabric. A certain amount of fine tuning will be necessary at this stage to produce a vest which is not too loose, but still is not overly large, as it will tend to "bunch up" when you tighten the belt at the waist.
The vest is constructed in two parts. The lower part of the vest, and the shoulder pad which is constructed separately. The shoulder pad is sewn onto the vest after the vinyl strips are applied.
After the black fabric vest is constructed, the vinyl strips are sewn onto it. It is not necessary for the strips to go all the way to the top as a certain amount of the vest body will be hidden by the shoulder pad.
The vinyl strips are cut from the dark material, and are folded over and then sewn along the edges. This will make it easier to sew the strips to the black fabric later.
For my uniform, I cut the dark grey vinyl strips 2.5" wide. I then marked the underside of each strip with two parallel lines, 1" from each edge. The strips were then folded so that the edges of the vinyl lined up with the lines that were drawn on that side. The strips were sewn on a sewing machine exactly .25" from each edge using a matching grey thread. This resulted in strips approximately 1.5" wide.
The exact number and length of the strips required will depend on the final dimensions of the vest, and some playing around will be necessary in order to determine the best layout when cutting the vinyl. It is safe to say that you will be using most, if not all, of the 1.5 yards the dark grey vinyl material.
Once all the strips have been sewn, it is time to lay them out on the fabric vest. I found that the easiest thing was to lay the vest flat on a table, start placing the strips at the seam on one side, and work my way in to the center of the front and the back.
You may want to lay them out and pin them in place all at once. However, I laid out the strips using a pencil between them to maintain an equal spacing all the way around, and marked the location of the strips with a sliver of soap to avoid having to pin them all in place and wrestle the whole thing through the sewing machine at once. It DOES get harder to handle as the number of strips sewn to the fabric increases, so why make life difficult for the whole process? The strips are then sewn to the fabric by (carefully) sewing along the same stitching which is holding the fold in the vinyl strips.
The shoulder pad is constructed the same way, with the strips being laid out starting at the top center, and working out to the front and back.
Once the pieces are completed, the shoulder pad is best sewn to the vest with the help of an extra pair of hands. It is almost impossible to keep the shoulder pad in place and determine the proper location for it to be sewn to the vest if you have only the standard issue of two upper appendages at your disposal.
The ends of the strips which have been sewn to the black fabric, are concealed with strips of the light colored vinyl which has been glued to a light cardboard.
A light cardboard, such as that taken from a cereal box, and the back of the vinyl are both covered with contact cement and then pressed together after a suitable drying time. Once bonded, the material is marked on the cardboard side, and cut into 1" wide strips with an X-acto knife and a ruler. Please watch your fingers!
The length of each of the strips will have to be determined by laying them out on the finished vest and determining how it looks best. For covering sections of vest where curves are involved, it is probably best to cut shorter lengths and over-lap them. I found that I was cutting some of the pieces to about 1.5" long. The covering strips are glued to the edges of the vest with crazy glue, covering the ends of the dark vinyl. Use the crazy glue made for porous material. Regular crazy glue will not hold. Contact cement works for a while, but will break free after a few weeks. It also turns yellow and looks pretty gross. Of course, if you like gross....
Finally, the whole thing is closed in the front with some kind of closure (snaps, clips, etc.). Velcro will not hold it enough, and you will find it keeps opening.
The center of the rear side of the vest is concealed with the spine cover. The spine cover is made from the light colored vinyl, again glued to the same light cardboard material, OR PLASTIC MESH. The design calls for seven pieces, but I found that leaving out one or two of the pieces seemed to work okay if the space between the shoulder pad and the belt is limited in distance. You will have to determine what looks best.
The vinyl ropes that go around the neck, and around the center of the uniform are formed by gluing strips of the dark vinyl to lengths of vinyl yacht rope, which are then glued to the vest with crazy glue. The vinyl cord frays easily, so when you cut it, you will need to melt the ends with a match or lighter. Once you have cut the cord to length, cover it, and the vinyl you will cover it with, with contact cement.
Uniform Pants
| Materials | $ US | |
| 1 pr. jogging grey pants | 9.00 | |
| Misc. (thread, etc.) | 2.00 | |
| Total | 11.00 |
Basic Imperial uniform pants can be easily created by making some simple modifications to a pair of grey jogging pants.
Obtain a pair of jogging pants that are a bit loose as you will be making some small pleats along the front of each leg, and this will make the pants a bit tighter when you are finished.
Using a straight edge, lay out a straight line along the front of each leg, and sew a small pleat from the top to the bottom of the leg. Then lay out a second line to the outside of each pleat and sew that as well. Finish each leg by sewing a third and final pleat on the inside of the original pleat.
When completed, you will have have a pair of grey pants with three small pleats down the front of each leg.
Insulated Undersuit
| Materials | $ US | |
| 1 black sweat shirt | 5.00 | |
| .5 yard black velour fabric | 3.00 | |
| Misc. (thread, etc.) |
A basic insulated undersuit can be constructed by starting with a standard black sweat shirt from which you remove the arms.
The black velour fabric is folded in half and cut so that you have two equally-sized pieces. Sew these pieces to form two tubes of fabric. These will form the new arms for the shirt. It is not quite the fur sleeves as used in the TV series and movies, but Lt. Kregaar will atest to the fact that fur is not a Klingon's best friend when you're attempting to look fierce in a park during a summer fair in 90į heat.
Turn everything inside-out and sew the new sleeves to the body of the shirt. At this time it would also be a good idea to finish off the end of the sleeves so that they do not fray. Don't worry, they will be concealed by your gloves. The looseness of the velour fabric will give you room to breath in the suit, and it doesn't look half-bad.
If after trying on the shirt, you feel that it could use the addition of shoulder padding, you can attach a pair of shoulder pads to the inside of the shoulders with some velcro. The velcro allows you to reposition the padding easily, as well as remove them for washing the shirt.
Imperial Female Klingon Uniform
Basic Padded Vest
The ladies uniform, can be made simular to the males.
On of the first things you musty consider, is weither the jacket will be open or closed front. Some folks have used a McCall's pattern #4437 , and modified it, using only the front and back pieces. Also, some have made the vest into two pieces.
Also, if you make the jacket VERY OPENED, you might want to make the "chest" armour, such as B'Etor wore.
There are several ways to accomplish this. Once is findind a bra, which looks metallic, fits well, and you wont mind showing a bit...
You can also make one, using:
- a pair of round bra fillers
- grey felt (.5 yrds)
- grey material (about 18" X 7" min.)
- a fabric thata dosen't unravel...velour works well
- fabric paint, silver and gunmetal grey, a small brush
- compass (to draw circles)
- and a neddle with dark grey or charcoal grey thread and glue.
Measure the diameter of the bra fillers. You'll want to make the diameter of your felt circles about 1/4" larger than half of that amount...(Ex. if the diameter of the bra fillers if 6", your felt circles will measure 3 1/4" accross.)
Cut out 8 felt circles for each breastplat. Paint gunmetal grey at the edges, and silver as you move in. Mix the paint and create an imtermediate tone between the two colors for depth. Paint following the countour of the circle.
After they are dry, glue the circles to each bra filler in a pinwheel pattern, overlaping each other. Reinforce with stitching. Make sure you keep the cup shape of the bra filler. Dab paint on the stitches, and any part of the bra filler that shows.
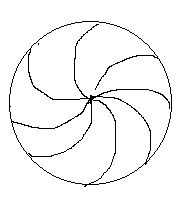
Attach to uniform, using the grey material, or whatever else you wish. This will also efffectively hide a regular bra.
Figure out where you will be wearing your belt. You will want the bottom hem of the TOP part of your vest to come to the bottom edge of your belt. Then a small "apron" bottom piece is made for the lower half.
The apron, or fabric flaps, can be made in any style you choose. Look at some photos to get an idea on how you want it to look. You can either sew it to your jacket bottom, use velcro, or sew it directly to your belt.
Now ladies, you must decide if you want to wear pants like the men do, or wear a skirt. The ladies Klingon Skirts are made similar as the vest is made. The skirts are pannels of vinyl strips and material. You will have to adjust it to where you are able to move about comfortable. It can have just 2 slits in the front, or totaly made up of pannels, layered in such a way that it is not noticible.
If you want to wear pants, you can use the same instructions as the men's pants, or you can use stretch pants
Here are some OTHER ideas and picture to help you with your uniform. 1,2,3,4, 5,
Boots
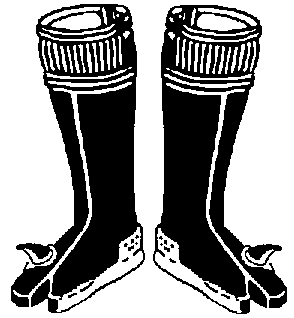
The Budget version for boots is to utilize hight top boots or biker boots. You can add horns to the top, and metallic strips around the soles. You can also extend the tops by adding an elastic cuff to the top. Let your tastes decide.
Cloak
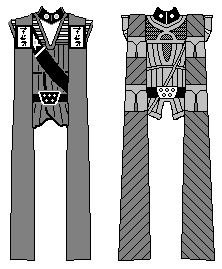
How to make a robe, courtesy of House SaqIm
Gloves
Gloves can be done by buying fingerless gloves, or taking an old pair of gloves and cut the finger tips off. to add claws, cut the blades of a plastic throwing star and glue and/or thumbtack them on the gloves. Plastic claws will also work well.
Armguards or Bracers
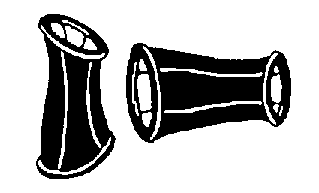
There are many ways this can be done. A quick way is by starting with a
forearm guard pad. If they are white, dye them back first. Then after they are
dry, sew black vinyl to the pad, covering it.then make 2 black tubes, made of
black vynil and fill them with a stuffing material. Then sew each tube to the
the end of the pad area. You can then cut out Klingon letters from vinyl, paint
them gold, and glue them to your bracers. Another Method I have heard done, is
from Kang's pages...at http://www. islandnet.com/~timespac/klingon/insig.html.
His ideas is to use metallic glue sticks to make the studs and insignia on parts
of the uniform. Check out his pages for the results. 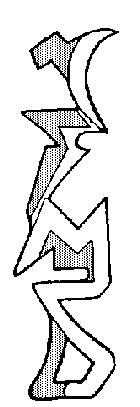
***NEW**
I have also found that using a product, callied "FOAMIES"...I
have found it in the Wal-Mart craft section...it is a thin and flexable piece of
foam. You can cut out the pattern that you want, and then paint it. You can even
give the pattern a 3D effect..it hold the paint well. Then, you can velcro of
glue the emblem to your gaunlets. Take a peek, here.
Also K'Put has an EXCELLENT website for making gaunlets. The site is located
at:
http://www.geocities.com/Area51/Shuttle/8981/index.html - K'Put's Closet.
Buckles
can be made from wood, stiff cardboard, plastic or metal. Look at photos to decide what color you wish to make yours. The shape and edge of the border, and the numer of studs can also vary. Or, you can use the Klingon Symbol, like Lursa wore.
Headpieces
**NOTICE***
I have included the old instuctions...but I now have my own to add!!!
I tried this out, last year...and the headpiece came out very well. This is especially helpful if you have no one to help you out...and you want to get a headpiece to match your own skin color.
Method #1
This headpiece is 2 parts. The headpiece and the hair.If you find a wig to
suite your needs, you may use that...But I used loose hair, that you can
buy from various places. Here is the supply list:
- Liquid Latex (Clear)
- Optional Wig or Loose Hair
- Superglue
- Plaster
- Modeling Clay
- Scissors
- Brush
- Baby Powder
- liquid make-up to match skin color
- White glue
- paper strips
- and a styrofoam head
Now...you are probably wondering what in the heck the paper strips and white
glue are for..{{:-)
Stryofoam head come in MANY sizes...but it is hard to find one that comes close to your own head size...especially if you have to worry about hair! So..you are going to make a mold of your head, using paper mache' using the white glue and paper strips!!
Tie down your hair, and be sure to put some kind of bathing or swimsuit cap to cover your hair. If not..you can use celophane as a temporary cover! (This WILL get messy)
Soak the torn stips of paper in water that you have added about 1-2 teaspoons of white glue. Starting at the bridge of the nose..gently wring the access water from the stips of paper, and place on the face...small pieces around the eyes, nose and mouth..moving to larger pieces around the forehead, chin and sides of the face. You want to cover from about the middle of the top of the head to at least half way down the face...I did a full mask, covering to just under the chin...(just in case I wanted to do more later!)
After you have covered everything...you can use a blowdryer to help the mask harden. Once it is firm enough, wiggle your face until you are free from the mask, and place it on the styrofoam face to dry completely.
Once the mask has fully dried, you can paint the mask to protect it. Now, you have a preey close cast of your face, that you can work from.
The first step is to choose a design for the ridge you want to have. Look at photographs for help. After you have chose the design, model the clay on the mask to resemble the design. Using a modeling clay that will NOT harden is the best method. Now it also the time, if you want to make nose ridges for yourself. They can be connected, or two seperate pieces.
Once you have a design that you like, apply the plaster to the clay sculpture and cover the design design. Make a small clay dam to contain the plaster. The plaster should be thick. If you have a large container ie...a milk carton, you can pour the plaster into the container, and place your clay ridges inside.
Allow the plaster to harden. Once this is done, remove the clay from the plaster, which is now a negative mold of your ridge design. Make sure you clean it out good.
Once the plaster is dry, you can brush the latex into the mold, over the design. Use a small brush you don't mind throwing away. For a quick drying time, use a blow dryer. Apply as many coasts of layers as wanted, but at least 5 coats and blow dry each coat. Carefully, peel the latex appliance out of the mold and apply a light coat of baby powder to both sides of the appliance. Place apliance back on mold.
If you wish to add hair, you can either use loose hair, or an wig. I used loose straight hair, after finding a color that I liked. There are many ways to attach the hair to the head. You can glue it, or sew it to the edges of the appliance. I cheated, and sewed the hair to a stocking cap, and then attached the appliance to the cap also. this way, I don't have to use much glue on my head...and it is very comfortable... and I dont sweat as much.
If you wish to use the wig, cut the section from the wig where the appliance will be. Turn down the cut edge of the wig and glue to the appliance with the superglue. Let the glue DRY COMPLETELY.
Use sprit gum or latex, to attach the headpiece to your head.
Method #2
Here is the most basic of ways to make your own "Bumpy Head". This is a VERY Basic modle. If you want more details, you will need to find you a group that can help you take a head casting, and create your headpiece.
Most headpieces are 2 parts. The headpiece, and the wig.For the headpiece,
you will need:
- Liquid Latex (Flesh Colored)
- Wig
- Superglue
- Plaster
- Modeling Clay
- Scissors
- Brush
- baby Powder
- and a styrofoam head
This is difficult to do, so do not feel discouraged, if your first attempt does not go quite right.
THe first step is to choose a design for the ridge you want to have. Look at photographs for help.After you have chose the design, model the clay on the styrofoam head to resemble the design. Using a modeling clay that will NOT harden is the best method. Apply the plaster to the clay sculpture and cover the design design. Allow the plaster to harden. Once this is done, remove the clay from the plaster, which is now a negaticve mold of your ridge design. make sure you clean it out good.
Brush the latex into the mold, over the design. Gor a quick drying time, use a blow dryer. Apply as many coasts of layers as wanted, but at least 5 coats and blow dry each coat. Carefully, peel the latex appliance out of the mold and apply a light coat of baby powder to both sides of the appliance. Place apliance back on syrofoam head.
If you wish to add the wig , cut the section from the wig where the appliance will be. Turn down the cut edge of the wig and glue to the appliance with the superglue. Let the glue DRY COMPLETELY.
Use sprit gum or latex, to attach the headpiece to your head.
tlhIngan maH!

0105.1000