

Last year for our Halloween party, I wanted a coffin for a room centerpiece. I also wanted it to be realistic and I wanted to be able to use it year after year in a variety of ways. This sent me on a journey of all the stores, web sites, and articles I could find looking for the right coffin for my needs. All were either cheap cardboard, too small, or too expensive. After a lot of thought I decided to build my own. It cost me about $300.00 and here's how I did it;
You
will need,
Ponderosa
Pine boards-two 1"x4"x8' , two 1"x6"x8', one 1"x8"x8'
Cheap
pine boards-four 1"x12"x8' (some knot holes are okay)
ACX
Plywood-one 4'x8'x1/4"
Medium
Density Fiberboard (MDF) sheet-one 4'x8'x3/4
Crown
molding (Homebase #PPR609) one 12' length
Casing
molding (Homebase #PFJ428) one 10' and one 7' or equivalent
3/4"
pine duck molding (custom molding shop)
tools;
Table
saw, miter saw, circular saw, drill & bits, bar clamps, nail set, hammer,
router & bits, stapler, tape measure, hot glue gun.
Misc.
2"
dry-wall screws, ½" wood screws (silver), 1" finish nails (not silver),
wood glue, black upholstery tacks, 5" and 1" furniture foam, polyester
lining material, 220 and 100 grit sand paper, stain or paint, 48" piano
hinge (Homebase), six coffin handles (AEON).
The
first thing to cut will be the base, the measurements will be 17" at the
head, 14" at the foot, 28" across at the widest point. From the top to
a parallel line at the mid section (widest point) will be 21" and the mid
section to the bottom is 53 ½" (see fig 2). The fiberboard
is very strong and you will need a sharp blade to cut it. I found that
a circular saw with a rip blade works best. Use a strait edge to
guide the saw and cut slowly, you may need to use a rasp to smooth up the
edge a bit.
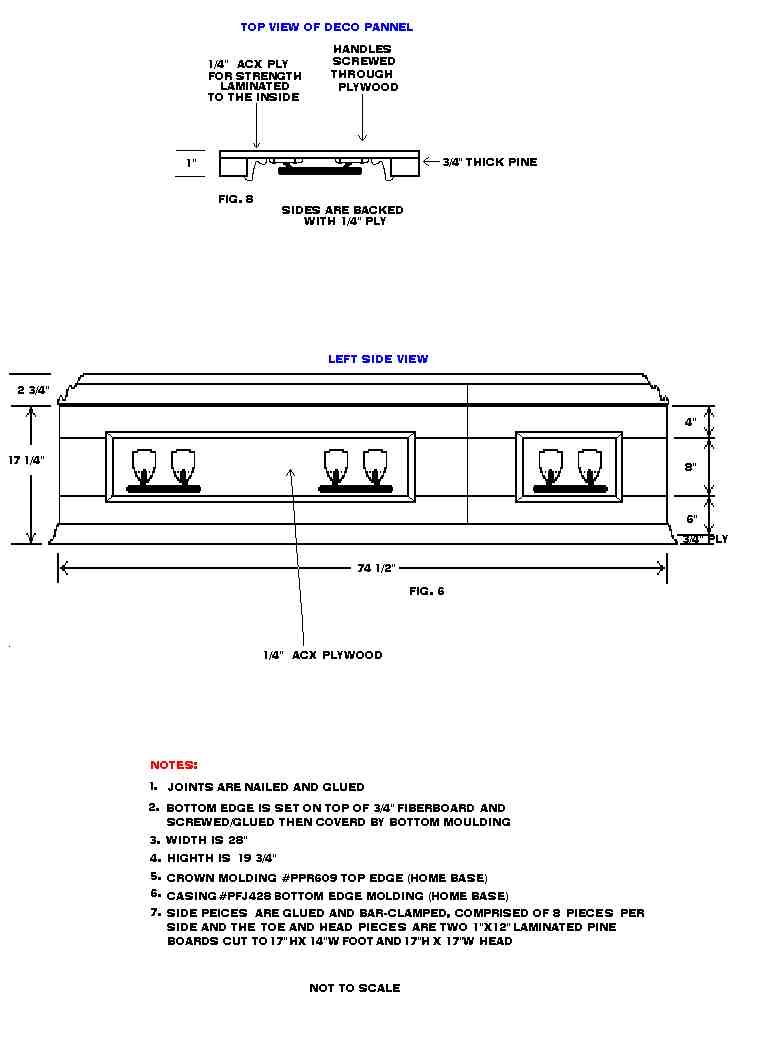
Once
you have the base you can start on the sides. They will be a little
long and cut to size. The sides will be put together with wood glue
and the plywood back will strengthen them and make a deco panel.
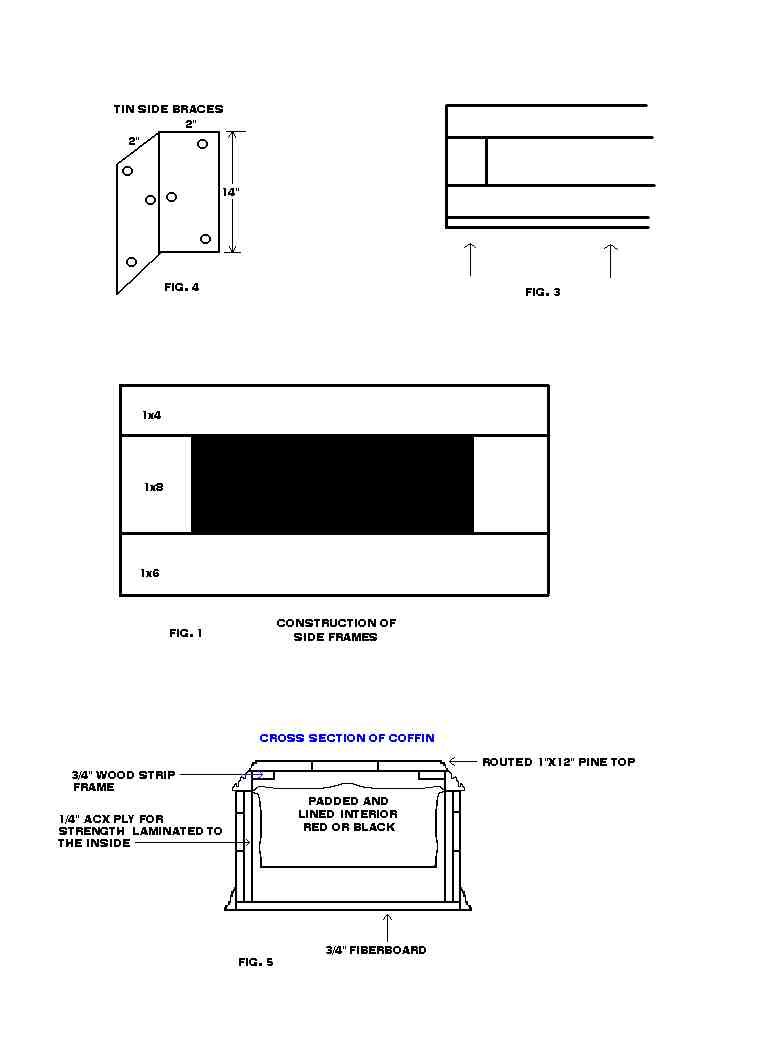
Let's start with the upper side sections. You'll need to cut two
pieces of 1"x4" and two pieces of 1"x6" to 22 ½ " long and four
pieces of 1"x8" to 3" long, use a miter saw for the best edge. Next,
put them together like a frame with the 1x4 on top and the 1x8's in the
middle and 1x6 on the bottom and clue and clamp the assembly, (see fig.
1) don't worry about the ends being even, you'll cut them to size later.
Next, are the lower side sections. Cut two 1x4's and two 1x6's to
55" long and four 1x8's to 4 ½" long and assemble them the same
as the upper sides. You should have four frame sides and a bottom
now. Lets work on the foot and head pieces next.
These
two ends are made up of four pieces of a 1x12 board. They are
two pieces joined side-by-side with wood glue and clamped. After the glue
dries cut both to a total height of 17". The foot piece is cut to
14 ½" long and the head piece is 17 ½" long.
Now
for cutting the edges of your pieces. Set your table saw blade to
the correct height for cutting 3/4" stock and set at a 45 degree angle,
since your ripping an edge, you need to use your miter fence. The foot
and head pieces should be cut at a 45 degree angle. The edge where
the upper and lower side pieces meet should be cut at 15 degree angles,
keep this in mind (see fig. 2). Cut ONE end of all your pieces (45 degree
ends), trimming off only enough to make a uniform edge. Set your
pieces on top of your fiberboard base one-by-one where they will go and
be sure to have the 1x4 upright. Measure the length (remember, measure
twice, cut once) . After your satisfied with the measurement trim
the pieces to length. Now you see why we made all the lengths a little
long.
All
the pieces should be a uniform height of approximately 17" and fit snug
next end to end. Note where each piece sits on the base board and mark
it. If you need to shim any of the sides to match height, then now
is the time to do it. Next you attach the sides to the bottom.
Pre-drill
two holes from under the base up into the upper sides with a 1/8" bit (see
fig. 3). And use 2" dry-wall screws and wood glue to secure them.
Pre-drill three holes for the lower sides and two for the foot and head
ends and secure them the same way. The strongest way to secure the
edges together is to glue the joints and reinforce them with thin
metal brackets. These can be made from tin that is 2" wide and 14"
long (see fig.4). Screw the tin reinforcements in place at the inside
of the joint and nail the outside of the joints with finish nails on both
sides and set the nails, unless you have a biscuit joiner, then that's
the way to go, I don't have one.
To
make the plywood backing, measure the inside height of your box. Set the
table saw blade to 90 degrees and rip the 1/4" plywood to fit. Cut the
plywood to length, it will take four sections, two upper and two lower.
Now, lay the casket on its side and put glue on the pine side-frames and
laminate the plywood sides to the pine (see fig. 5 & 8). To hold
this firmly, screw the plywood to the frame with ½" wood screws
making sure you don't miss the pine frame.
Now
is a good time to sand all the sides and clean up any rough edges that
will show in the finished product
You
should have the box mostly completed now. The frame of pine you made
with the plywood backing, has made a deco panel in the side of the coffin.
The molding for the bottom will cover the ugly joint where the fiberboard
and pine frame meet, this is a trial and error fit process. Fit the
molding all the way around the base mitering all the ends for a neat appearance.
For the inside of the deco panel edges, you will need to miter the duck
molding at 45 degree angles making a picture frame (see fig. 6).
The molding will also cover any nasty edges you might have (I love molding!)
Nail this in place and set the nails.
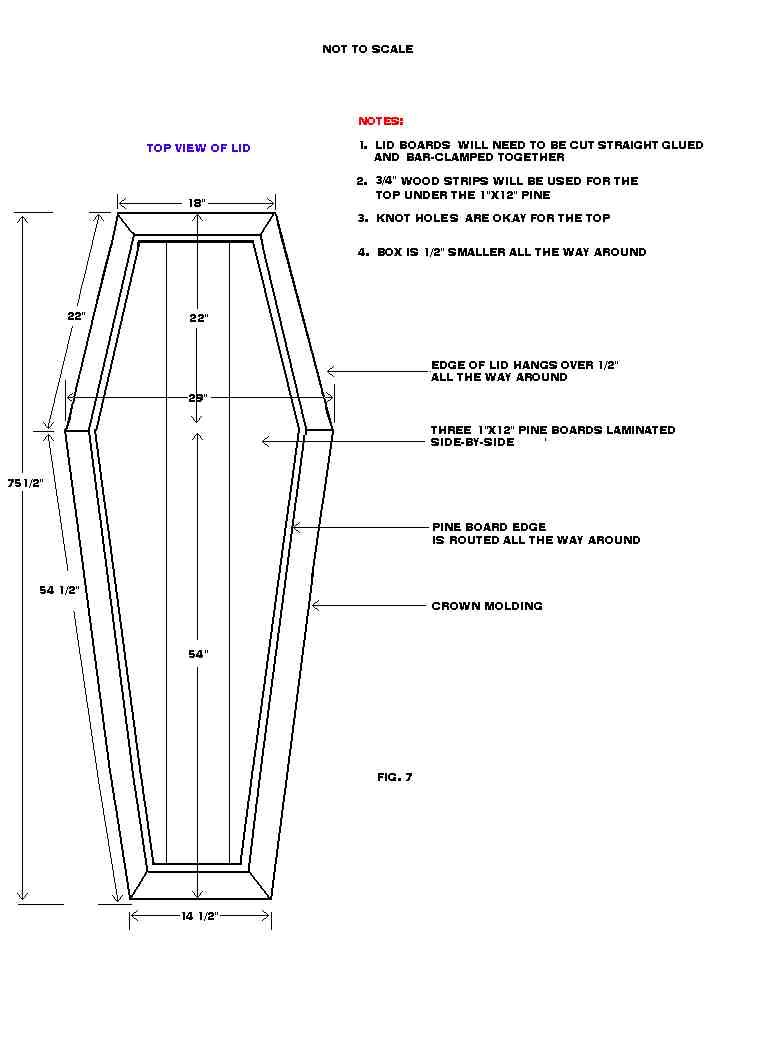
Okay,
on to the lid (fig. 7). First, cut three 1x12 boards to 73" long
and approximately 8 3/4" wide each, use the fence on your table saw and
set it to trim off 1/4" strips until you get to your desired width, you
will use these strips later on the inside of your lid. Glue the boards
side-by-side and bar clamp them together alternating the clamps one on
bottom, one on top, one on bottom, etc. You will need to trim the lid to
a width of 25 3/4" after the glue has dried . After the glue
has dried, measure the lid to 12" at the foot, 15" at the head, and 26"
at the widest point, mark the outline of the casket shape, cut to size
with the circular saw and a straightedge. Now, with whatever router
bit you like, I used a 3/4" rounding over bit set deep, router around the
outside of the lid.
Next,
make a frame out of some scrap about 3" wide and 3/4" thick to follow around
the underside edge of the lid (see fig.5). This is to attach the
lining and crown molding to. When you've done this, glue the frame
to the underside of the lid and let it set. While the lid and frame are
setting, you can cut and dry fit the crown molding. As with the bottom
molding, this is also trial and error fitting. The crown molding
will run around the scrap frame just under the routed lid edge. When
the glue from the frame is dry, attach the molding using glue and finish
nails. The molding has a lip at the top you can conceal the nail
under, but you should still set the nail. At the mitered corners,
the best way to glue and clamp them is with a miter clamp, if you don't
have that then let the pressure of the butt joint hold it. If the
molding you use will be what I used, it will be primed for painting, if
you intend to paint your coffin then this is fine but I wanted to stain
mine so I had to strip the primer off.
Now
for the lining. For the bottom you will need 5" thick foam and for
the sides you need 1" thick. Figure out how much of the 5" thick
foam you will need, I bought a 96x24" roll from a fabric store here where
I live called "$2.00 fabric store" and it cost about $40.00.
The 1" thick foam comes in 2'x4' sheets and I got five of them at about
$4.00 each. The material is polyester lining, it looks like silk
which is perfect. I got black. I also bought some black upholstery
tacks from an upholstery warehouse at .99 cents for 24 , these look like
big thumbtacks but when you set them they look like a tuck-n-roll job.
First,
fit the 5" foam in the bottom and don't worry about gaps against the side,
the 1" foam will cover. Then fit the 1" foam to the sides using the
strait edges for the top. Cut the polyester to fit the bottom by
wrapping it around the 5" foam, tuck it in good and that's all you
need
to do. Cut the material for the sides in two long pieces allowing
extra material for wrapping around the foam and for the head and foot ends
(e.g. One side is long for the head end and the other is long for the foot
end). Tuck the material around the 1" foam and hot glue to the wood
behind the foam and at the foot and head ends. The glue will seep
through the material and hold the foam as well. Decide where you
want the tacks to go, drive them through the material and foam to the wood
underneath. The easiest way I found to do this is push the tack in
to the foam then just whack it with the hammer and hope it sets in the
wood, if you bend the tack just get a new tack. The lining for the
lid is a little trickier.
Lay
the lid on the floor, stuff the 1" foam pieces between the 3" frame and
hot glue them when you figure out the placement. Now, here's where
it's a little tricky, put the polyester material on the lid and set the
tacks working from one side to the other. You must do this because
if you attach the liner to the lid first or try to set the tacks in pairs,
the lining will rip, this stuff doesn't stretch! When you have all
the tacks in place, cut the material to shape leaving it a little wide
so you can staple around the edge in to the lid frame and then take the
1/4" strips of wood, cut them to fit around the inside edge of the lid
and over the staples for a neat appearance, hot glue them in place.
Now
the final steps. Sand the whole thing and stain or paint it to the
color you like. I did not put a top coat on mine, I wanted an old
look. The knot holes in the lid contribute to this effect.
After I stained mine, I sanded it lightly and gave the edges a worn look.
The
hardware for this thing is a 48" piano hinge for the lid, a chain, and
six coffin handles. The hinge is from Homebase and the handles came
from a company called AEON in Harbor City Ca., their number is (310) 534-0720.
They have different styles to choose from and you must tell them that you
need handles for a "toe pincher" coffin. They are very helpful and
very affordable, my handles were $15.00 including S&H, there's a minimum
of $15.00 purchase, if you ask them they will send you a picture of the
handles and a price list. I used the #3079 in silver at $1.91 each
and was happy with the way they looked. I attached them with the
½" wood screws which are silver and look good with the handles.
As far as the hinge, just line up the lid and use the screws provided and
secure it, you might need two people, the lid is heavy.
This
makes a coffin large enough for a six foot tall person and it is 23" wide
at the inside middle.
That's
about it, the coffin is heavy so don't plan on lugging this thing by yourself.
I have been told by people that it's too realistic looking (just what I
wanted!) My crown molding has shrunk a bit but it adds to the old look
I wanted, I can't wait till Halloween!
 |
 |
 |
|
|
 |
 |
 |
 |
 |