the
SLAG HEAP
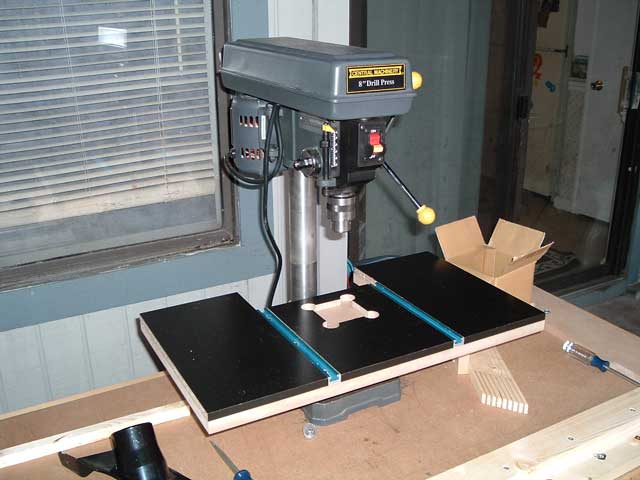
Drill Press TableThis is the drill press table that I put together. It's based on a few designs I've found online. |
|||||
|
Home Projects Jigs & Mods My Workshop Links |
|||||
 |
|||||
|
I picked up the Harborfreight 8" Drill Press (DP) last fall at the same time I bought my Ryobi BT3100. The DP was on sale for $40, so I figured it was a decent way to get something more acurate than my 20 year old Black & Decker hand held drill. The DP istelf isn't bad when you consider the price, or as long as you don't expect professional production quality from it. I'm not going to go into a review of it here, since this is about the table I built for it. After brwosing the web for inspiration, I settled on a combination of designs, but it mostly follows the mini-drill press table from rockler.com. It's still in the process of evolving, but who really has a workshop that isn't? The materials involved were mostly stuff I already had around the house or shop. Here's a quick rundown:
I started the layout by measuring the shelf. Mine was about 13" deep by 23" wide. If you have something different, don't worry about it. Just make sure you use the measurements from your boards, not mine. :P I wanted to put in a pair of 3/4" wide T-tracks for clamping and such, so I added another 1.5" to the overall width. I made a rough calculation of how wide the throat at the back of the table would have to be to accomodate a 45° rotation without interfering with the DP body or main support. I think 7" was the magic number. If your DP has an elevation crank, make sure you figure that in for clearance too. I've found that making a mock-up out of cardboard or styrofoam helps me to get those measurements close to where they need to be. Just make sure you figure the thickness of the material too, not just the profile. 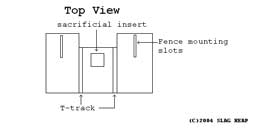 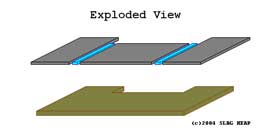 Basic layout of the table from the top and exploded. Once I had my dimensions figured out, I cut the shelf into three parts: one center and two wings. The center is shorter due to the notch. I cut the MDF to match the final width of the cut shelves and T-tracks. The depth of the notch was set to give me enough clearance that I could move the fence all the way back to the support pole for maximum throat clearance. An easy way to figure that is to add the thickness of your fence, the leg of the mounting angle, another inch for the edge of the table, and another half to whole inch for clearance around the support so that you can see the angle guide. Here's an example:
I found a set of bedrails on the side of the road that were in good condition and figured I would give them a try as they were free, and 1/4" aluminium angle stock is pretty hard to find locally. I say that this is NOT RECOMMENDED because the steel in the rails is tempered to some pretty serious specifications. It took me the better part of a week to cut and drill them, and in the process killed a half dozen abrasive wheels for my dremel, and every bit in my toolbox between 1/8" and 5/16". After a few trips to the ACE and stocking up on select sizes of carbide tipped bits and some machine oil (very important!) |
|||||
All content ©2004 SLAG HEAP | |||||