On-Line Study Group
PhotoShop 5, 6
Study Guide Number 7
Review of Tools and Skills
Text: PhotoShop Bible
Chapters 1-4
Review of Shortcut Keys:
I = Eyedropper
J = Airbrush
S = Stamp
Exercises:
Capture the Image, method 2:
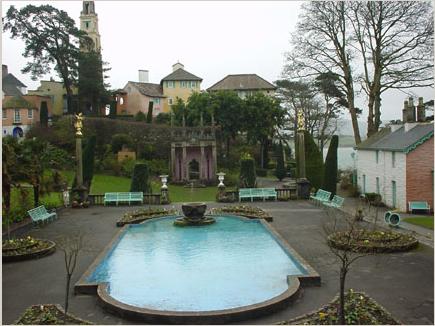
1. Capture the above image and open in Photoshop.
2. Right-click the image. Click Copy, or Save Image As:
3. If you copied the image, open a new canvas in Photoshop, and paste
the image into it. Then flatten the image (ctrl-shift-E)
4. If you chose Save in the dialog box, be sure you are saving to the
correct folder (I recommend saving to the Desktop.) Switch to Photoshop.
Double-click the Photoshop desktop. In the Open dialog box Look In window,
switch to the Desktop and open the image you just saved.
5. You now see the image on your photoshop workspace.
6. Be sure you have Default colors. Then choose the Crop tool (C)
7. Add about 3/4 inch around the image, using the method described
in the previous lesson. Your frame will be white. (Be sure to do this.
We'll use the frame.)
8. Press Ctrl-0 (zero) to make the picture as large as it can appear
without being hidden behind any palettes. If necessary, hide your palettes
by pressing the tab key.
You now have an image lifted from the Internet. Remember that it's copyrighted,
even if you don't see anything written on it that says so. You are only
borrowing it for practice purposes.
Picking up Colors from an Image
1. Press I for Eyedropper. Press Enter to display the Options Palette.
2. Set the Sample Size to Point Sample. This means the Eyedropper will
pick up the color of the single pixel it is placed over. You can also pick
up an average sample of 3x3 or 5x5 pixels.
3. Display the color palette (F6). Click the small triangle to the
upper right of the palette. Choose RGB sliders and RGB spectrum. (You can
switch to CMYK sliders and spectrum to see the difference, but please switch
back again.)
4. Be sure the color palette indicates that the foreground color is
active (upper-left color square on the palette should be double-outlined.)

Foreground color active.

Background color active.
5. With the Eyedropper, click on the blue directly in front of the
fountain.

6. Click on the pavement. Note the foreground color.
7. Hold down the mouse button and drag around on the water with the
Eyedropper. Do the same in the pavement. Note color palette. Notice the
values as well as the dynamic movement of the sliders.
8. Zoom in (ctrl-+) to 200%.
9. Hold down the spacebar to toggle to the Hand.
10. Push the canvas until you see the red on the side of the house
to the right.
11. Let up the spacebar to toggle back to the Eyedropper.
12. Drag around in the "red" and look at the color sliders. Are you
surprised to find the color isn't red at all? What color stays slightly
in advance on the sliders? Your eye compensates to see the colors your
brain "knows" must be there. Measuring colors is imperative when adjusting
images.
13. Hold down the spacebar again and push the canvas until you see
the roof of the large, central house.
14. Drag in the yellow of the house. Again, notice the results.
15. Drag in the white part of the trim with the eyedropper. How white
is it?
Color Casts
In order to determine whether an image has a color cast, it is necessary
to measure the neutral areas. Neutral areas are those which should not
contain any color hue at all. If the roof should be gray, you should not
see any of the sliders in advance when you drag about in them with the
Eyedropper.
Correcting color casts will be discussed in later lessons.
Using the Airbrush
1. Press J for Airbrush. Zoom to 300%.
2. Note the options palette (enter). Set to Normal, 10% pressure (type
a 1). Choose the third brush, second row on the Brush palette (The brackets
[ and ] will cycle through the brushes/sizes.)
3. Toggle to the Eyedropper by pressing the Alt key. Click on the green
of one of the benches. Let up the Alt key to toggle back to the airbrush.
4. Hold the spacebar to toggle to the Hand, and push the canvas until
you can see the lower edge of the pool.
5. Spray-paint an area in the pool. Try to make it look soft and natural.
6. Notice that the longer you hold down on an area, the more green paint
you will build up.
6. Pick up some of the deepest blue beneath the fountain and spray
the brownish areas at the bottom of the pool.
7. Hold down the Alt key and click on the pavement.
8. Let up the Alt key to toggle back to the Airbrush, and spray the
shadowed side of the pool to make it lighter er and softer.
Original
After using the Airbrush.
Using the Stamp Tool
We will get now add a second fountain to the pool.
1. Press S to switch to the Stamp tool.
2. Notice the Options palette. Set at Normal, 100% opacity, aligned.
The Stamp tool picks up pixel data from one area
and copies those pixels to a new area. It is really a cloning
tool.
3. Move the mouse pointer over an area of the fountain. You will clone
this area to place a second fountain at the bottom right of the pool.
4. Hold down the Alt key and click on the fountain. Just one click.
(Yes, let up the alt key now.)
5. Move to the bottom of the pool and paint.
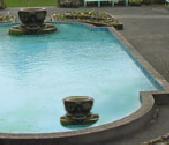
Notice the crosshair that indicates where you are picking up data from.
Notice that it moves about as you paint.
To pick up from a different area, you must again alt-click. Move the
mouse pointer over a different part of the image, hold down alt, click.
Let up the alt key and move to a different area. Paint.
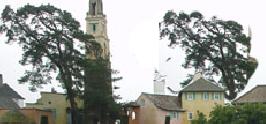
Here, I have cloned branches from the tree to a different part of the
sky.
To make the tree look more natural, I need to disguise the fact that
it is a direct clone. To do this, I will alt-click on some other branches
and clone them over the first bit.

Experiment with setting the opacity lower and picking up from various
areas of the trees on the right.
The stamp tool is often used by "dabbing." Click, click, to stamp in
little dabs and small areas.
Notice the Aligned button. If you uncheck it, the source of the stamp snaps
back to the place where you alt-clicked. Try both aligned and unaligned,
until you understand the difference.
Copyright Christine C. Frey, 2000