 Directions
are for three sizes. You will need about 2 ounces (small), 2-1/2 ounces
(medium), or 3 ounces (large) of worsted weight wool yarn, and a pair of No.3 US knitting needles. The gauge in garter stitch
is 5 stitches equal 1 inch.
Directions
are for three sizes. You will need about 2 ounces (small), 2-1/2 ounces
(medium), or 3 ounces (large) of worsted weight wool yarn, and a pair of No.3 US knitting needles. The gauge in garter stitch
is 5 stitches equal 1 inch.DIAPER COVERS
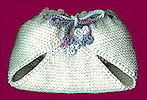
When a lot of us were babies, plastic pants hadn't yet been invented, so our mothers used natural fibers (cotton, wool, linen) and knitted or crocheted soakers for us. Modern mothers are tired of the rashes and ecological factors involving plastic pants and a lot of them are returning to soakers, now called diaper covers.
Directions
are for three sizes. You will need about 2 ounces (small), 2-1/2 ounces
(medium), or 3 ounces (large) of worsted weight wool yarn, and a pair of No.3 US knitting needles. The gauge in garter stitch
is 5 stitches equal 1 inch.
The row gauge doesn't really matter as long as you are knitting it tightly. You will need a small amount of a contrasting color to make the cord and the little gizmos on the ends. (I used one skein of Peaches and Cream cotton to make the sample for size small. There was just about enough left to do the finishing work---so unless you are making the small size, I would suggest getting two skeins).
Diaper Cover: for small size cast on 96 (104 medium, 112 large) stitches.
Work in ribbing of k2, p2 for 4 rows. Overs are made in the next row (row 5) to
form eyelets for the cord.
Row 5: *K2; bring yarn to the front, wrap it back over the needle and
then under the needle to the front again (an over); p next 2 sts tog. Repeat
from * across row.
Row 6: Work across row in k2, p2 pattern, working all the overs as
stitches.
Rows 7, 8 and 9: Work in k2, p2 pattern.
Row 10: K across row
Row 11: K across row. From this point on work in garter stitch (knit all
stitches). The right side of the work is the side on which the knitted rib of
the ribbing is twisted near the holes made by the overs. Make decreases as
follow at each end of the right side rows.. (I found that if you slip the very
first stitch on every row, instead of knitting it, you get a very neat edge -
see detail below.) 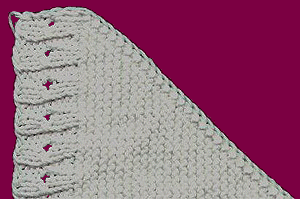 Knit first st, sl 1 st, k1, psso, k across the row until 3 sts are left; k the
next 2 sts tog, k the last st. When the smooth side of ribbing is up, k plain
across the row without decreasing. When 4 sts remain on needle and right side of
work is up, sl1, k1, psso, k next 2 sts tog. Turn, knit, turn, k2 sts tog, pull
end through and fasten off, leaving an end for sewing. Bring ends of ribbing
rows together and whip stitch together on the wrong side. Bring point of work up
to the seam at the end of the last ribbing row and whip edges of work together
on each side of the point for about half the distance along leg edge. (You can
adjust the size to fit your baby's legs by determining how big an opening you
need--these should be fairly tight, but not so that they cut off the circulation
or leave marks.) Fasten securely at the end of the seams.
Knit first st, sl 1 st, k1, psso, k across the row until 3 sts are left; k the
next 2 sts tog, k the last st. When the smooth side of ribbing is up, k plain
across the row without decreasing. When 4 sts remain on needle and right side of
work is up, sl1, k1, psso, k next 2 sts tog. Turn, knit, turn, k2 sts tog, pull
end through and fasten off, leaving an end for sewing. Bring ends of ribbing
rows together and whip stitch together on the wrong side. Bring point of work up
to the seam at the end of the last ribbing row and whip edges of work together
on each side of the point for about half the distance along leg edge. (You can
adjust the size to fit your baby's legs by determining how big an opening you
need--these should be fairly tight, but not so that they cut off the circulation
or leave marks.) Fasten securely at the end of the seams.
CORD: With a contrasting shade of yarn, and a size D aluminum hook,
crochet a chain of about 30 inches, skip 1 st of chain, work 1 slip st in each
st of chain to end, fasten off.
GIZMOS: With the same contrasting shade of yarn (or whatever you want to
use) and a size D crochet hook, ch4, dc in 1st st of ch, ch3, sl st in same st,
*ch3, dc in same st, ch3, sl st in same st. Repeat from * twice (4 petals made),
fasten off leaving an end for sewing. Make a second gizmo just like the first.
Thread cord through holes in ribbing, beginning at one side of the center front
seam. Tie yarn ends from beginning and end of gizmo tightly onto the ends of the
cords, weave the ends into the cords or into the gizmos to hide them. Make sure
it is very secure, so that the baby doesn't try to eat it....you know how they
are!